
How to Manually Setup WordPress in cPanel
Many people that want to start using WordPress on their web hosting account are lost because they either have a web host that doesn’t offer an automated script installer like Softaculous or Fantastico, or they have a type of hosting such as VPS Hosting where these automated systems add an unnecessary extra monthly cost to their hosting bill (especially if they are using their VPS for private use).
Below, you will find a high-definition video (1080P) that will walk you through the entire process of setting up your WordPress to work on your web host. Even if you do not have cPanel and instead have an in-house or Plesk control panel, you can use this video to guide you along.
Starting a New Website?
Did you know that InMotion Hosting includes a free WordPress setup with your web hosting order? See our in-depth InMotion Hosting review and click here to order. During the last step of your order, check the radio button to “Install WordPress” and you can skip this guide entirely!
 We record our videos in full 1080P resolution. To enjoy the full experience, click the icon shown in the image to the left to maximize the video during playback.
Setting Up WordPress Manually
Below, you will find the steps to setup your WordPress manually using cPanel as explained in the video above. We like to provide a textual guide as well as video to cover both types of learning methods (we all learn differently!). I like to use the cPanel file manager to upload the files to the server because you just need to upload one file and then extract the files on the server. It ensures that all files are uploaded correctly, ensures zero corruption during the upload process and is the most fool-proof method I’ve found.
Step 1 – Download WordPress
The first thing you’ll need to do is download WordPress. From that page, click the blue “Download WordPress” button to download the latest version. Be sure to download the file to a location you can remember such as the Windows desktop.
Step 2 – Extract the Files
Windows 7 and higher include native support for zip files. You can double click the file and use the “Extract all files” button in Windows explorer or if you have software such as WinZip or WinRar, you can simply right click the zip file and extract as I show in the video.
Step 3 – Rename Config File
Now that you have the files extracted, you’ll want to rename the wp-config-sample.php file to wp-config.php. Once renamed, open the file in a text editor such as notepad.
Step 4 – Login to cPanel / Open File Manager / Upload
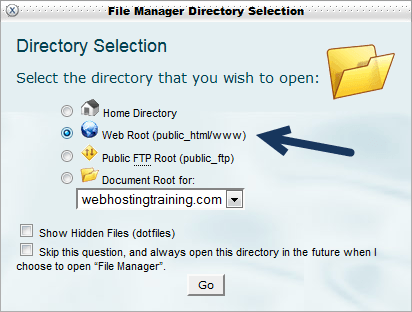 Once logged in to cPanel (reference your welcome email or get hosting from our web hosting review section), you’ll want to find the button labeled “File Manager” and open that. In the popup, Start from “Web Root (public_html/www)” and click the “Go” button.
In the actual file manager, find the “Upload” button. Click that and then “Browse” to your downloaded WordPress file from step 1. You should now notice on the bottom right of the screen, a progress bar shows the file being uploaded from your computer to the server.
Step 5 – Extract the File
Once the file is uploaded, return to the file manager and click the Refresh button. Now you should see the WordPress zip file uploaded to your website. Simply right click the file and “Extract.” Follow the prompts and it will extract the file onto your server.
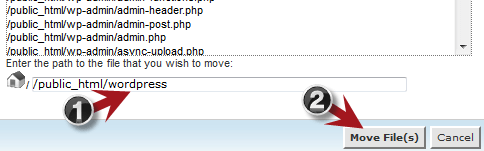 With the files extracted, you will be left with a “wordpress” folder with all of the files necessary to run WordPress inside. Since you will not want your website to be http://www.mywebsitehere.com/wordpress/ you will want to move these files to the main root. So, double click the wordpress folder and click the “Select All” button. Once all files are blue/selected, find the “Move File” button which will bring up a screen similar to the one above.
- Change /public_html/wordpress to /public_html/
- Click Move File(s).
Congrats. You have now uploaded and placed all of the files required to run WordPress on your web host! Using this method of uploading ensures that no files are corrupted or skipped because we didn’t upload each individual file separately via FTP.
Step 6 – Setup Your Database
 Now we need to go back to the file we opened in our text editor from step 3. With it open, return to cPanel and find the “Databases” section and click the “MySQL Databases” button.
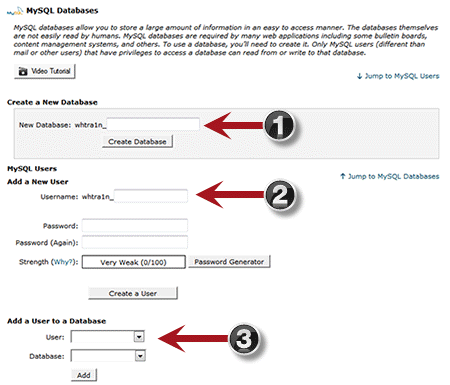
The screenshot to the left has been edited to only show the sections you should be looking for. Referencing this screenshot:
- Type in a database name. Click “Create Database” and then copy and paste the full database name to your wp-config.php where it says define(‘DB_NAME’, ‘database_name_here‘);
- Type in a username. This username is strictly for access to your database. Feel free to use the “Password Generator” to create a 16+ character encrypted password. Click the “Create a User” button. Copy the username to wp-config.php where it says define(‘DB_USER’, ‘username_here‘);. Copy the password to wp-config.php where it says define(‘DB_PASSWORD’, ‘password_here‘);
- Once the above 2 steps are complete, the “Add a User to a Database” fill show your username and database from above. All you need to do is click “Add” then in the next screen, click the “All Privileges” checkbox then click “Make changes.” What this does is allows your database user to fully access the database to make database changes (for which the WordPress setup process requires).
Step 7 – Add Authentication Keys and Salts
The final step to your wp-config.php editing is to add the authentication keys and salts which will help secure your WordPress installation. Go to the WordPress salt webpage and it will generate unique phrases automatically. Just copy all lines to your clipboard and replace the 8 define lines with the content in your clipboard.
Save the wp-config.php. You are done editing this file.
Step 8 – Upload wp-config.php to Server
 The final step is to upload your wp-config.php file to the server. Go back to the cPanel control panel, click File Manager (location Web Root again), click Upload, click Browse, select your newly saved wp-config.php file and begin the upload.
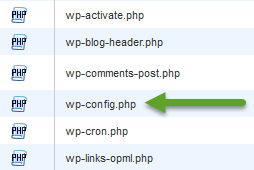
After the file is uploaded, return to the file manager, click refresh and verify that you have a wp-config.php file located along with your other WordPress files as shown in the screenshot.
Step 9 – Setup WordPress
Now your WordPress should be ready for install. Visit your website and you should see a language selection option. Click your desired language, click the blue “Continue” button and finally, fill out the site information including Site Title, login username, login password, your email address and make sure the check box “Allow search engines to index this site” is checked. Simply click “Install WordPress” and the setup will configure your database and prepare your site for first-time use.
Step 10 – Complete!
Congratulations! Your WordPress site is now ready for use. After clicking “Install WordPress,” you’ll be taken to the WordPress Admin Dashboard where you can start configuring your website, add posts, add pages and much more. You may also visit your main website URL and verify that your site is showing default content. At the time of this review, the setup uses the default “Twenty Fifteen” theme.
In the coming weeks, months and years, we will continue creating guides to help you get the most of your new WordPress website. We’re going to show you how to change WordPress themes, add WordPress Plugins, teach you how to configure your WordPress and much more.
What would you like us to cover here? How did you like this guide? Let us know in the comment section below!