You’ve found the WordPress training resource site provided by Top Five Advisor. Our goal is to help our users learn and use WordPress to maximize everything WordPress has to offer. We in-depth WordPress theme reviews, premium WordPress tips, tricks and resources to help beginners and intermediate users.
Now that you’ve been using your WordPress website, you are probably looking for ways to extend your website to add additional functionality and features. One of the first steps you should make is adding an SEO plugin and to take advantage of SEO resources that will potentially increase your website traffic.
One of the biggest sources of traffic to your WordPress website will likely be search engines. Unfortunately, the default WordPress configuration will not allow you to maximize your chances of ranking better in their search index.
Below, you will find the top five resources that we recommend you to use and implement as part of your overall SEO strategy.
What is SEO? SEO stands for Search Engine Optimization and is generally the best practices that can be followed to help achieve a better ranking in search engine result listings.
Without a doubt, the best and most popular SEO plugin for WordPress is WordPress SEO. This solution is comprehensive, has the most features, optimized for easy usability and it just… works.
The primary goal of most SEO plugins is to do one thing, to allow you to optimize your content title tag and meta description so that search engine spiders will have a greater understanding of what your content is about.
WordPress SEO goes way above and beyond that by allowing you to optimize your tag, category, custom post type, archives and pages as well. The thing is, this plugin does so much more, things you may not be expecting, that will help you drive more traffic to your website. For instance:
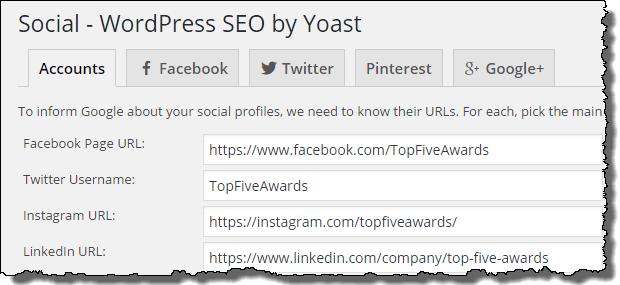
How about a full social media enhancement that allows you to inform search engines about your social media pages and profiles? Facebook Open Graph is support, Twitter cards are supported and specific Google+ meta data is also supported. If you’ve seen our Twitter account, we don’t even need to explain how awesome these enhancements are:
Other features include XML Sitemap generation (easy spider food for engines), RSS optimizations, breadcrumbs, import and export functionality to convert to or from another SEO plugin and lastly, the awesome page analysis feature that occurs on any page or post. The analysis will let you know how your SEO for your target keyword is, will show you how many characters left in your meta description and will even warn you if your title/description text is too long. All of it, great stuff and we use it every day.
Price: Free.
You may upgrade to WordPress SEO Premium for $89/year to add a redirect manager, tutorial videos, Google Webmaster Tools integration and premium customer support. Of course, this is optional but does help support Joost and his team.
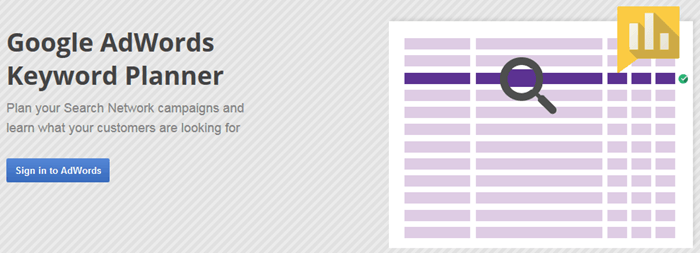
Best Keyword Research Tool – Google Keyword Planner
One of the most important things you can do for your niche and website is to do your research into your market. The Google keyword research tool is awesome for Google AdWords users (paid traffic) but it can also be awesome for people not planning to advertise.
With this free tool, you can search our your niche and get keyword ideas based on search volume, number of results and it will even show you the competitive scope of the keyword. Dig around in there, find some low hanging fruit and make content around it.
We strongly recommend incorporating the Google Keyword Planner in your content marketing SEO strategy.
Price: Free.
Best Link Checker Tool – Screaming Frog SEO Spider
Screaming Frog SEO Spider is an awesome spider and website crawler tool that you run as software on your PC, Mac, or Ubuntu. The software will crawl your entire website and generate a list/report that you can use to find broken links, 301 redirects and other problem areas on your website.
This tool is especially useful if you’ve changed your permalink structure and need to quickly find posts that reference old URLs that need updating. Although this can be a tedious manual process, there is a quicker way with PHPMyAdmin export, find/replace and upload which you could certainly outsource to someone who can do this for you.
We found this tool to be invaluable when we converted our Top Five Advisor website to WordPress and needed a full site structure spreadsheet that we could use to redirect old links. After that was completed, we decided to switch our URL structure again to take advantage of the WordPress tagging system which required another round of link fixing.
Price: Free for 500 URLs.
£99/year for the full version that removes the 500 URL limit.
Alternative: Broken Link Checker Plugin. This plugin will scan your website for broken links on your website that is totally free, however, this plugin is known to be extremely resource intensive on your web host which can lead to performance issues or a message from your web host to discontinue use. A popular WordPress web host WP Engine has outright banned its use.
Once you start adding a ton of content to your website, you might be wondering what your competitors are doing to give themselves an edge on your website and the rest of their competition as well.
With SEMRush, you can research any website, get analytics and insights, discover competitors’ best organic keywords to target, discover backlink resources including referring domains, types and geolocation, find Google AdWords ad copy and budget, find search volume, discover additional competitors that are in your niche(s) and so much more!
Price: Free with limitations.
Pro Plan – $69.95/mo, includes 10k keywords per report with 3k reports per day.
Guru Plan – $149.95/mo, includes 30k keywords per report with 5k reports per day.
Business Plan – $549.95/mo, includes 50k keywords per report with 1k reports per day.
Definitely give their free search from their main page a try. You’ll instantly learn things about your competitors with a few strokes on your keyboard and mouse clicks. Of course, when you start doing a ton of searches, you’ll eventually hit their free threshold that will prevent further searching until the next day.
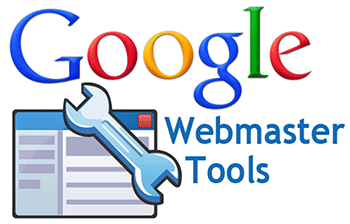
On Site Knowledge and Analysis – Google Webmaster Tools
Wrapping up the top five best SEO tools to use on your WordPress website is the Google Webmaster Tools service. Using WordPress SEO, which was recommended above, you can easily integrate Google Webmaster Tools into your website which will begin tracking your visitors, your page views, your popular pages and much much more.
From your WordPress dashboard, go to SEO > General then click the “Webmaster Tools” where you can enter the code provided to you by Google’s Webmaster Tools. Once you complete this step, return to Webmaster Tools and verify that the code has been integrated properly.
From there, give Google a few days to collect data on your website and then return to see all of the awesome metrics and stats they provide you with.
Price: Free.
Important Information – Optimizing Your Website
It has been known for quite some time now that Google loves websites that are optimized for fast page load times and for mobile users, they recently launched a new algorithm that looks for websites that are mobile response and mobile friendly.
Regarding page load times, a lot of that comes down to the amount of plugins that add javascript and heavy code to your web pages, whether you use a content delivery network and about your web host as well. The last thing you want to do is load hundreds of WordPress plugins that make visual changes to your front-end because if you look at the source code, you are going to see a massive TON of javascript files that will end up making your site load slow and degrade the user experience. Remove plugins you do not use and remember, less is more.
Make use of resources like GTmetrix and Google PageSpeed to check your website and see how it scores. Consider making changes to your website that will improve your scores.
Sometimes your web host will be a determining factor on how fast your pages will load. If you are on a discounted web host, consider investing in your business with a premium WordPress web host. WP Engine includes access to a content delivery network, object caching and other tools that will make your website load faster, perform better for your users and, therefore, boost your chances at SEO success.
Lastly, mind your images. Did you know that we optimize every image before we upload them to our articles? There are premium WordPress image optimization tools and services available, however, we primarily use the PNG image format for our uploads and optimize them with TinyPNG, a free web-based service that is quick and painless.
Did you transfer or install WordPress on WP Engine and need to figure out how to configure your site to restore the email functionality? We touched on this in our WP Engine review, however, we thought we’d create a separate guide for those that have already made the switch and in panic mode because they aren’t getting their contact form or comment alert messages.
We faced this exact scenario, hit up Google Search, spent hours in research and testing, and then we figured out this solution which worked the best for our needs.
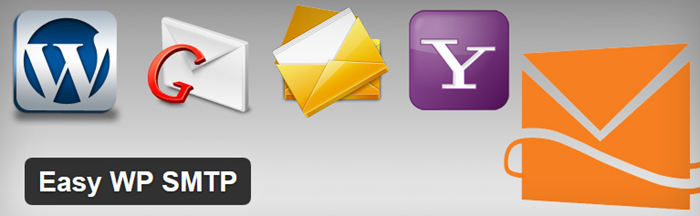
Step 1: Install Easy WP SMTP
We recommend Easy WP SMTP because it works 100% of the time for us and our clients. We’ve tried 5 plugins to accomplish this task and this plugin did the job perfectly, every time.
We only work with the best and in this case, the best is Google Apps for Work. You can register your account and try their service free for 30 days to make sure it is a good fit for your needs.
The best part about Google Apps is it uses the familiar and popular Google Gmail service to deliver your emails. This means, you can configure your domain email just like you can with Gmail, including forwarding, signatures, filtering and, of course, take advantage of their powerful spam filtering features.
The cost is $5 per month or $50 per year for one user.
Have multiple emails? Don’t panic. You can setup email aliases with your Google Apps account so that all of the emails are delivered to a single account. If you need more than one account / user, you can setup additional accounts for the same $5/$50 charge.
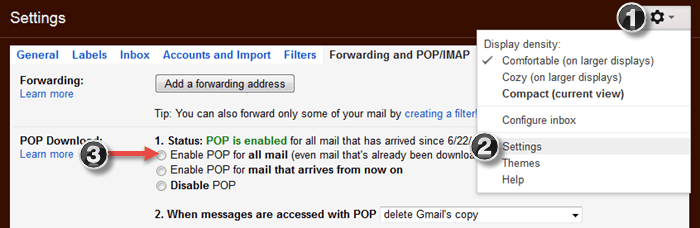
Used to using POP3? So are we. Here’s how to enable POP3:
Click the cog in the upper right.
Click settings.
Click the Forwarding and POP/IMAP tab
Click Enable POP3.
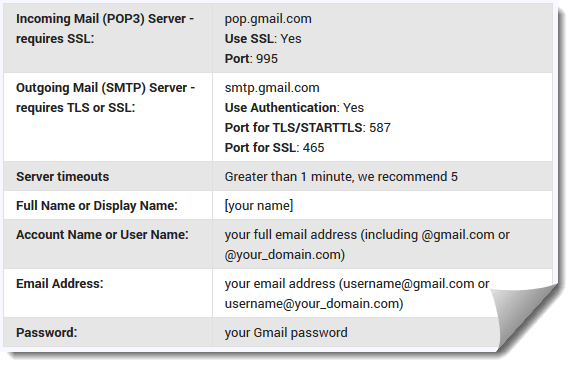
Now, go into your email client and setup a new account. Popular email clients like Thunderbird will auto-configure your account for Gmail, but if you need the manual settings to use, here they are:
Step 3: Configure Easy WP SMTP
Once you have the plugin installed and you have your Google Apps configured, you now need to configure Easy WP SMTP to work so that it can send emails to you.
In your WP dashboard, go to Settings > Easy WP SMTP and you will find the screen we show here.
If you decide to use Gmail, take advantage of the settings that work best for us in the screenshot we provided to the left.
Once saved, use the “Testing and Debugging Settings” section on this same page to send yourself an email to make sure everything is working correctly.
That’s it! Now you’ll receive any messages generated from your WordPress website including any contact form submissions, WP upgrade alerts, new comment alerts and more.
If this guide helped you, please leave us a comment and let us know. Of course, consider sharing this on social media and your website to help support us.
Are you having a problem with using /%category%/%postname%/ as your permalink structure when attempting to remove the /category/ base? As of the time of this guide writeup, it is still a problem in WordPress 4.2.1 that has dated back to WordPress over 8 years ago according to our research.
If you take advantage of a little hack in your permalinks by adding a . under category base, you may notice that your page 2 and beyond will show up as a 404 error. That’s not going to work, so you have a few options.
Change your permalinks to not use /%category%/.
Live with URLs like:
https://www.t5a.com/category/wordpress/wordpress-category-postname-permalinks/
Read on and use our fix to correct the issue.
How to Fix Page 2 404s Without /category/ in URLs
There’s an older free plugin available to correct this called WP No Category Base.
Simply install that plugin then go to Settings > Permalinks and remove the “.” from the Optional “Category base” area and you are golden. There’s no additional configuration page or settings that you’ll have to mess with.
Note: This plugin hasn’t been updated since July 29th, 2012 at the time of this guide, yet, if you read the plugin reviews, you’ll notice that people are still using and recommending this plugin for those having this 404 issue with using a category permalink structure but removing the /category/ out of their URLs.
What’s really nice about this plugin is the fact that it will also redirect 301 the old /category/ links to the URL structure you want to use.
Plugin Compatibility
Works with multiple sub-categories
Works with WordPress Network setup (WordPress Multisite)
Works with sitemap plugins.
Does not work with certain foreign languages according to their support forum (encoding issue).
Does this fix your problem? Leave a comment below and let us know.
In our WP Engine review, we explained there is an easier way to migrate your files from your current web hosting provider to WP Engine besides the methods they explain in their migration checklist.
Above, you will find the video recorded by reviewer Scott Buehler that shows you exactly how to do this in cPanel. Thankfully, if you happen to be on a host that uses Plesk or any other control panel, they are highly likely to have a file manager that you can use to accomplish this same task.
The reason you want to compress your wp-content folder into a zip file is it guarantees there will be zero file corruption or missing files during your migration. If you have to download all the images and files one by one using FileZilla, you will have to carefully watch the status screen for red errors about file transfers not completing. If you see them, those will be files that will likely be missing or corrupt, not good.
For those of you that have a cPanel web host, usually you’ll just need to add a /cpanel to the end of your domain name. If that doesn’t work, then head over to your web host’s control panel and find the cPanel access link from there to get where I started this video.
Once you gain access to the file manager, you simply right-click on wp-content and click the compress option as shown. Additionally, there is a “Compress” icon on the file manager toolbar should you need it.
Depending on the size of your website and your sites’ server speed, it will take a few seconds up to a minute to complete the process. After that, download the file from your server. upload it to WP Engine and you are good to go.
WP Engine wp-content Migration Instructions
I briefly showed you how to download the file in FileZilla. It’s the same process to upload, simply login to WP Engine via your SFTP instructions and click and drag the file from the left panel (your computer) to the right panel. Once that file transfer is completed, click on the green Notify Support button in the migration checklist, as shown above, to alert WP Engine customer service that you file is ready to be extracted.
Genesis and Thesis are two of the most popular WordPress Framework systems. Genesis was developed by StudioPress and Thesis was developed by DIYThemes. These two developers are highly respected and they also developed several plugins available to their customers. Here are just a few of their best membership plugins.
Best Plugins for Genesis
We found the following plugins available for StudioPress Genesis framework customers.
Genesis Simple Hooks – With this membership plugin installed you can easily create your new settings page for Genesis that will allow you to easily insert codes whether it’s HTML codes, PHP or shortcodes then attach it to action hooks that you can find in many parts of the Genesis Framework. This makes creating, editing or adding functions to your WordPress theme a breeze.
SEO Data Transporter – This membership plugin for Genesis is a real gem. You no longer have to worry about transporting your SEO data from one theme to a new theme. This used to be a very tedious task but with this plugin you no longer have to worry about the different formats of data.
Genesis Simple Edits – Editing post info, footer and post-meta areas of your sites are now quick and easy. You don’t need to be an expert programmer to edit and improve the look of your site. The name of this membership plugin says it all. It’s simple editing even for those without any web designing experience.
Social Profiles Widget – This Genesis membership plugin is quite useful especially for those who want to connect their site with their own social networking pages. You can quickly share links to your Facebook account, Twitter, YouTube, Digg, and any other social profiles so users can easily get in touch with you. All you need to do is install this plugin, drag it to the sidebar then insert all the icon links of your choice.
Best Membership Plugins for Thesis
We found the following plugins available for Thesis:
Thesis Import and Export – This Thesis membership plugin is a very useful one because it lets you import your Thesis settings so you can export it later on after installing a new theme. This used to be a complicated task but with this plugin you just need to download all settings to the Thesis-design file, Thesis-settings file and the Open-hook file. After customizing your layout or changing your site’s skin design you can then export all your data and settings without any problem. Just make sure you don’t click the restore link before saving your backup files to avoid any lost of data.
Google Sitemaps XML – With this membership plugin installed, your site will automatically send out sitemaps to search engines such as Google, Ask, Yahoo and others. It’s a great way to make your site rank up. This membership plugin is free to download so it’s a must-have.
Math Comment Spam Protection – Many WordPress blogs are now plagued with spam comments. It’s great to have a lot of comments on your blog entry but what you don’t want are those auto generated comments. With this Thesis plugin, you won’t have to worry about that. This is more reliable than captchas.
Thesis OpenHook – With this Thesis membership plugin you can easily customize your site even without having the knowledge of how to handle WordPress hooks.
Conclusion
There are a lot of membership plugins to choose from either for Genesis or for Thesis. Genesis has an advantage of having several plugins available that are also developed by StudioPress which means that when StudioPress creates an updated version of Genesis, all these plugins will become compatible to the new version. As for Thesis, there are countless third party developers offering great membership plugins that you can download and easily install.
Choose the plugins you think would make it easier for you to manage your WordPress sites. It’s a must to get these plugins if you want to save time and energy in creating the codes yourself when you can do it in just a few clicks.
In this guide, we walk you through all of the default settings of WordPress and also cover the WordPress dashboard main screen. In the video below, we cover the general, writing, reading, discussion, media and permalinks settings and also go over why we make the recommendations that we do.
Keep in mind that these recommendations are what Scott Buehler recommends. If you believe your site will benefit from different settings, then do it! Setting up these settings now, although tedious and boring, will help you down the line because you’ll be able to focus on what actually matters, your content!
WordPress Settings Configuration Training Video
Running time: 20 minutes 53 seconds
Since we are covering each setting section in detail, this video is much longer than the majority of our training videos, sorry about that.
General Settings in WordPress
Site Title – This is your website title that is typically used on your website’s header (theme dependent) and also can appear in your site’s title tag. You can freely change this at any time.
Tagline – Some themes use this in the header area of your website and in your site’s meta description. It’s always a good idea to make this a few words on the exact topic(s) of your new website.
WordPress Address – Do not change this unless you are moving your site to a new domain.
Site Address – An advanced setting that allows you to move your website to a subfolder. You’ll need to copy and move your website files via FTP or your control panel and then update this field to reflect the changes.
Email address – You can change your admin email address at any time.
New User Default Role – Do not change this. If you setup to force registration on your website and people start registering their accounts on your site, all users will be setup at whatever role you set here. Meaning, if you set this to “Administrator” and allow registration, you will be giving people full admin rights to your site which will result in posts being altered, deleted, added and lots of nasty things.
Timezone – I recommend setting this to the nearest popular city on your timezone. By doing so, your posts will reflect your time when publishing.
Date Format – Keep this default unless you decide another format is easier. If you want to setup your own custom date format, you can learn how to do so here.
Time Format – I change it to x:xx PM with capitals. A personal preference.
Other options including configuring what day the week starts on and your preferred site language.
Writing Settings in WordPress
Formatting Emoticons – I recommend enabling formatting emoticons so that your ASCII smilies will be converted to smiley faces like this 🙂
Formatting Nested XHTML – WordPress can attempt to correct bad XHTML in your posts when using the “Text” tab, but in my experience, it is better to leave this disabled.
Default Post Category – Once you setup post categories which will be covered in another training, you can set your default category here if desired.
Default Post Formats – Keep this as “Standard” unless you have a reason to change it later.
Post via e-mail is an interesting feature if you prefer to write your blog posts via email instead of using the WordPress editor. You’ll want to keep the email address you configure as secret so that other people can’t send it email and have their post appear on your website. For security reasons, I do not use this feature.
Reading Settings in WordPress
Front Page Displays – Unless you want to have a specific blog post or page appear as default on your main domain, you’ll want to leave this set to “Your latest posts.” Additionally, certain themes come with custom front page setups that do not use this feature, so for most users, keeping it set to “Your latest posts” is recommended.
Blog Pages Limit – When you start writing a lot of content on your website, you’ll start to notice that WordPress automatically sets up pagination when you reach 10 posts. This is to improve page speed times and helps to not overwhelm your visitors with too much content. We recommend keeping this set to 10 posts per page, but that preference is up to you.
Syndication Feeds Limit – Otherwise known as your RSS feed that certain people use to watch for content on your website, you can limit the total amount of posts that appear in that feed. It is set to 10 but you can customize this if you wish.
Article Feed Article Limit – This relates to your RSS feed as well. As you gain in popularity, people may start setting up spam blogs that reproduce your content on their website using your RSS feed. If / when that happens, you can set this to “Summary” which will only generate a small summary of your blog posts in your RSS feed.
Search Engine Visibility – Do not check this box unless you purposefully do not want your website to appear in search engines. Even if your site is brand new and you are “embarrassed” by the current content of your site, we still do not recommend enabling this option because it will take much longer for your site to appear in the engines after unchecking that box.
Discussion Settings in WordPress
In this section, I go over my recommendations in the video which effects how people interact with your content (the commenting system).
Attempt to notify any blogs linked to from the article – You’ll want to keep this checked because it will send a “ping” to whoever your link to. Sometimes, this will create linkbacks to your website depending on that webmaster.
Allow link notifications – I turn this off because there are spammers out there that post fake trackback notifications to your website in an attempt to gain links. This will also clutter up your comments system once your site gets more and more popular.
Allow people to post comments – Unless you do not want user engagement on your website, we recommend keeping this enabled so that your users can comment on your content.
Comment author name/email – Keep this enabled so that you know who you are talking to when you reply. Also, by asking for an email, you can get back to them in email and your WordPress will be able to use the Gravatar system to pull in their photo on their comments.
Users must be registered – Unless you have a specific reason to do so, we do not recommend enabling this because it requires your visitors to jump through hoops just to comment on your content. If you want as much user engagement as possible, you’ll want to make it as easy as possible for them.
Automatically close comments – I don’t recommend this unless you only want feedback for an X amount of days which can be useful on certain niche blogs and websites.
Enable threaded comments – Definitely enable this because it allows people to reply to other commenters and it stimulates discussion on your website. You can see an example of this on my InMotion Hosting VPS review page where we replied to a question received.
Break comments into pages – This will create multiple pages based on the amount of comments received on a post. If you set this to 50 and get 150 comments on that post, WordPress will break your comments into 3 pages. We do not recommend enabling this because your WordPress will reuse the same post content on each page causing duplicated content issues (can impact your search engine rankings).
Those are the main things you should consider updating. You definitely want to keep the emails enabled when you receive comments, that way you’ll be alerted when someone makes a comment so you can get into your dashboard and approve / reply to them ASAP.
Enable moderation so that you have full control over the comments that appear on your website. If you don’t manually approve comments and simply leave must have a previously approved comment on, a spammer can make several helpful posts to your website and then later return with a ton of spam that will automatically approve on your site. Just something to be aware of.
Another technique I use to prevent spam is to set the hold comment for moderation option to 1 link so that when someone makes a comment on your site, if they include even one link, they will wind up in the moderation queue. You only need to worry about this option if you decide to leave “” unchecked.
The blacklist is a neat feature because you can setup comment words, names, emails and IP addresses to automatically be marked as spam when received.
Avatars
This feature is awesome. If someone has setup a Gravatar with their email address, when they place a comment on your website, their icon will display along with their comment right on your website. For most users, set the maximum rating to G, set the “Mystery Person” Avatar and call it a day.
The default avatar icon will only display for users who have not setup a Gravatar for their email address.
Media Settings in WordPress
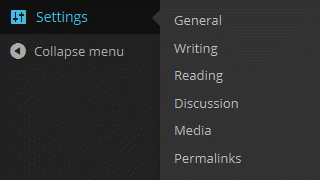
For most users, you can leave this page as is. Only if you need to change the thumbnail and other media sizes will you need to go in here and setup custom image sizes to fit your needs. When you install premium or custom themes, the authors will typically make use of their own image size settings anyway.
Space considerations: Every time you upload an image, WordPress will automatically generate the various sizes listed here. If you know you’ll never use these custom sizes (such as medium size and large size), you can go in and set the sizes you don’t need to “0” so that image won’t be generated that you’ll never use.
Organize my uploads – This option should be left unchecked, that way your post images will be organized by when you upload them to your website. Otherwise, you are going to end up with a massive single subdirectory on your site with thousands, even millions, of images in the same folder. This can and will cause problems for your server down the road.
Permalink Settings in WordPress
This is arguably the most important section you’ll need to update. WordPress allows you to customize the web URLs on your website so that they are more eye-catching and friendly to your users. Again, we will use our blog here to show how important this is.
When sharing your URL around the web including social media, the first URL actually tells your users what your content is about whereas if they saw the default opton (the second option above), they would have no idea what your content was about or, more importantly, if they want to click that link and see what you wrote.
Our recommendation is to set this to “post name” so that your post name is used as your URL.
You Made It – WordPress Settings is Configured
If you made it this far and have configured your website, congratulations!
Now that you’ve conquered the most boring part of setting up your website, now we get to move on to learning how to create content, how to change your theme and much more. It’ll be way more fun from here on out so congrats for getting this done.
One of the biggest hurdles people face when wanting to start their website is actually getting it started. There are thousands of people online willing to do it for you that cost more money than many people’s budgets and they end up frustrated, never to launch their dream project.
The first thing they will do is look for guides that teach people how to install WordPress manually which can confuse and frustrate them. They simply do not want to go through that entire process and look for an easier way.
In this guide, we’ll walk you through some of the easiest methods to install WordPress that we’ve found that have left people saying “Whoa, it’s that easy!?!” Yes, it is that easy. Let’s begin, shall we?
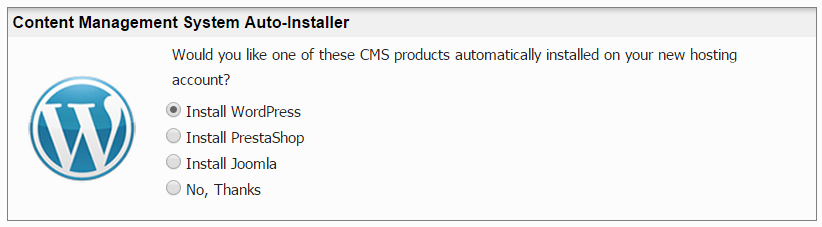
Easiest WordPress Install Method – No Hosting Setup Yet
If you have no hosting yet and truly just starting out, you are in luck! What if we told you that there is a host out there that will automatically setup your WordPress with no effort on your end? All you’d need to do is order your hosting and click on a radio button that says “Install WordPress” and boom! Your brand new web hosting account will have WordPress automatically setup for you!
It can’t be that simple Scott Buehler, can it? Absolutely. Let me show you right now:
Around the 3 minute mark in this video, I begin to show you the entire ordering process with InMotion Hosting web hosting. On the very last page of the ordering process, you’ll find the “Install WordPress” option. As long as you don’t miss that, you are golden.
Sounds expensive Scott. How much? This is the best part. If you use our site and link below to order, you’ll get over 50% off their normal pricing. This is an exclusive offer that we have because I spent years getting to know their staff and company. Take advantage of it now!
Your total price you will pay with no add-ons is just: $47.94 for a full year of web hosting. It’s absolutely crucial to understand that InMotion Hosting is not a discount cheap host out to cram as many customers on a server as possible making your site load slowly. Not at all, in fact, the price you’d pay without our link is more than double. Additionally, I use and trust their web hosting on several of my own projects.
Easier Method to Install WordPress – I Already Have Hosting
If you already have a web hosting plan, you may still be in luck to get WordPress setup and running with little hassle. Head over to your web host’s sales pages and look for mentions of anything that references an installer for the most popular Internet software. If you see that, you are in luck!
If your web host mentions this, they probably have a 3rd party solution in their control panel called Softaculous or Fantastico. Both of these solutions will install WordPress on any domain setup on your web hosting plan in a matter of a couple clicks. The best part? You can take advantage of these services for free.
Once you find the Fantastico or Softaculous icon on your control panel (after logging in), you simply click that and you’ll see something similar to the image I shared with you in this section. Simply click the Install WordPress option, fill out your new blog’s information and let the installer do everything for you.
Lastly, if you have your heart set on a host that does not offer any of the solutions we’ve talked about on this page, we will do it for you! As long as you order your web hosting from our site, we will gladly setup your WordPress for you for no additional cost. All you need to do is copy and paste your hosting order receipt to us in our contact form and request WordPress setup and we will take care of everything for you.
People that will typically fall into this category have chosen a much higher quality web hosting solution such as a VPS Hosting or even a dedicated server and they didn’t opt to pay monthly for Softaculous (which can be extremely expensive over the years of your plan).
Questions or Comments?
If you have any questions or comments about the process of getting WordPress setup for you, please leave it below. Scott is monitoring this post for any questions and will respond personally to anything you need.
One of the most frequent questions we receive in our client work is about WordPress.com versus WordPress.org. Specifically, which version do I need? Why is one better than the other? What are the pros and cons of each system? What do you recommend?
Both systems, WordPress.com and WordPress.org are confused frequently. In this WordPress guide, we will go through both systems so that you will have a full understanding of each system to help you make an informed decision about which system is right for you. We want you to feel confident in your decision so if you have any questions at all, please feel free to ask in the comments section at the bottom of this guide.
WordPress.com Overview
What is WordPress.com? The WordPress.com website is a commercial site that allows you to create and host a site for free. It includes the ability to use your own domain name, they provide the web hosting for you and they offer add-ons to enhance your experience.
If you do not have a domain name, your website will use a subdomain on the WordPress.com website similar to https://tygrscott.wordpress.com where tygrscott is your username you select during the account creation process.
WordPress.com runs on the WordPress.org software which is important to understand. The WordPress.com website is simply a hosted solution that runs the WordPress content management system, however, if you choose WordPress.com, you will be locking yourself into a set amount of themes, set amount of available plugins and no way to customize your theme PHP files to enhance your website. The system, put plainly, is locked down.
WordPress.com Pros
There are 350+ elegant WordPress themes to choose from in the backend.
No worrying about hosting or site maintenance.
Regular security updates and backups performed automatically.
Available for free with limited features.
Affiliate links and sponsored posts are allowed.
Optimized speedy hosting.
WordPress.com Cons
The upsells to premium features are expensive.
The free account only allows 3GB of space before requiring a paid $20+/year upgrade.
Ads may appear on your website. A payment of $30/year is required to remove ads.
Many of the most attractive themes are marked premium and require a payment from $20 – $150.
Plugins? What plugins? You may not install or use WordPress plugins on WordPress.com without an expensive upgrade.
Mapping a domain to your account requires a $13/year upgrade.
Adding your own advertising requires “WordAds” which requires 25,000 pageviews per month to access. Even then, you will split your revenues 50/50 with them.
Adding your own image ads from third-party networks is not allowed.
Your site and content is subject to their Terms of Service.
If you advertise on Google Adwords, performance tracking via Google Analytics is not available.
Limited choice for eCommerce. WordPress.com Business users ($299) can choose between Ecwid or Shopify.
WordPress.com Premium Plans
Once you have setup your free website, you’ll notice in the backend that they have a “Store” option which includes enhancements to the free plan which you should be aware of. Most will setup their website, spend months writing content and then they will find out that they will need to pay in order to access certain features. Let’s go over these enhanced plans now:
Free Plan: As explained, includes 3GB space, create pages, posts, links and allows comments from your users. Some pages you create may surprise you with advertisements that cost money to remove.
WordPress.com Premium:Cost – $99/year. This plan will include a domain registration of your choice, domain mapping, removal of ads, ability to host your own videos with VideoPress, an upgrade to 10GB of space and the ability to customize the design of your chosen WordPress theme.
WordPress.com Business:Cost – $299/year. This plan includes all of the premium features plus it enables live chat with support specialists, enables access to all 50+ premium themes sold in the store and upgrades your storage to unlimited space. Offers access to eCommerce features from Shopify or Ecwid.
WordPress.com Enterprise:Cost – $500/month. That’s right, the isn’t per year, it’s per month. This plan allows full front-end customizations including CSS, fonts, JavaScript and more. You’ll gain access to 100+ plugins, have unlimited access to all WordPress.com themes, unlimited storage, ability to run your own advertising campaigns, choice of analytics and includes customer support.
WordPress.com VIP:Cost Starts at $5,000/month. Enables cloud hosting, enables 200+ certified plugins, hourly backups and is intended for high traffic websites that need scalability for optimal page delivery to all visitors.
WordPress.com Conclusion
As you can clearly see, the easiest way to setup a website isn’t always the best way to go. At one point or another, you will need to upgrade your plan to enable certain features that are blocked on the free plan. Whether you need to add a domain name, remove ads, upgrade to a professional theme, or heck, customize the theme to your liking, you’ll have to dig out your wallet.
Remember, with WordPress.com, your content is subject to their Terms of Service. If they designate your content to be spammy, includes threats, uses any form of spammy links to drive traffic, they find your content misleading, your site generates content via automated methods and many other reasons, your site will get shut down.
By submitting Content to Automattic for inclusion on your Website, you grant Automattic a world-wide, royalty-free, and non-exclusive license to reproduce, modify, adapt and publish the Content solely for the purpose of displaying, distributing and promoting your blog. This license allows Automattic to make publicly-posted content available to third parties selected by Automattic.
The above quote is taken right from their Terms of Service as well. Your content is not under your full control like it would be if you hosted your own WordPress website. Additionally, WordPress.com includes a reblog feature that allows any WordPress.com user the ability to repost your content on their website.
WordPress.org Overview
What is WordPress.org? An open source content management system that powers 22% of the Internet now including T5A.com. WordPress.org is the website you visit to freely download the latest version of their software including installation files.
Almost all of the guides and tutorials for WordPress on TopFiveAdvisor is based on the WordPress.org software that is installed on your own web hosting provider. Many web hosts include access to an automated WordPress installer which means WordPress on your own web hosting is about as easy as WordPress.com. If you happen to have a higher quality VPS hosting service that doesn’t offer a WordPress installer, you can use our installing WordPress manually guide.
You can upload and use WordPress plugins for which there are over 35,000 to choose from.
You can use any free or premium WordPress theme.
You can freely edit your WordPress theme files including making styling edits and more.
You have full control over your content and you are only limited by the Terms of Service of your web hosting company.
You’ll earn 100% of your advertising revenue.
Custom analytics and tracking solutions available.
eCommerce is best with WordPress.org with premium plugins.
WordPress Network Install is available to run multiple blogs with on installation.
You are only limited by your web host for disk space and bandwidth. Most hosts offer unlimited everything which eliminates any worry.
No hidden fees or upgrade costs. You can use your own domain, add advertising and you can take advantage of your web host for customer support.
Wide choice of eCommerce platforms without a $299 fee to access them. You’ll need to ask your web host for an SSL certificate but once installed, you can use any premium eCommerce platform that offers a WordPress plugin.
WordPress.org Cons
Bring your own hosting. You’ll need to register a web hosting account. See our web hosting reviews for help choosing your web host. We recommend InMotion Hosting because they automatically but optionally setup your WordPress for free during your hosting order.
You will need to upgrade your WordPress occasionally. This process takes a single click to perform and many minor maintenance / security updates are done automatically with the latest editions.
You are responsible for your backups. There are plugins available that automate this task but we do recommend downloading your backups at least weekly. Many web hosts also will backup your data at least weekly.
You’ll have to deal with security issues including dealing with SPAM. Your WordPress will come with Akismet that can be configured to help with SPAM.
Tougher learning curve and additional research needed when choosing customizations, plugins, themes and more.
At one point or another, you will need to learn how to optimize your website for page load times. Usually, this will require an upgrade to SSD hosting or VPS Hosting (see our KnownHost VPS SSD hosting review for a decent solution) and installation of a caching plugin.
Our Recommendations
If you are just getting your feet wet, don’t care about making money from your website and just want to setup a quick personal blog, your choice is best with WordPress.com. However, considering all the fees you’ll likely face as you get more serious with your website, there may come a point where you’ll wish you started with your own hosted WordPress installation.
Therefore, for the majority of viewers who are unsure, we highly recommend starting with the solution that gives you much more freedom, far less hidden costs and you are in full control of your content. The clear winner is WordPress.org. Of course, besides your web hosting, you’ll still need a domain name from GoDaddy (that link offers you their best domain registration discount) to use with your WordPress website.
Ease of Use Factor: Whichever you choose is essentially the same as far as creating your content. Since WordPress.com uses the same software that you download from WordPress.org, you won’t have a different experience for the most part. The only difference, as we’ve discussed, is the fact that you’ll need to do additional research about which plugins and themes to use. Remember though, that research and testing is what makes WordPress.org magic because you are in full control.
Did we miss something that you love about WordPress.com or WordPress.org? Be sure to leave a comment below and let us know. Of course, please consider sharing this guide on social media (sharing options below), in email, or with a friend. We’d appreciate your support!
Many people that want to start using WordPress on their web hosting account are lost because they either have a web host that doesn’t offer an automated script installer like Softaculous or Fantastico, or they have a type of hosting such as VPS Hosting where these automated systems add an unnecessary extra monthly cost to their hosting bill (especially if they are using their VPS for private use).
Below, you will find a high-definition video (1080P) that will walk you through the entire process of setting up your WordPress to work on your web host. Even if you do not have cPanel and instead have an in-house or Plesk control panel, you can use this video to guide you along.
Starting a New Website?
Did you know that InMotion Hosting includes a free WordPress setup with your web hosting order? See our in-depth InMotion Hosting review and click here to order. During the last step of your order, check the radio button to “Install WordPress” and you can skip this guide entirely!
Interesting Note: This training video is the very first video created by Scott Buehler for T5A.com WordPress training. Remember to subscribe to us at YouTube to support our efforts.
We record our videos in full 1080P resolution. To enjoy the full experience, click the icon shown in the image to the left to maximize the video during playback.
Setting Up WordPress Manually
Below, you will find the steps to setup your WordPress manually using cPanel as explained in the video above. We like to provide a textual guide as well as video to cover both types of learning methods (we all learn differently!). I like to use the cPanel file manager to upload the files to the server because you just need to upload one file and then extract the files on the server. It ensures that all files are uploaded correctly, ensures zero corruption during the upload process and is the most fool-proof method I’ve found.
Step 1 – Download WordPress
The first thing you’ll need to do is download WordPress. From that page, click the blue “Download WordPress” button to download the latest version. Be sure to download the file to a location you can remember such as the Windows desktop.
Step 2 – Extract the Files
Windows 7 and higher include native support for zip files. You can double click the file and use the “Extract all files” button in Windows explorer or if you have software such as WinZip or WinRar, you can simply right click the zip file and extract as I show in the video.
Step 3 – Rename Config File
Now that you have the files extracted, you’ll want to rename the wp-config-sample.php file to wp-config.php. Once renamed, open the file in a text editor such as notepad.
Step 4 – Login to cPanel / Open File Manager / Upload
Once logged in to cPanel (reference your welcome email or get hosting from our web hosting review section), you’ll want to find the button labeled “File Manager” and open that. In the popup, Start from “Web Root (public_html/www)” and click the “Go” button.
In the actual file manager, find the “Upload” button. Click that and then “Browse” to your downloaded WordPress file from step 1. You should now notice on the bottom right of the screen, a progress bar shows the file being uploaded from your computer to the server.
Step 5 – Extract the File
Once the file is uploaded, return to the file manager and click the Refresh button. Now you should see the WordPress zip file uploaded to your website. Simply right click the file and “Extract.” Follow the prompts and it will extract the file onto your server.
With the files extracted, you will be left with a “wordpress” folder with all of the files necessary to run WordPress inside. Since you will not want your website to be http://www.mywebsitehere.com/wordpress/ you will want to move these files to the main root. So, double click the wordpress folder and click the “Select All” button. Once all files are blue/selected, find the “Move File” button which will bring up a screen similar to the one above.
Change /public_html/wordpress to /public_html/
Click Move File(s).
Congrats. You have now uploaded and placed all of the files required to run WordPress on your web host! Using this method of uploading ensures that no files are corrupted or skipped because we didn’t upload each individual file separately via FTP.
Step 6 – Setup Your Database
Now we need to go back to the file we opened in our text editor from step 3. With it open, return to cPanel and find the “Databases” section and click the “MySQL Databases” button.
The screenshot to the left has been edited to only show the sections you should be looking for. Referencing this screenshot:
Type in a database name. Click “Create Database” and then copy and paste the full database name to your wp-config.php where it says define(‘DB_NAME’, ‘database_name_here‘);
Type in a username. This username is strictly for access to your database. Feel free to use the “Password Generator” to create a 16+ character encrypted password. Click the “Create a User” button. Copy the username to wp-config.php where it says define(‘DB_USER’, ‘username_here‘);. Copy the password to wp-config.php where it says define(‘DB_PASSWORD’, ‘password_here‘);
Once the above 2 steps are complete, the “Add a User to a Database” fill show your username and database from above. All you need to do is click “Add” then in the next screen, click the “All Privileges” checkbox then click “Make changes.” What this does is allows your database user to fully access the database to make database changes (for which the WordPress setup process requires).
Step 7 – Add Authentication Keys and Salts
The final step to your wp-config.php editing is to add the authentication keys and salts which will help secure your WordPress installation. Go to the WordPress salt webpage and it will generate unique phrases automatically. Just copy all lines to your clipboard and replace the 8 define lines with the content in your clipboard.
Save the wp-config.php. You are done editing this file.
Step 8 – Upload wp-config.php to Server
The final step is to upload your wp-config.php file to the server. Go back to the cPanel control panel, click File Manager (location Web Root again), click Upload, click Browse, select your newly saved wp-config.php file and begin the upload.
After the file is uploaded, return to the file manager, click refresh and verify that you have a wp-config.php file located along with your other WordPress files as shown in the screenshot.
Step 9 – Setup WordPress
Now your WordPress should be ready for install. Visit your website and you should see a language selection option. Click your desired language, click the blue “Continue” button and finally, fill out the site information including Site Title, login username, login password, your email address and make sure the check box “Allow search engines to index this site” is checked. Simply click “Install WordPress” and the setup will configure your database and prepare your site for first-time use.
Step 10 – Complete!
Congratulations! Your WordPress site is now ready for use. After clicking “Install WordPress,” you’ll be taken to the WordPress Admin Dashboard where you can start configuring your website, add posts, add pages and much more. You may also visit your main website URL and verify that your site is showing default content. At the time of this review, the setup uses the default “Twenty Fifteen” theme.
In the coming weeks, months and years, we will continue creating guides to help you get the most of your new WordPress website. We’re going to show you how to change WordPress themes, add WordPress Plugins, teach you how to configure your WordPress and much more.
What would you like us to cover here? How did you like this guide? Let us know in the comment section below!


 Wrapping up the top five best SEO tools to use on your WordPress website is the
 Note: This plugin hasn’t been updated since July 29th, 2012 at the time of this guide, yet, if you read the plugin reviews, you’ll notice that people are still using and recommending this plugin for those having this 404 issue with using a category permalink structure but removing the /category/ out of their URLs.
 For those of you that have a cPanel web host, usually you’ll just need to add a /cpanel to the end of your domain name. If that doesn’t work, then head over to your web host’s control panel and find the cPanel access link from there to get where I started this video.
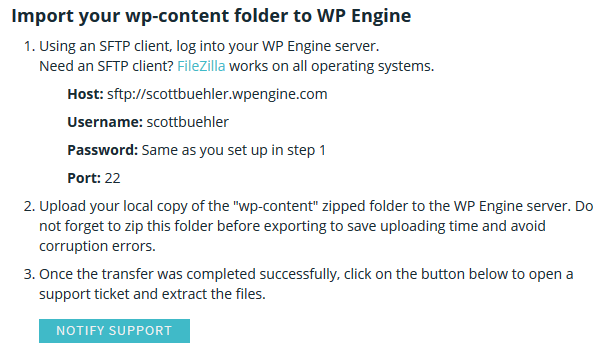
 In this guide, we walk you through all of the default settings of WordPress and also cover the WordPress dashboard main screen. In the video below, we cover the general, writing, reading, discussion, media and permalinks settings and also go over why we make the recommendations that we do.
 Sounds expensive Scott. How much? This is the best part. If you use our site and link below to order, you’ll get over 50% off their normal pricing. This is an exclusive offer that we have because I spent years getting to know their staff and company. Take advantage of it now!
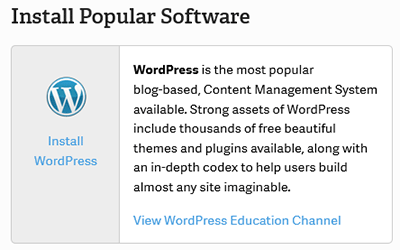 If you already have a web hosting plan, you may still be in luck to get WordPress setup and running with little hassle. Head over to your web host’s sales pages and look for mentions of anything that references an installer for the most popular Internet software. If you see that, you are in luck!

 We record our videos in full 1080P resolution. To enjoy the full experience, click the icon shown in the image to the left to maximize the video during playback.
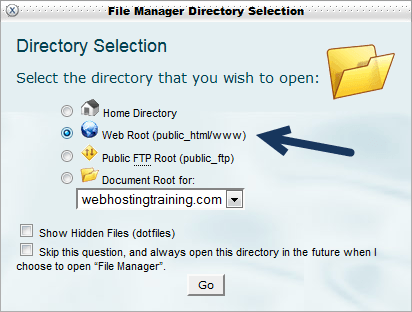 Once logged in to cPanel (reference your welcome email or
 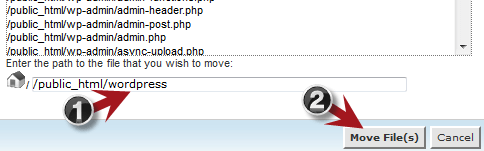 With the files extracted, you will be left with a “wordpress” folder with all of the files necessary to run WordPress inside. Since you will not want your website to be http://www.mywebsitehere.com/wordpress/ you will want to move these files to the main root. So, double click the wordpress folder and click the “Select All” button. Once all files are blue/selected, find the “Move File” button which will bring up a screen similar to the one above.
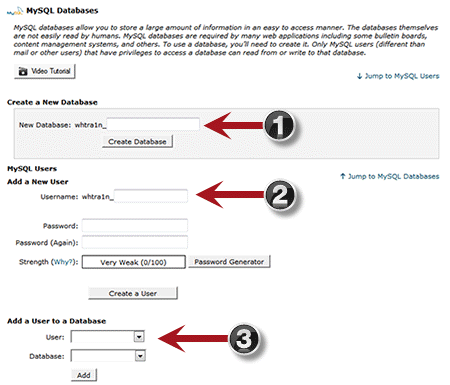 Now we need to go back to the file we opened in our text editor from step 3. With it open, return to cPanel and find the “Databases” section and click the “MySQL Databases” button.
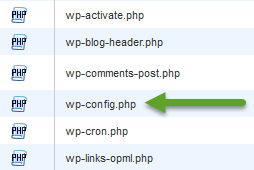 The final step is to upload your wp-config.php file to the server. Go back to the cPanel control panel, click File Manager (location Web Root again), click Upload, click Browse, select your newly saved wp-config.php file and begin the upload.