In this guide, we walk you through all of the default settings of WordPress and also cover the WordPress dashboard main screen. In the video below, we cover the general, writing, reading, discussion, media and permalinks settings and also go over why we make the recommendations that we do.
Keep in mind that these recommendations are what Scott Buehler recommends. If you believe your site will benefit from different settings, then do it! Setting up these settings now, although tedious and boring, will help you down the line because you’ll be able to focus on what actually matters, your content!
WordPress Settings Configuration Training Video
Running time: 20 minutes 53 seconds
Since we are covering each setting section in detail, this video is much longer than the majority of our training videos, sorry about that.
General Settings in WordPress
Site Title – This is your website title that is typically used on your website’s header (theme dependent) and also can appear in your site’s title tag. You can freely change this at any time.
Tagline – Some themes use this in the header area of your website and in your site’s meta description. It’s always a good idea to make this a few words on the exact topic(s) of your new website.
WordPress Address – Do not change this unless you are moving your site to a new domain.
Site Address – An advanced setting that allows you to move your website to a subfolder. You’ll need to copy and move your website files via FTP or your control panel and then update this field to reflect the changes.
Email address – You can change your admin email address at any time.
New User Default Role – Do not change this. If you setup to force registration on your website and people start registering their accounts on your site, all users will be setup at whatever role you set here. Meaning, if you set this to “Administrator” and allow registration, you will be giving people full admin rights to your site which will result in posts being altered, deleted, added and lots of nasty things.
Timezone – I recommend setting this to the nearest popular city on your timezone. By doing so, your posts will reflect your time when publishing.
Date Format – Keep this default unless you decide another format is easier. If you want to setup your own custom date format, you can learn how to do so here.
Time Format – I change it to x:xx PM with capitals. A personal preference.
Other options including configuring what day the week starts on and your preferred site language.
Writing Settings in WordPress
Formatting Emoticons – I recommend enabling formatting emoticons so that your ASCII smilies will be converted to smiley faces like this 🙂
Formatting Nested XHTML – WordPress can attempt to correct bad XHTML in your posts when using the “Text” tab, but in my experience, it is better to leave this disabled.
Default Post Category – Once you setup post categories which will be covered in another training, you can set your default category here if desired.
Default Post Formats – Keep this as “Standard” unless you have a reason to change it later.
Post via e-mail is an interesting feature if you prefer to write your blog posts via email instead of using the WordPress editor. You’ll want to keep the email address you configure as secret so that other people can’t send it email and have their post appear on your website. For security reasons, I do not use this feature.
Reading Settings in WordPress
Front Page Displays – Unless you want to have a specific blog post or page appear as default on your main domain, you’ll want to leave this set to “Your latest posts.” Additionally, certain themes come with custom front page setups that do not use this feature, so for most users, keeping it set to “Your latest posts” is recommended.
Blog Pages Limit – When you start writing a lot of content on your website, you’ll start to notice that WordPress automatically sets up pagination when you reach 10 posts. This is to improve page speed times and helps to not overwhelm your visitors with too much content. We recommend keeping this set to 10 posts per page, but that preference is up to you.
Syndication Feeds Limit – Otherwise known as your RSS feed that certain people use to watch for content on your website, you can limit the total amount of posts that appear in that feed. It is set to 10 but you can customize this if you wish.
Article Feed Article Limit – This relates to your RSS feed as well. As you gain in popularity, people may start setting up spam blogs that reproduce your content on their website using your RSS feed. If / when that happens, you can set this to “Summary” which will only generate a small summary of your blog posts in your RSS feed.
Search Engine Visibility – Do not check this box unless you purposefully do not want your website to appear in search engines. Even if your site is brand new and you are “embarrassed” by the current content of your site, we still do not recommend enabling this option because it will take much longer for your site to appear in the engines after unchecking that box.
Discussion Settings in WordPress
In this section, I go over my recommendations in the video which effects how people interact with your content (the commenting system).
Attempt to notify any blogs linked to from the article – You’ll want to keep this checked because it will send a “ping” to whoever your link to. Sometimes, this will create linkbacks to your website depending on that webmaster.
Allow link notifications – I turn this off because there are spammers out there that post fake trackback notifications to your website in an attempt to gain links. This will also clutter up your comments system once your site gets more and more popular.
Allow people to post comments – Unless you do not want user engagement on your website, we recommend keeping this enabled so that your users can comment on your content.
Comment author name/email – Keep this enabled so that you know who you are talking to when you reply. Also, by asking for an email, you can get back to them in email and your WordPress will be able to use the Gravatar system to pull in their photo on their comments.
Users must be registered – Unless you have a specific reason to do so, we do not recommend enabling this because it requires your visitors to jump through hoops just to comment on your content. If you want as much user engagement as possible, you’ll want to make it as easy as possible for them.
Automatically close comments – I don’t recommend this unless you only want feedback for an X amount of days which can be useful on certain niche blogs and websites.
Enable threaded comments – Definitely enable this because it allows people to reply to other commenters and it stimulates discussion on your website. You can see an example of this on my InMotion Hosting VPS review page where we replied to a question received.
Break comments into pages – This will create multiple pages based on the amount of comments received on a post. If you set this to 50 and get 150 comments on that post, WordPress will break your comments into 3 pages. We do not recommend enabling this because your WordPress will reuse the same post content on each page causing duplicated content issues (can impact your search engine rankings).
Those are the main things you should consider updating. You definitely want to keep the emails enabled when you receive comments, that way you’ll be alerted when someone makes a comment so you can get into your dashboard and approve / reply to them ASAP.
Enable moderation so that you have full control over the comments that appear on your website. If you don’t manually approve comments and simply leave must have a previously approved comment on, a spammer can make several helpful posts to your website and then later return with a ton of spam that will automatically approve on your site. Just something to be aware of.
Another technique I use to prevent spam is to set the hold comment for moderation option to 1 link so that when someone makes a comment on your site, if they include even one link, they will wind up in the moderation queue. You only need to worry about this option if you decide to leave “” unchecked.
The blacklist is a neat feature because you can setup comment words, names, emails and IP addresses to automatically be marked as spam when received.
Avatars
This feature is awesome. If someone has setup a Gravatar with their email address, when they place a comment on your website, their icon will display along with their comment right on your website. For most users, set the maximum rating to G, set the “Mystery Person” Avatar and call it a day.
The default avatar icon will only display for users who have not setup a Gravatar for their email address.
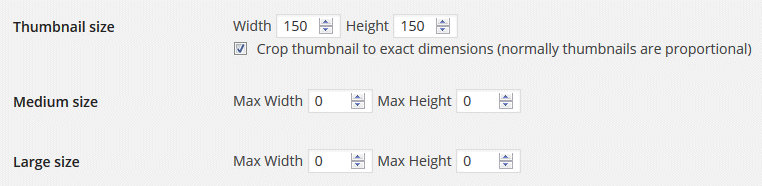
Media Settings in WordPress
For most users, you can leave this page as is. Only if you need to change the thumbnail and other media sizes will you need to go in here and setup custom image sizes to fit your needs. When you install premium or custom themes, the authors will typically make use of their own image size settings anyway.
Space considerations: Every time you upload an image, WordPress will automatically generate the various sizes listed here. If you know you’ll never use these custom sizes (such as medium size and large size), you can go in and set the sizes you don’t need to “0” so that image won’t be generated that you’ll never use.
Organize my uploads – This option should be left unchecked, that way your post images will be organized by when you upload them to your website. Otherwise, you are going to end up with a massive single subdirectory on your site with thousands, even millions, of images in the same folder. This can and will cause problems for your server down the road.
Permalink Settings in WordPress
This is arguably the most important section you’ll need to update. WordPress allows you to customize the web URLs on your website so that they are more eye-catching and friendly to your users. Again, we will use our blog here to show how important this is.
When sharing your URL around the web including social media, the first URL actually tells your users what your content is about whereas if they saw the default opton (the second option above), they would have no idea what your content was about or, more importantly, if they want to click that link and see what you wrote.
Our recommendation is to set this to “post name” so that your post name is used as your URL.
You Made It – WordPress Settings is Configured
If you made it this far and have configured your website, congratulations!
Now that you’ve conquered the most boring part of setting up your website, now we get to move on to learning how to create content, how to change your theme and much more. It’ll be way more fun from here on out so congrats for getting this done.

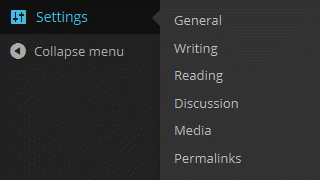 In this guide, we walk you through all of the default settings of WordPress and also cover the WordPress dashboard main screen. In the video below, we cover the general, writing, reading, discussion, media and permalinks settings and also go over why we make the recommendations that we do.