

How to Create and Update a Menu in WordPress
In this guide for WordPress Beginners, we are going to show you how to create and update menus in WordPress. Menus are used in WordPress themes to show important pages or posts that you want your visitors to see. Menus can also be used on your sidebar to show navigation links, sales pages and whatever else your heart desires.
How to Create a Menu
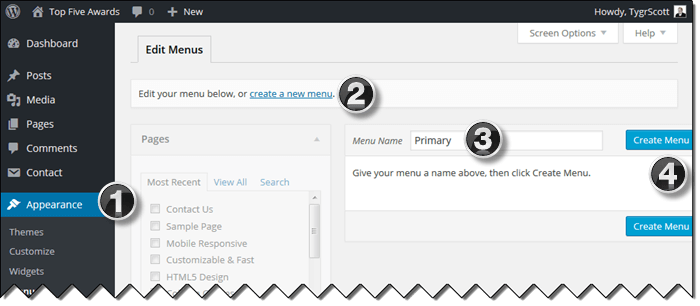
In order to create a menu, log in to your WordPress dashboard and then head over to Appearance > Menus. From there, you will find a blue link that says create a new menu where you can then name your first menu and then click the blue Create Menu button.
It’s as easy as that, now your menu is created and ready for your posts, pages and links.
You may have noticed in my screenshot how I named the menu Primary. That’s because I want to be able to visually understand what menu is assigned to what location on my site. If I want to create a menu that will be used as a sidebar widget (explained further down), I’d name it something similar to Sidebar Navigation just so I’d understand what menu I need to edit when I decide I want to add something to a menu.
In this case, I know I want to assign my new menu to the “Primary Menu” location (also explained below) on my theme, so I called the menu Primary.
Adding Items to Your Menu
With your menu created and hopefully you have pages ready to be assigned, let’s prepare to add items to your new menu. Before that though, I want to call your attention to a hidden area of this screen that is quite important called Screen Options.
Screen Options
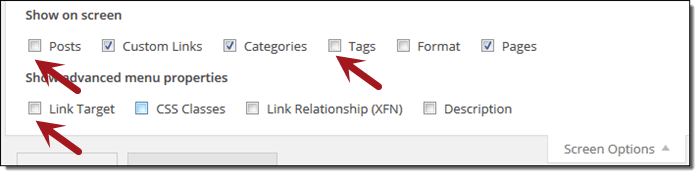
Once you click the Screen Options tab on your menu edit screen, it will reveal the options shown above. From here, you can enable certain menu options that are hidden by default. Believe me, I wish I had someone show me this because I spent a couple years using Custom Links to manually add links to some of my posts because it wasn’t shown as an option by default.
If you think you will ever need to add menu items that link to Posts or Tags, place a check in these boxes to enable them as options when creating your menu. I also highlighted Link Target because this option will allow you to create a new browser window or tab on external links if needed. Once this is checked, you’ll have access to a new checkbox under all links in your menu labeled Open link in a new window/tab.
Once done enabling screen option features, click the Screen Options tab again to close this hidden area.
Let’s Add Some Items to Our Menu

As shown in the Gif image above, it’s rather painless and easy to add menu items to your menu. Select the section that has pages or posts that you want to add to your menu, check the boxes and then click Add to Menu.
You can also link to categories, custom links (external websites), tags and more.
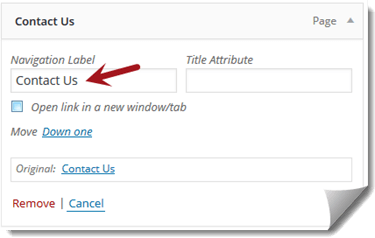 Once your items are added, you can customize the text of the menu items by clicking the down arrow under each item you added under Menu Structure which will reveal the options shown on the left.
Navigational Label: This will change the text that is used on the menu.
Title Attribute: This is a popup label that appears when a user hovers their mouse over a menu to explain more about the page/post.
If you want to change the order of your items, you can simply drag and drop them to use the order you prefer. You can also place certain menu items on various levels which will cause a sub-menu to appear on your menu.
After you’ve added all your items, changed the order of the items and edited the item labels, remember to click the blue Save Menu button to save your changes. In the animated Gif above, you may wonder why I checked the “Primary Menu” option before saving, let’s go ahead and dive into this feature now:
Assigning Primary / Secondary Menu
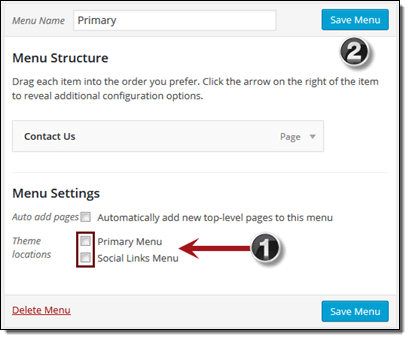 If you are currently using a WordPress theme that allows for Primary and Secondary menus, you will be able to assign your new menu with items to that designated location on your front end website.
Keep in mind, the designated location where your menu will appear depends on the theme but for most, you can assume the Primary Menu will be located in your navigational area at the top of every page on your website.
Another important thing to know is that each WordPress theme can call each menu location something different. In my screenshot, I’ve got the Twenty Fifteen theme active and it is calling the secondary menu “Social Links Menu” which is obviously meant for linking social media.
Simply select Primary Menu or any other theme location and click save menu.
 Alternatively, you can click the tab labeled Manage Locations and assign your menus to the proper theme locations as shown in the screenshot to the left here.
Simply click the drop menu, assign your created menus that you want to use then click Save Changes.
Finished!
Adding a Menu to the Sidebar or Footer
Now that you’ve created your primary navigation and set up your menus, you may be wondering how you’d go about adding a menu to the sidebar or footer areas of the front end website. This is actually easier than you’d think.
First, create the menu that you’d like to appear on your footer or sidebar. In the case of these menus, do not assign a Theme Location. Instead, we will manually place the menu using widgets.
Second, after your menus are all created and ready to be used, go to Appearance > Widgets.
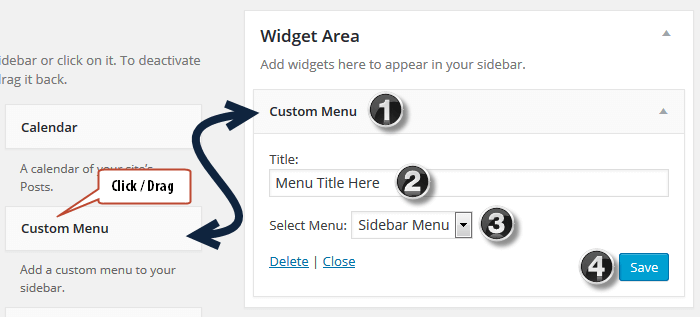
From the widgets screen, add the Custom Menu option from the Available Widgets area to your Widget Area*. As shown above:
- Click and drag Custom Menu to your Widget Area*.
- Add the text that you want to appear above your menu in the Title area.
- Select the menu you want to appear.
- Save.
After saving, go to your website and check out the new sidebar menu!
If your theme supports footer widgets, you will see a footer section on your Appearance > Widgets page that you can use to add other custom menus.
Editing Your Menu
 Once your menus are placed on your website, you won’t have to change their placement settings. From here on out, all you need to do is go to Appearance > Menus and select your menu from the drop down list.
From there, make any changes you want to your menu including removing/adding pages, changing the labels, etc. and save. Once you click the Save Menu button, the changes will go live immediately on your website.
Hopefully this guide helped you to create, edit and place menus on your WordPress website. If you have any questions or would like us to enhance this guide in any way, please leave a comment below. Remember, if this guide has helped you, take a moment to share this post in social media and on your website. We’d appreciate it!