WordPress Users Topic Index
Topic Index for "WordPress Users"Learn how to use the Users section in WordPress. Here we will teach you how to add, edit or delete users, what the user roles are, how to edit user roles and much more.

Learn how to use the Users section in WordPress. Here we will teach you how to add, edit or delete users, what the user roles are, how to edit user roles and much more.

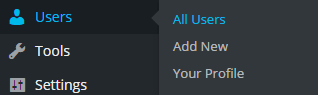 Once you are established with your new WordPress website, you will likely want to add new users so that they can help you write new content or manage your existing content. Thankfully, WordPress makes this extremely easy. In your WordPress Dashboard, hover your mouse over Users then click All Users.
Once you do that, this page will appear.
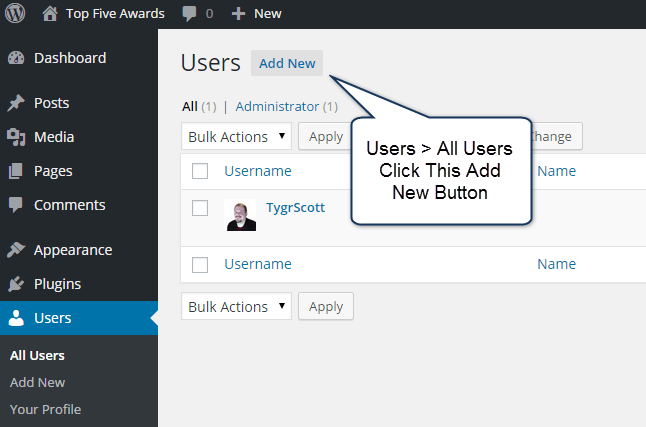
Click “Add New”
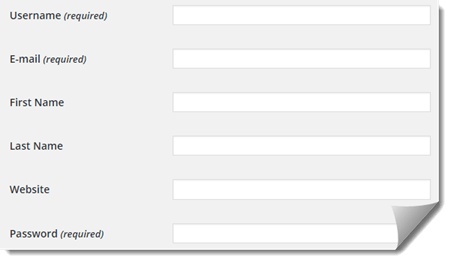 From there, everything is straight forward.
Username: This is used by the new person to log in to your website.
Email: Make sure this is their real email address that way if they forget their password, they can do a password recovery.
First / Last Name: This can be used and displayed on your website depending on your theme.
Make sure you create a very secure password for them to use.
Send Password? This is an option you can use to send the username and password to your new user. We typically do not use this function opting instead to craft our own email that explains how to add new content to the site.
Role: Need help understanding user roles? Click that link to learn about the default user roles to help you understand what they are and what role you should assign.
Then click the “Add New User” button.
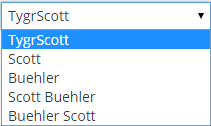 Head back to Users > All Users and click on their username or the edit link below their username. On this page, you can edit the profile name, nickname and as we’re showing here in our screenshot, the Display name publicly as option which is how the name will appear on your front-end pages.
Visual Editor: You may disable the visual editor which is the traditional editor that you use to style your content. If you want to provide an environment for your writers to simply copy / paste text that you will then style yourself, that’d be a great example of why you’d disable the visual editor.
Admin Color Scheme: There’s 8 color schemes for your users to choose from.
Keyboard Shortcuts: Certain user roles allow comment moderation which allows for keyboard shortcuts to be used. You may disable keyboard shortcuts to help prevent your authors from styling comments and to prevent accidental actions like marking a comment as spam with the s key.
Toolbar: The black floating toolbar when viewing your website’s front-end is enabled by default on all logged in users. If you wish, you can disable that toolbar if needed.
There’s a new section here called About Yourself that you or the new user will be able to add or edit their Biographical Info. Depending on the theme you use, you may or may not see this information on the approved content they share.
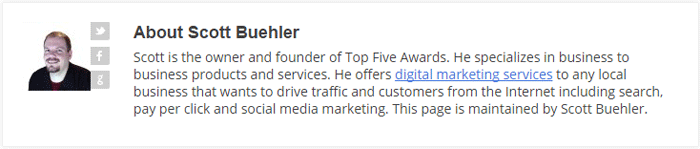
You may notice that there is an “About Scott Buehler” at the bottom of this page that shares a little information about me. This is all done in the edit profile area in WordPress and you can even add text links using simple HTML as shown below.
He offers <a href="http://www.scottbuehler.com">digital marketing services</a> to any local business
Simply edit the HTML and text and it will be transferred to a text hyperlink that people can click.
Depending on the theme you use and plugins installed, you may notice that there are additional options on this page to fill out for each user. For instance, WordPress SEO, a recommended SEO Tool, will add a WordPress SEO Settings area that will allow you to customize the author page title, meta description and more.
 Users > All Users.
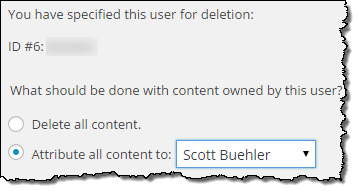
Hover your mouse over the user and then click the red “Delete” link. This will always take you to the screen shown here where you will have final options to complete before deleting the user.
Delete all Content: For most (with a few exceptions), you should not delete all content because it will remove content from your website causing 404 errors and other issues. If a writer has left your website and you simply want to remove the user while keeping their content, you’d choose the other option.
Attribute All Content to: This will change all of the content under the user being deleted to be attributed / assigned to a different user that you select. While most will simply assign content to the main admin account, you may also consider a <Sitename> Staff username that you assign these posts to so that it doesn’t appear that you, the admin, wrote the content. In our case, this would be our Top Five Advisor Staff account.
Once done, click the Confirm Deletion button and the user will be removed from your website.
The goal of this WordPress Guide is to help those who have decided to create a new user in their WordPress installation. This is not a comprehensive and exhaustive list of features of each default user role, but this is a quick reference that can be used to answer the common question What user role should I assign this user account I am creating in WordPress?
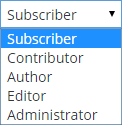 There are 5 default user roles that ships with your WordPress installation. In this guide, we will quickly cover what these roles mean to your new user, what they can do on your WordPress dashboard (permissions) and help you decide which role to select.
With no further delay, let’s get started.
This user has no additional rights to your WordPress dashboard. They can only read your posts which is also traditionally available to unregistered users as well. Typically, this role is often assigned and used by membership plugins and, if you so choose, will also be assigned to users when you open registrations under WP Dashboard > Settings > General > Membership (check) Anyone can register.
If you want a higher degree of control on your website, you can disable commenting to unregistered users and require registration which would also take advantage of the subscriber role. We recommend keeping commenting available to everyone and use our guide to help control comment spam should that be an issue.
If you are manually setting up a user on a WordPress site that doesn’t have additional membership software, you’ll likely not need this role.
This would likely be the default role you’d assign to a new writer on your website. They can write and manage their own posts but can only submit those posts for review by an Administrator or an Editor.
When a Contributor creates a new post on your website, they will see a blue Submit for Review button instead of a Publish button. There will be no illusion that what they write will automatically appear on the site without first going through an approval process.
If you plan on establishing a review and approval workflow that all authors will submit content and then get approved by an Editor, you do not want to use the Author user role, instead, you’d place all authors under the Contributor role.
Otherwise, if you do not want an approval process and allow your writer(s) to directly publish content on your website without editorial control, you’d set them up under the Author user role.
As you can see, the Editor role has a lot of power over your website and should only be assigned to people that you trust. You would assign the Editor role to someone as part of a review and approval workflow with the Editor being the one who approves all content submitted by Contributors.
If you are currently running your WordPress website (which is likely why you are on this guide in the first place), you are already familiar with the Administrator role because that is exactly what your access login is.
If you add another user as an administrator, they will have the exact same rights as your account including the ability to delete any users (including your own administrator account).
There is another role that most won’t see or have access to and is the Super Administrator. This is an administrator of a WordPress Multisite / Network setup that has multiple sites installed under a single WordPress database. The large majority of WordPress sites do not use or need WordPress Multisite and is beyond the scope of this guide.
Now that you are getting the hang of WordPress, your site is live, you’ve started adding content and then it happens, you want to scale it up and bring on additional staff to help you write content and do various tasks to help your site grow at an even faster pace.
When you start looking into it, you find out about User Roles and access it by going to WP Dashboard > Users. Inevitably, you’ll start adding test users into the system, log out, log in under the new users and see what they can do on your site that you’ve worked so hard on.
Then you discover that the default user roles are great, but it isn’t perfect. You like X role but you can’t setup new accounts under it because it allows them to do Y, which you only want administrator accounts to manage.
For both options below, we strongly recommend reviewing the WordPress Codex for Roles and Capabilities to have a full understanding of the roles and capabilities before making changes. On that page, consider scrolling down to the Capability vs. Role Table section and have a look at their visual representation of the default roles that WordPress ships with. Just to save a little confusion for you, “Super Admin” is a role that is only offered on WordPress Network / Multisite install which allows you to run multiple “sites” in one WordPress website.
Additionally, consider copying the default roles and modifying those to your liking. Then you can set your users to those roles and never use the WordPress defaults. This way, you can reference the default roles and capabilities at any time.
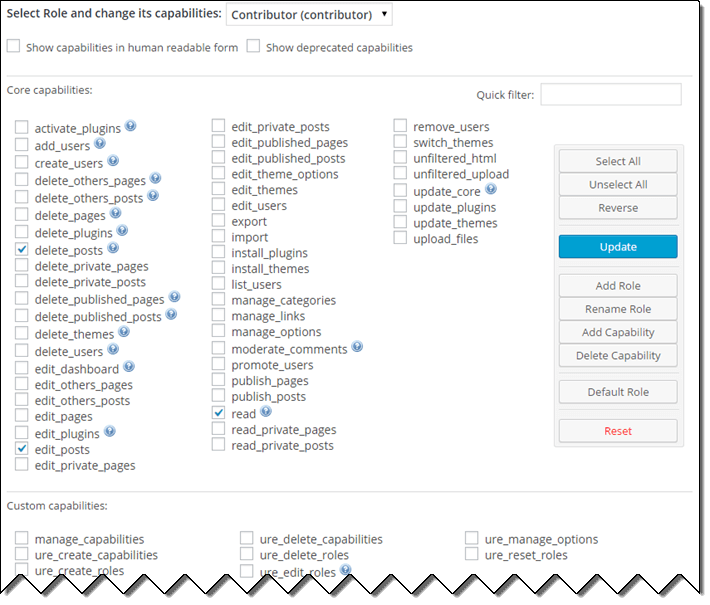
The above screenshot is exactly how User Roles Editor works within your WordPress and is accessed by going to WP Dashboard > Users > User Role Editor. Of course, you can check the box that says Show capabilities in human readable form if you wish, that will just remove the underscore and make the options plain text (we don’t recommend this because then it is a little harder to cross reference the roles and capabilities codex linked above).
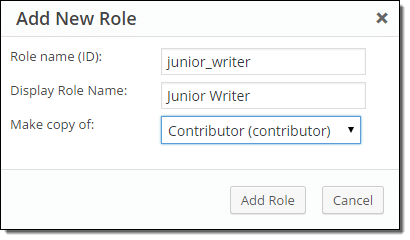 From this screen, you can easily “Add Role,” “Rename Role,” and even do more advanced things like add or delete capabilities for these roles. As we show you on the right, adding a new role is straight forward. Enter the role name, what it displays and select what default role you’d like this role to mimic before you begin editing its capabilities.
From here, you can quickly reference the capabilities enabled (checked) and modify how that role works on your website when they log in.
If you’d like to have your senior writers have advanced access to your website, like publishing posts created by junior writers but you don’t quite trust them enough to be a full “Editor” on your site, you can quickly create a Senior Writer role by making a copy of the “Author Role,” reference the codex and enable a few select Editor capabilities and call it a day.
The same thing with your editors. You can create a new editor role and create a “Super Editor” role that would have a select few administrator rights.
Or, go the other way (like what we do) and create an Author role but remove certain default features we don’t want them to have, such as the ability to delete posts.

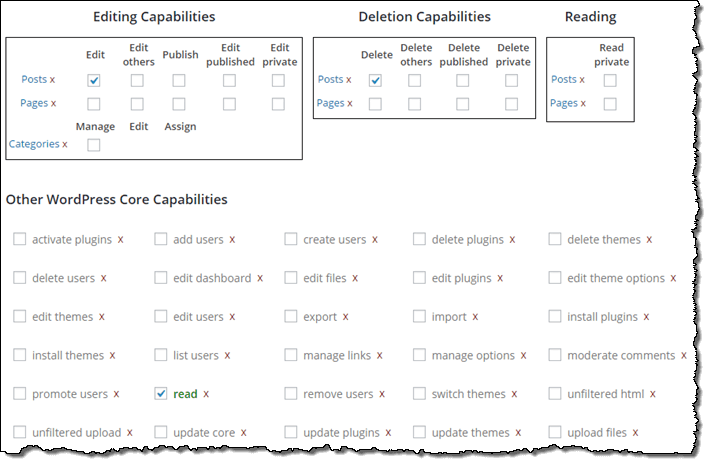
Immediately after activating this plugin, it will create new capabilities inside of your database, even if you do not make a single modification or change. The above screenshot was taken right from our localhost install when using Capability Manager Enhanced (below) which shows obvious entries added by User Role Editor using the name ure_ as the capability name. Unfortunately, the developer doesn’t offer a way to remove these newly added references upon removal or with the “Reset” function which resets all user roles back to default. If you Reset > Deactivate > Uninstall User Role Editor, the ure_ references remain. Just something to be aware of, which may or may not bother you as an administrator.
Capability Manager Enhanced is, for the most part, the same as the User Role Editor plugin we showed first. The difference here (and why it is included) is the fact that it is a bit more user friendly in the way it portrays the capabilities in an easier-to-understand format.
Of course, the downside with this is also that you are going to have a harder time cross-referencing the codex page to learn exactly what some of these Other WordPress Core Capabilities do exactly.
After the plugin is installed, you can access this plugin by going to WP Dashboard > Users > Role Capabilities.
One thing nice about this plugin is you can completely disable capabilities within a role using the red X without having to delete the capability (which is how URE works).
No revert option available. One of the features mentioned on this plugin’s description page is the ability to revert roles and capabilities to WordPress defaults, however, we thoroughly searched the support threads, reviews and looked over the plugin and do not see a way to do this within the settings. In fact, we had to load URE and use their reset function to remove all the changes we made in this plugin.
Copying roles is a little less user friendly and less obvious compared to URE above. In order to accomplish copying a role, you will need to “Load” a role, like Author and then under Copy Author Role, you type in the name of the new role that you want created. In URE, you simply click “Add Role” then it asks for the name as well as a drop-box to select the user role you want to copy, which is way more straight forward and less confusing.
We’d love to hear how you are using modified or new roles in your WordPress setup. Leave a comment below to help our readers understand the benefits of creating specific roles.