WordPress Free Plugins Topic Index
Topic Index for "WordPress Free Plugins"Learn about popular and unknown WordPress free plugins alike.

Learn about popular and unknown WordPress free plugins alike.

After you’ve used WordPress for a while, you may want to consider optimizing and cleaning up your website, database and more. Using these techniques, you will free up disk space, optimize your database for best performance and hopefully, see a little increase in performance on your website.
Have you ever logged in to your WordPress site via FTP and looked at /wp-content/uploads/? If you have, you may notice that every image you upload is resized multiple times automatically on every upload. These images are left there, permanently and will likely never be used.
It gets worse when you start adding plugins and customized themes because they also can add their own image sizes that WordPress will process on every upload. Thankfully, there’s a way to disable the default image sizes in your WordPress settings.
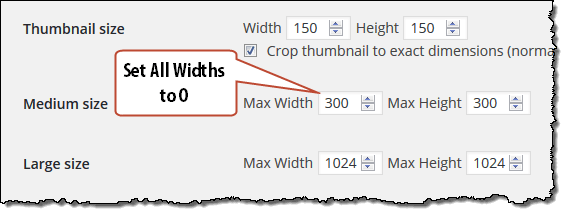
Go to Settings > Media.
Thumbnails may be used by your theme to display posts on your front end which you can check by right clicking the image in your browser and look for image viewing options. In Firefox, Right Click > View Image Info. In Chrome, right click image > open image in new tab. Either way, you will be able to see the image name and location which will tell you if the theme is using your original upload or a thumbnail.
If the thumbnail being used does not match what you show in Thumbnail size under media settings, then your theme is likely using its own image size. If that is the case, then you can set Thumbnail size, Medium size and Large size to 0 in all 6 fields.
Once saved, your WordPress will no longer create these additional images.
Every time you modify and save a post, WordPress defaults to saving a revision of your post. What this will do is create an entire copy of your post and save it to your database which can then be used to restore an old post in case you overwrite something important.
The problem is WordPress will store an umlimited amount of revisions on your posts which can take up a massive amount of space and bloat in your database. I’ve seen WordPress databases grow to the point of 6x the size it needs to be (we’re talking GBs of space here) with certain clients that have tons of posts and changes going on daily.
So what can be done to fix this issue?
You can disable post revisions on all content so that this doesn’t happen in the first place by adding a single line of code to your wp-config.php (the file that stores your database authentication settings). Add this line anywhere in your wp-config.php and revisions will no longer be saved:
define( 'WP_POST_REVISIONS', false );
Of course, you may decide that revisions are important, especially if you have a multi-author blog. If that is the case, then I’d recommend limiting post revisions to a maximum of 3 revisions to keep your database as bloat-free as possible while still having restore functionality. Here’s the code that you’d add to your wp-config-php:
define( 'WP_POST_REVISIONS', 3 );
Feel free to change the 3 to a number you are comfortable, however, my recommendation or lower number stands.
Now that you’ve limited or eliminated post revisions, you still have an existing bloat in your database which can be severe depending on how long you’ve been adding / editing content on your website.
Let’s go ahead and clean out all the junk in the database.
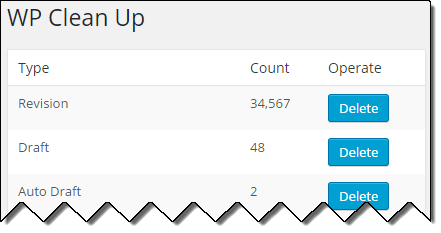
Once installed and activated, go to Settings > WP Clean Up.
On that page, you will see the above screenshot with all of the options to clean up on your database. Obviously, I fudged the numbers in my screenshot because I keep my revisions disabled, however, you might be shocked at how much junk is stored in your database!
Be careful what you purge with this. For instance, we like to plan our content out in advance by saving draft posts. If we clicked delete under drafts, a full 2 days of research and post creation goes out the window. If you don’t do this, you may discover that using the Delete All button is fine.
Before deleting anything, I hope you followed that red warning at the top, back up your DB! Scroll down to the bottom of the WP Clean Up page and take note of how big your database is under Total.
Go ahead and clean up your database and let out a sigh of clutter relief.
After discovering WordPress plugins, many users will go crazy installing and playing with all sorts of plugins to see how they work. The problem is, if you leave all these unnecessary plugins installed, it can delay the page loading speeds of your pages and slow down your overall site performance on both the front end and back end.
Go to Plugins in your WordPress dashboard and thoroughly evaluate your plugins and determine their value. Do you really need that Hello Dolly plugin? No. Delete it (sorry Matt).
Since you are in the deleting plugins mood, head over to Apperance > Themes.
You can delete a theme that you aren’t and will never use by clicking on the theme which will take you to a Theme Details overlay. On the lower right corner of that overlay, you will see a red Delete link that will allow you to delete the theme.
I recommend leaving Twenty Fifteen in your themes along with the theme you actively use. Just in case your theme breaks during an update or some other reason, WordPress can revert your site to the Twenty Fifteen theme if necessary.

If your site is even remotely popular, it is likely the comments section of your posts is being hit by spambots that add tons of spam comments into your database.
Go to Comments > Spam Tab
From here, you can scan your comments and look for legitimate comments received that were marked as spam. After restoring those, you can use the Empty Spam button to delete thousands of spam comments.
Depending on how much spam you’ve allowed to accumulate, this can be a major performance booster as it removes tens of thousands of comment entries in your database.
Shocked? If you want a way to manage your spam and virtually eliminate your spam problem, be sure to check out my fighting WordPress spam guide. Every client I manage takes advantage of the spam fighting techniques I use in that guide and not one has complained. 🙂
Since you are here, go to Comments > Trash tab and purge the comments there as well.
If your site is having a spam problem, I recommend purging your spam on a weekly basis to keep your database optimized.
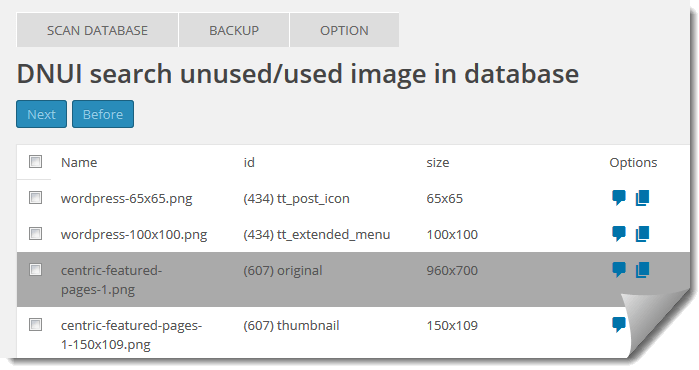
In the occasional case where I’ve been hired to help cleanup a WordPress site that has been operational for over a year and they have expressed a desire to cut down on the disk space their site is using, I’ll use what I am about to mention to clean up the unused images and image references in the database.
For the most part, this isn’t necessary for most websites. If your site isn’t image heavy or hasn’t been online for too long, skip this and move on to the next cleanup tip below.
What this plugin does is scans your database and looks for images that aren’t assigned to posts on your website. What this plugin cannot do is prevent deletion of images that are being used naively by your theme.
Access the plugin by going to Settings > DNUI.
From here, go to the OPTION tab and check the option Show only image not used so that images used in your posts will be hidden from the results page. Also update the Quantity of image to search to 100. There’s no save button here, but after switching to the Scan Database tab, the settings are used.
Go ahead and select / delete unused images.
I hope this guide has helped you. If you see any value in the efforts to create this guide, please consider sharing it on social media, your email blast or link to it on your website. Thank you!
Need a way to allow someone to contact you from your website? Rather than offering a list of contact form plugins that you’d have to choose from and figure out, we are going to use one of the most popular and easiest contact form plugins available and walk you through the entire process of adding a form to a contact page. Let’s begin, shall we?
With almost 27 million downloads and over 1 million active installs, Contact Form 7 is my go-to choice for installing a contact form on a WordPress website, whether it be my own sites or on client websites. It just works without any hassle or huge learning curve.
After you have successfully installed Contact Form 7, click Activate Plugin or go to Plugins > Installed Plugins and click activate from there. You should notice a new Contact section has been added to your dashboard. Ignore it for now.
Go to Pages > Add New.
In the title, enter the name of the page, traditionally called Contact Us.
Click in the WordPress visual editor (where you type your content) and you’ll notice a permalink has been automatically generated. Click the edit button if you wish to rename to something shorter like /contact/.
Add your desired content that you want to appear on your contact page. You can add content that you want to appear before and after the form.
Click the Save Draft button to save your work.
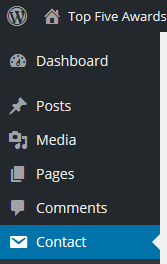 A shortcode is a small bit of code that Contact Form 7 uses to generate your contact form. In your WordPress Dashboard, click on the new Contact section as I’m showing you on the left.
This will take you to a new page labeled Contact Forms with one form already created for you.
Feel free to click the edit link on the default form and rename the form to Contact Page if you plan on having multiple contact forms then click the blue Save button.
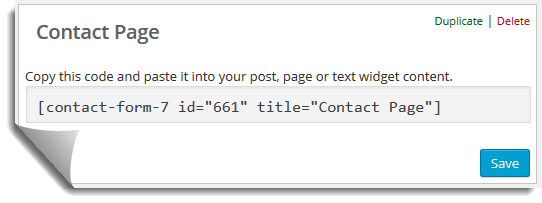
Copy the shortcode they provide you (every id is different, don’t use ours) to your clipboard with right click > copy.
Head back to Pages and click the edit link under the draft contact page we created in step 2. Now paste the shortcode where you’d like your contact form to appear within your content. Here’s our finished example:
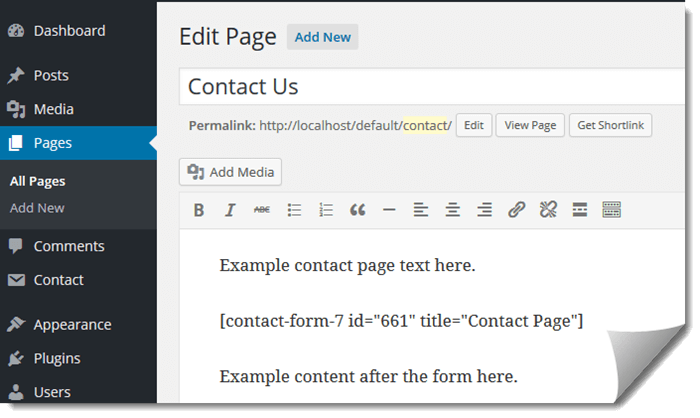
Click the blue Publish button to make your new contact form live.
Once your page is published, click the View Page button (shown in screenshot above) and it will take you to your new contact form page.
On the page, go ahead and fill out the form and send it to yourself to make sure the contact form is working (and that you receive an email).
That’s it! Your form is live and ready for your viewers to submit a request to you.
Once you start adding multiple contact forms to your website, you may find that figuring out where the submissions are coming from and knowing what priority to treat the messages to be extremely important.
Contact > Edit your form. Scroll down to the Mail section and look for Subject: on the left.
You can add a label in front of [your-subject] so that when the mail is delivered, you’ll know where the request was received from. Here’s an example we use on our contact form: T5A Contact Page: [your-subject]
This does two things, one, I can setup my email client to FILTER all messages with a subject that has T5A in it and place these messages in a high priority folder. Second, Contact Page, this tells me where the contact form was filled out. Without ever opening or previewing the email received, I already know what site and what form was filled out. Neat, right?
You can edit your form to add new fields or to remove fields that you don’t want to appear on your site. All you need to do is edit your form and click the “Generate Tag” button which will give you several options to choose from. Each selection will offer some instructions to complete along with some options.
Once you fill out your new desired entry, you will need to follow instructions and add the shortcodes given to you where they want it. The first code will be copied to the form on the left (add it wherever you want the form entry to appear on your live form). The second code will be copied to the Mail template section which is the template that is generated and sent to you via email. If you forget the add that second code to the mail section, you won’t see what the user has entered into your form.
Once done, click the blue Save button and your changes will already be live on your site (no changes needed to your contact page). Test it, see how the form appears on your site and see how the email looks when delivered. From there, you can make changes if needed.
Leave a comment below to let our readers know how you are using Contact Form 7.
Remember to share this guide if it has helped you.

Right after launching your first WordPress website, you will likely want to integrate some sort of social media functionality to make it easy for your viewers to share your content on social media. So, you hop on the WordPress Plugin Directory, do a few searches for social media plugins and instantly get that overwhelmed feeling.
There are hundreds of options to choose from and each one has their own pros and cons.
You might even be a great researcher and decide to start reading the reviews and support forums for each social media integration plugin, however, you’ll find yourself spending days deciding and testing various plugins to find the one that is right for you.
Our goal with this guide is to help you save all of that previous time, do the research for you and report our findings. This isn’t your average top list, we’ve downloaded the plugins, installed the plugins, checked how they effect page loading speed and more.
The below plugins are all free to use. Although there are some awesome premium social sharing plugins out there, we’ve kept this guide’s focus on the best FREE social media sharing plugins.

Tested Version: 1.17
Configure: Settings > Floating Social Bar
Supports: Facebook, Twitter, Google+, LinkedIn, Pinterest
Front-End Payload:
fsb.js: 9.27 KB
This plugin loads extremely fast and only requires 10KB of JavaScript to work. The JavaScript allows the user-fieldly popup when someone clicks to share your content.
Socialite is an awesome feature because it allows your social media icons to load on your website without any additional payload from the default scripts that social media websites use. When a user hovers their mouse over a social icon, the button updates then to show the default button. Impressive.
Interval to Update Stats: Because Floating Social Bar does not load the default sharing options on every page load, this plugin needs to store and update the share statistics occasionally. Meaning, if your post gets shared 950 times and you set this option to 30 minutes, any shares that occur during that 30 minute interval will not show until the stats update. However, your posts will still show 950 shares on the share icon.
This is the best of both worlds because you are reducing the heavy payload of traditional sharing icons while still showing statistics to the reader which can (and does) increase sharing. When the user hovers over the share icon, they will get the real number of shares.
Don’t want to float your social bar? This is where the name of this plugin can be deceiving because you are not forced to use the floating options! You can check the option “Make Social Bar Static” and it will disable floating as well as provide you with static options including showing social media icons Above and Below Content, Below Content, or Above Content.

We noticed alignment problems with Socialite enabled on the default Twenty Fifteen theme. Testing on Thrive Themes, Twenty Thirteen and Twenty Fourteen went fine. Socialite adds the social media counter feature so that readers can see how often your posts / pages can be shared. We were able to fix the issue by adding custom CSS to fix alignment, but for most, it will need knowledge of CSS and ability to identify the CSS classes needed to change. You may, or may not, experience alignment problems on your theme after hovering over an icon, especially the Facebook and Google+ icons. If this occurs, you can “Disable Socialite” and the problem will disappear.
We were impressed with floating social bar because there is no direct monetization to add features to your social media sharing experience. The only optimization methods are an email opt-in to get email updates from WPBeginner and an advertisement for Soliloquy, a responsive slider plugin.
Floating Social Bar remains one of our go-to plugin recommendations when a user needs a fast social media integration that is easy to set up and go. If you aren’t using a theme that integrates social media, need a solution that is free and is fast loading on the front-end, this plugin should be a perfect fit.
![]()
Tested Version: 2.3.5
Configure: Mashshare > Settings
Front-End Payload:
mashsb.min.css: 28.2KB
mashsb.min.js: 3.35KB
Total Payload: 31.55KB
* Does not include monetization options.
Supports: Only Facebook and Twitter on the free version (see monetization below).
Note: Not seeing the share icons on your website? Here’s how to enable it right away, go to Mashshare > Settings > Visual Tab > Location & Position Tab. Under post types, check post and page to enable the share options on all posts and pages. Once saved, go to the Social Networks tab and place a check under Facebook, Twitter and Subscribe as desired. Remember to save.
There’s going to be a larger performance hit when using this plugin because it is collecting statistics on your database. You can opt to switch from MashEngine (local data collection) to SharedCount to offload the hit, but this only allows 10,000 free requests before a payment is required.
The other option is to disable the Sharecount option which requires no SQL queries at all. Enable cache expiration of at leasdt 30 minutes to reduce server load as well, they have a 5 minute setting as default which we wouldn’t recommend.
Other optimizations include the ability to force the JavaScript to load at the bottom of your HTML.
An interesting feature of this plugin is that they allow you to fake your statistics by adding a number you specify to the total tally. Shady at best.
For Facebook, you can configure the count to include shares, likes, or all shares, likes and comments on your content.
Under Visual > Customize you will find a lot of options available to customize how your sharing will appear. You will be able to round the share count to the nearest 1K or 1M, animate the share count, change the share count title, add Twitter handle, change share count color, add a border radius to your share icons (rounding effect), add gradients, change the default button width, enable small buttons and customize the Subscribe button link and behavior.
Under the Visual > Location & Position tab you can customize the position of the share icons from Top, Bottom, or Top and Bottom. You’ll also be able to customize where your share options appear including any custom post type, post or page. You can also add share icons to your category pages of front page which is a really nice touch.
As much as we love Mashshare, the plugin is severely limited in functionality for those looking for a free option. By default, you will only be able to add Facebook, Twitter and a “Subscribe” page link on your content. If you want your users to have the option to share to other networks, that’ll cost you. There’s a lot of things that’ll cost you, so here’s the options.
Mash Networks: Want Google+, Whatsapp, Pinterest, LinkedIn, Tumblr, Stumbleupon and other networks? That’ll be €19.00 for one site.
VideoPost Popup: At the end of your embedded video playback, this optin allows a popup to appear to encourage sharing of the video. You can also set this to popup after a specific period of time on the video playback. That’ll be €39.00 for one site.
Facebook Likebar: A sticky mobile-optimized bar that encourages viewers to like your Facebook page. The bar disappears when a user likes the page and offers an X to close the sticky bar should the reader not want to like the page. Mobile optimized and offers many customizations for €19.00 on one site.
Sticky ShareBar: Add a sticky bar that plasters to the very top of the browser window that offers share options. That’ll be €18.00 for one site.
Realtime Pageview Counter: Show how many times your page has been viewed from the point this feature is activated. That’ll be €18.00 for one site.
Google Analytics Integration: €19.00 for one site.
Mashshare Responsive: Be default on the free version, the share icons do not shrink and instead stack on each other. If you want this functionality for your mobile viewers, that’ll be €9.95 for a single site. Come on guys, seriously? This should be a default feature!
URL Shortener: A free enhancement option that allows you to use goo.gl links in Twitter. Mashshare does not recommend this feature currently due to performance issues.
Mashshare LikeAfterShare: Ok, this is actually really cool because when someone clicks your Facebook share button and shares your page, they will be taken back to your site with a new popup that asks for a LIKE on your page as well. A hefty €29.00 pricetag for one site.
Open Graph: Add open graph options to your social sharing. We wouldn’t recommend this because if you’ve installed WordPress SEO, you already have it. This is free to use if needed and allows for your featured images to be used on Facebook and other social media when your content is shared.
They have also added a $24 social locker enhancement that links to CodeCanyon which allows you to encourage sharing on your content to reveal a special download or offer.
Get the Core Add-On Bundle: If you elect to purchase any of the above add-ons, you might want to claim the bundle which includes 7 add-ons for €39 for one site (VideoPost not included). For €99 you can get this for 3 sites and it includes VideoPost.

Tested Version: 1.7.8
Configure: Settings > Social Media
Front-End Payload: No added JavaScript or CSS. Only images.
Supports: Facebook, Twitter, Google+, Reddit, Pinterest, LinkedIn, Tumblr, Email, RSS, YouTube, Vimeo, Instagram, Flickr, Foursquare.
Placement Customizations: After Post, Before Post, Before & After Post.
No floating options.
Clicking an icon forces a a new browser tab to open which is used to share the post to a user’s social media. Since they do not use javascript, there’s no way to make this plugin open a traditional smaller window to share the content.
They only offer one style and do not offer traditional sharing icons with counters to be used. Therefore, readers won’t be able to see engagement or popularity on a post.
We found the settings page to be pretty confusing and somewhat overwhelming. They offer a floating menu on the upper right of the settings page that covers the explanation of features. You must find a small “toggle” link to remove the floating menu so you can read the full descriptions.
Icon size is customizable with 6 sizes. Icon resolution options allow optimization to consume less bandwidth.
Configuring the social media network settings appears daunting. There is 3-5 options to learn and fill out on each social network that allows customization of the type of sharing that will occur, share link (don’t touch), your social media link, title of the share or follow button.
Extra Icon Skins: This plugin only offers one set of icons. If you’d like to use other social media icon sets, there is a €9.99 fee to get “Extra Icon Skins”.
Grey Face Effect: This plugin offers a grey fade effect which is advertised on the plugin download page. €14.99 fee to add this feature. It shows your default social media icons in grey and then when moused over, turns the color on.
Light Prompt Overlay: This adds an overlay which offers different sharing options for the social media network clicked. Example: Facebook, when clicked, offers a small overlay that offers a Like and Share button with a share counter. A €19.98 applies.
Tested Version: 1.5.8
Configure: Settings > AddToAny
Front-End Payload:
addtoany.min.css: 1.19KB
page.js (external): 23.08KB
Loads external social media integration files on page load.
Payload: At least 25KB.
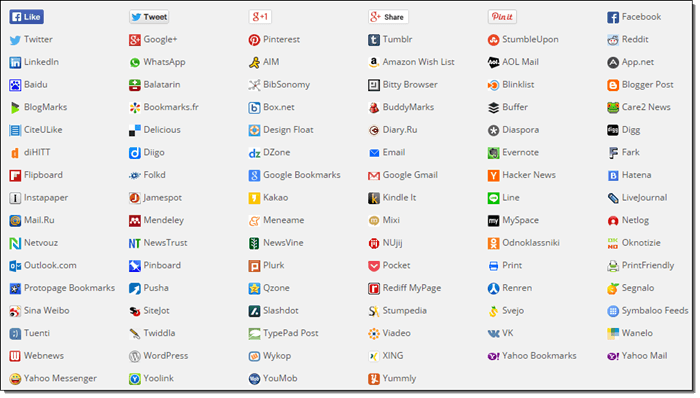
Want more social sharing options? The AddToAny plugin lives to its name with 100 social media sharing options to choose from. Of course, with great choice comes great responsibility.
For every social media integration you add as a Standalone button, you increase the page load time. The files requested are loaded asynchronously, however, they are always loaded and not loaded upon user request / hover like other plugins listed here.
Our recommendation? Select just a few of the major social media networks you’d like to have as a Standalone button and utilize the integrated + button that will allow your users to choose from the 100 options available.
Placement Options: You can select to disaply the social media icons at the bottom, top, or top and bottom of your posts, pages, front page, archive pages and on custom post types.
Menu Styler: One thing unique to AddToAny is the Menu Styler. This links out to AddToAny’s website but allows you to customize the main color, border color, link text, hover text and background. Once done, you can click “Done, get code” and it will give you code that you can add to the “Additional Options” area of the configuration page.
Floating: AddToAny also features a “Floating” tab on the configuration page which allows you to add a left or right hand vertical floating bar. You can configure this floating element to only display on desktop with XXX pixels width (you customize) and position the element XXX pixels from the top of the screen (allowing for larger headers).
If vertical floating isn’t your glass of beer, then scroll down to the Horizontal Buttons area where you can configure horizontal floating buttons that are docked to the browser window.
This is a very ugly option in our opinion because it docks the floating bar at the bottom of the browser window on the far right or left. If the reader is viewing your content on a maximized window on a large screen, the bar may appear way outside of your content.
We reviewed the plugin and found no attempts at monetization. There’s no advertisements or requests for donations. The only thing the author asks for at the bottom of the configuration page is a positive rating and to share it to others.
Tested Version: 3.5.3
Front-End Payload:
Loads 3 files on your site.
sharing.js 41.4 KB
sharing.css 16.9 KB
genericons.css 26.8 KB
Payload: 85.10 KB
Configure: Jetpack Menu > Sharing > Activate
Then Visit: Settings > Sharing
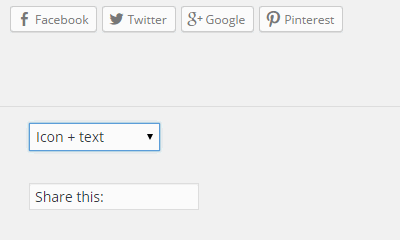
JetPack is a massive collection of enhancements and features for your WordPress website. One of those options happens to be a social media sharing option that allows you to add quick and easy sharing icons to your site. As shown to the upper right, you can select Icon + Text, Icon only, Text only or opt to use the default official sharing buttons provided by the social media networks.
JetPack doesn’t offer much in the form of customizations. The social sharing bar will only appear below the content with JetPack. If you are looking for a plugin that offers floating, this plugin is also not for you.
Social Media Support: Facebook, Twitter, Google+, Pinterest, LinkedIn, Reddit, StumbleUpon. Tumblr, Pocket, Email and Print.
Overall, Jetpack social media integration is very cut and dry. It adds a no-frills approach to adding social media to your website but does a minimal job to help your site increase social media sharing.
One huge benefit to JetPack is it brings familiarity to new WordPress website owners that have transferred from WordPress.com to their own WordPress.org installation. For those users, they can add most of the functionality they were used to on WordPress.com using JetPack, which is an official WordPress / Automattic plugin.
As expected, there is absolutely no attempts at monetization with this plugin with the Sharedaddy options.
We hope that the above list will help narrow down your social media integration plugin decision and get you on the important path of creating valuable content that people want to share.
Be careful out there. You will find old lists of recommended social media plugins that recommend plugins that haven’t been updated in over a year. At the time of this review, the popular sharing plugin Digg Digg, with almost a million downloads hasn’t been updated since July of 2013. If you look over their reviews, there’s a lot of complaints which can be expected from an abandoned plugin.
If you’ve found this guide useful, please consider sharing this page on social media using our integration.
You are correct, that’s because at the time of writing this guide, we aren’t using a social media plugin. Instead, we chose to use the social media integration provided by Thrive Themes. For us, social media integration was painless and easy because the theme did exactly what we wanted and knocked out one plugin we didn’t need to add to the site. Additionally, the sharing integration is optimized for fast load and isn’t too distracting for our readers.

There’s nothing worse than building a successful WordPress website only to attract spamming robots that leave hundreds, if not thousands, of spam comments all over your posts and pages. Lately, I’ve been having several conversations with people on Google+ about the issue which triggered this WordPress Guide.
This guide will cover a wide range of options and solutions that can be used to combat spam along with a my personal recommendations based on years of experience working with WordPress websites.
The BB Gun. It helps but lacks the power you need to go for the kill.
![]() Every WordPress website comes pre-installed with Akismet, which is a free spam-fighting WordPress plugin that uses an algorithm to check if a comment is spam based on many factors. All you need to do is go to your WordPress Dashboard and click Plugins. From there, you will see Akismet and Hello Dolly on a default WordPress installation. First of all, delete Hello Dolly, ‘nuf said.
Every WordPress website comes pre-installed with Akismet, which is a free spam-fighting WordPress plugin that uses an algorithm to check if a comment is spam based on many factors. All you need to do is go to your WordPress Dashboard and click Plugins. From there, you will see Akismet and Hello Dolly on a default WordPress installation. First of all, delete Hello Dolly, ‘nuf said.
Under Akismet, you will see a blue “Activate” link. Click that then click the blue “Activate your Akismet account.” From there, click the blue Get your API key. Once again, you’ll click “Get An Akismet API Key” on their website which will then take you to a WordPress.com signup page. If you have a WordPress.com login, click I already have a WordPress.com account! and log in. Otherwise, enter your email address, desired username and password and click Sign Up.
Once you authorize your WordPress.com account with Akismet, you’ll finally be taken to this screen with pricing options.
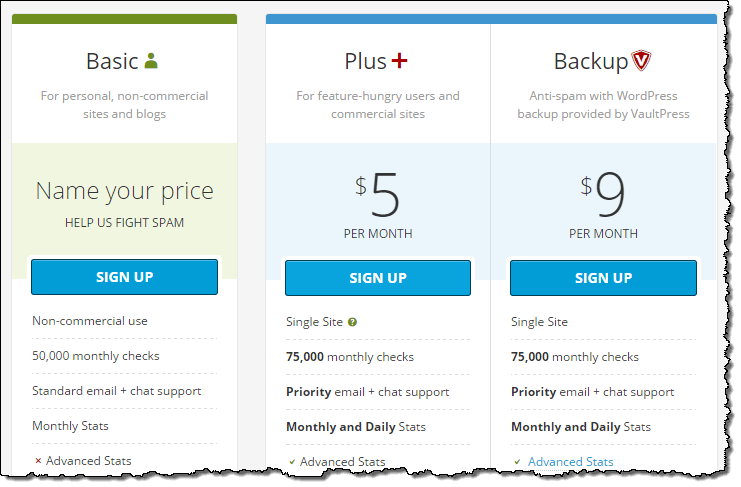
From here, you can opt for the $5/mo plan or use the Basic sign up which allows you to name your price with a pricing slider, one of which is FREE. As long as your website is not a commercial website, you can slide the slider all the way to the left so that it is $0.00/year (free) which will remove the credit card payment options and allow you to enter your first and last name.
Finally, you will get the required API key that you can then use on your website.
Head back to your WordPress Dashboard and find the Manually enter an API key section. Paste your key in there then click Use this key to activate Akismet on your site.
Now that you are active, Akismet will begin scanning comments and marking spammy comments as spam and place these comments in your Comments > Spam section.
All set right?
Here’s the problem. If you are getting thousands of robot spam submissions on your website, your database will continue to be filled up because the comments are being accepted into your database but are being placed in your spam folder. If you ignore your spam folder long enough, you’ll rack up a massive database size in no time at all which can cause your site to become more and more sluggish in page loading and administrative response times.
The handgun. It definitely takes care of bots looking for a WordPress commenting form but you’ll be fighting spam in a different way.
You’ve fought a long and hard battle with comment spam and decide, that BB Gun just isn’t doing the job to kill off the spam. What other options do I have to combat this seriously distracting issue? You take to the Internet and look at what popular WordPress websites are doing and realize, Oh! They switched their comment system and outsourced it to a third party!
Great idea! How do I do that? It’s pretty simple. Here’s a few of the most popular options that are available to you.
![]() Discus is the most popular WordPress comment replacement system that exists. Disqus allows you to moderate and control your filters, control anonymity preferences and is very easy to install. Disqus also integrates social media to share comments and reactions on Facebook or Twitter. They system is based on real time commenting which allows users to see the latest comments first (which may or may not please your readers).
Discus is the most popular WordPress comment replacement system that exists. Disqus allows you to moderate and control your filters, control anonymity preferences and is very easy to install. Disqus also integrates social media to share comments and reactions on Facebook or Twitter. They system is based on real time commenting which allows users to see the latest comments first (which may or may not please your readers).
The problems with Disqus is you are forcing your viewers to register on a separate site just to have the ability to make a comment. They will have to register by associating one of their social media accounts or will need to setup an account which requires them to provide an email address which may turn them off from commenting on your site.
Of course, if you decide to switch to Disqus from your WordPress, since the service is linked to your WordPress website, you will be able to transfer your old comments to the Disqus system. If you decide down the road that Disqus isn’t right for you and want to move back to the traditional commenting system, you can ensure all of your comments are synced under Comments > All Comments then deactivate / delete the plugin. Therefore, you won’t lose comments by switching then switching back, a really nice bonus.
 Another popular approach that some sites use is integrating and using Facebook or Google+ comments to replace the regular WordPress comment system. What this allows is for people to quickly and easily comment on your posts as long as they are registered on and using the social network integration you choose. One benefit is it will help increase the sharing of your content on these social media platforms and traditionally, people will use their real names in their comments, especially Facebook users.
Of course, not everyone uses social media or they have used it in the past and, for whatever reason, decided to delete their accounts and never use their platform again. For these users, you will have completely alienated them and they will not be able to comment (expect nasty contact form submissions for this decision on established websites).
Another major issue you’ll face is the comments themselves belong to Facebook or Google+. When switching to this type of system, you will lose all of your old comments. If you decide that social media commenting isn’t working out like you wanted, any comments received while social media commenting is integrated will be lost (and only available on the social media posts).
I’ve tried going this route on a new blog before and the biggest red flag is the fact that users can dig up your old content and leave links and spam that you will likely never see or be alerted towards. This is especially a big problem in Google+ integration with no resolution because Google+ doesn’t officially support comment integration. In Facebook, you can take advantage of the Facebook comment moderation tool to monitor comments received through your website’s app, however, you’re still left with dealing with spam on a daily basis, just in a different location.
Facebook: Facebook Comments Plugin or WP Dashboard > Plugins > Add New. Search Facebook Comments, look for By Alex Moss > Install Now.
Google+: Comments Evolved for WordPress or WP Dashboard > Plugins > Add New. Search Comments Evolved > Install Now.
Although Comments Evolved is the most popular WordPress plugin for Google+ comments, it should be noted that this plugin will also integrate Facebook, Disqus and the traditional WordPress commenting system as an all-in-one solution.
The Assault Rifle. Now we’re talking. The handgun definitely helped pick off the spammers that are close in range but we’re having problems hitting those pesky long targets. Let’s not mention the fact that some spammers invoke The Matrix and are able to dodge our handgun bullets.
We’ve discussed the potentials of switching your commenting system and the integrated Akismet plugin which helped but some spambots are persistent and are able to spam even though you’ve switched. Even if the integrated systems have virtually eliminated spambots, there’s still ways for spammers to manually attack your content with links that will have to be moderated.
 Question: How can we attack those persistent spambots where it hurts the most?
Answer: Remove the URL field in your traditional WordPress commenting system.
If you remove the URL field from your WordPress commenting system, manual spammers will not be able to submit spam because there is no URL field to complete. However, if you do this the wrong way, spambots will still be able to submit spam because they use a long URL string to form-submit to your website (the spambots do not actually use your form, they bypass it).
Hint: Do not use the widely-publicized CSS trick to hide the URL form. The spambots will continue submitting spam to your website even though your website doesn’t show the URL field.
Now that you’ve removed the URL field, you’ll make it known that you are not a URL-friendly website to spammers looking for target sites to attack.
Of course there’s always a downside to doing this. First, webmasters like myself enjoy researching people who comment on their website to learn more about them. Without the URL being submitted, you will find it harder to discover their latest projects. Most people who fill out the URL field on their comments will naturally link to their latest website, latest article or their latest project because that is what is freshest on their mind.
Secondly, a huge portion of people who comment on blog posts and articles are bloggers themselves. They enjoy commenting to add value to the conversation but they also enjoy getting a few backlinks to their site(s) here and there to attract traffic. If you remove the URL field, you are also removing some people’s willingness to comment.
The Nuke (name your deadliest weapon here?). That assault rifle approach did the trick! You were able prevent most of the spambots and manual spammers from submitting spam, but can we take it a step further? What if I don’t want to remove that URL box?
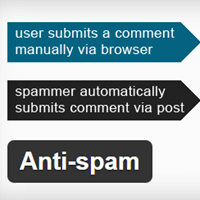 Introducing Anti-Spam, a free plugin that will help thwart spambots, doesn’t use a required captcha, but still allows the URL field on your website.
I’ve tried several spam prevention plugins available but this one is my favorite by far.
It. Just. Works. There’s nothing to configure which feels too good to be true, but isn’t. Pure magic.
Once you install and activate the plugin, you will notice a drastic, if not complete, reduction is spam ending up in your spam moderation queue. The plugin blocks spambot spam at the source by checking the user agent using JavaScript.
One awesome thing about this is the fact the bulk of the spam your site receives will not even reach your WordPress database. That’s one of the biggest reasons why I love this plugin so much. Best of all, it continues to remain free but the ability to support the author is there with an upgrade to Anti-Spam Pro which adds additional features (a more powerful automatic spam protection, a manual spam protection algorithm and a settings page) for a one-time purchase of $14 on codecanyon.
It’s important to note here that Anti-Spam (free version) stops the automated spambots but it doesn’t prevent manual spam submissions from real people using real browsers.
You’d be correct in saying that. However, what if you installed/activated the Anti-Spam plugin and deleted the URL field (the assault rifle approach above)?
Now you’ve got a site that uses the default WordPress commenting system that completely blocks most spambots and prevents manual spammers from spamming your site with URLs. Welcome to the solution we use on all of our WordPress projects. We have yet to see a need to even use Akismet because the spam doesn’t reach our database in the first place.
If you really want to keep your URL field for reasons we’ve stated above, your other solution is to upgrade to Anti-Spam Pro. This will add a manual commenting “spam-points algorithm” which will help you keep the URL field in tact but tackle most of the manual spammers.

Yep, I didn’t like when Webvitality added this notification flag and actually voiced my displeasure about it on their WP plugin support forum. Due to the complaints, he quickly added a new feature that allows us to remove this flag from the comments page, but it’s buried and you’ll have to know where to look.
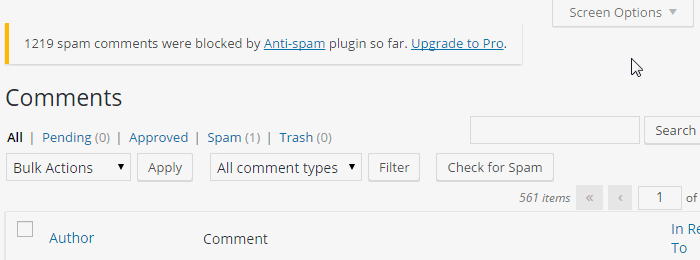
Use the above GIF to see exactly how to remove the Anti-Spam notification flag. On your Dashboard > Comments page, click Screen Options, uncheck Anti-spam info, click Apply. Done.
How have you handled your WordPress spam issue? Did this guide help you? Please leave a note in the comments below and let us know!
We faced a problem last night that took us a couple hours to diagnose and repair on our Top Five Advisor email forms. When someone would fill out a contact form and submit it to us, the FROM field would show our administrator’s email address and not the email address of the user who submitted the request.
As it turns out, the way Contact Form 7 and all other email plugins work is they “spoof” or fake the actual from field when in actuality, the email is FROM your website and FROM your website’s main email address.
Most email systems allow this and there’s no issue, but for those of us that made the switch to WP Engine and realized that they do not allow email to be sent through their system, you probably made the switch to Google Apps because they are the best premium email provider and offer the best spam tools to block the junk.
Unfortunately, Google Apps and Gmail is one of those providers that do not allow spoofing. Therefore, the emails generated from our websites will use the admin email address in the FROM field which makes it a giant pain to reply to emails because you will have to copy and paste their email address to the “To:” line in reply or else you are sending the email to yourself. No good.
 After researching the issue and discovering why this was happening, we searched out a solution from Contact Form 7 and found this article that helped us resolve the problem.
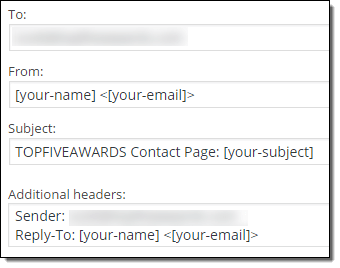
In your WordPress dashboard, click on “Contact” then hover your mouse over one of your contact forms and click the edit link.
From there, look for the section we show you on the left. The To should be your admin email address, the from area can be left as default, the subject line, you can customize like we do or just leave [your-subject] and finally, you’ll see the additional headers section which is where we will fix the problem.
Add the following code into this Additional headers box:
Then save the form.
Head over to your contact form and submit it using a fake email address in the “To:” field.
When you receive the email, you’ll notice that the FROM field still shows your website’s admin email, however, when you reply, your email program will use the “Reply-To” header and place the fake email address in the To box like you’d expect.
Now you or your staff will not accidentally send emails to themselves.
Now that you know about this Additional headers area, you can also add things like Cc: <youremail> Bcc: <manageremail> if you’d like to send the emails received to more than one staff member for archive and tracking purposes.

Now that you’ve been using your WordPress website, you are probably looking for ways to extend your website to add additional functionality and features. One of the first steps you should make is adding an SEO plugin and to take advantage of SEO resources that will potentially increase your website traffic.
One of the biggest sources of traffic to your WordPress website will likely be search engines. Unfortunately, the default WordPress configuration will not allow you to maximize your chances of ranking better in their search index.
Below, you will find the top five resources that we recommend you to use and implement as part of your overall SEO strategy.

Plugin Page – Joost de Valk WordPress SEO Page
The primary goal of most SEO plugins is to do one thing, to allow you to optimize your content title tag and meta description so that search engine spiders will have a greater understanding of what your content is about.
WordPress SEO goes way above and beyond that by allowing you to optimize your tag, category, custom post type, archives and pages as well. The thing is, this plugin does so much more, things you may not be expecting, that will help you drive more traffic to your website. For instance:
How about a full social media enhancement that allows you to inform search engines about your social media pages and profiles? Facebook Open Graph is support, Twitter cards are supported and specific Google+ meta data is also supported. If you’ve seen our Twitter account, we don’t even need to explain how awesome these enhancements are:
Interested in #ThriveThemes? See our in-depth Thrive Themes Review written yesterday here: http://t.co/DUpK861vnD
— Top Five Advisor (@TopFiveAdvisor) May 1, 2015
Other features include XML Sitemap generation (easy spider food for engines), RSS optimizations, breadcrumbs, import and export functionality to convert to or from another SEO plugin and lastly, the awesome page analysis feature that occurs on any page or post. The analysis will let you know how your SEO for your target keyword is, will show you how many characters left in your meta description and will even warn you if your title/description text is too long. All of it, great stuff and we use it every day.
One of the most important things you can do for your niche and website is to do your research into your market. The Google keyword research tool is awesome for Google AdWords users (paid traffic) but it can also be awesome for people not planning to advertise.
With this free tool, you can search our your niche and get keyword ideas based on search volume, number of results and it will even show you the competitive scope of the keyword. Dig around in there, find some low hanging fruit and make content around it.
We strongly recommend incorporating the Google Keyword Planner in your content marketing SEO strategy.
 Screaming Frog SEO Spider Page
Screaming Frog SEO Spider is an awesome spider and website crawler tool that you run as software on your PC, Mac, or Ubuntu. The software will crawl your entire website and generate a list/report that you can use to find broken links, 301 redirects and other problem areas on your website.
This tool is especially useful if you’ve changed your permalink structure and need to quickly find posts that reference old URLs that need updating. Although this can be a tedious manual process, there is a quicker way with PHPMyAdmin export, find/replace and upload which you could certainly outsource to someone who can do this for you.
We found this tool to be invaluable when we converted our Top Five Advisor website to WordPress and needed a full site structure spreadsheet that we could use to redirect old links. After that was completed, we decided to switch our URL structure again to take advantage of the WordPress tagging system which required another round of link fixing.
Alternative: Broken Link Checker Plugin. This plugin will scan your website for broken links on your website that is totally free, however, this plugin is known to be extremely resource intensive on your web host which can lead to performance issues or a message from your web host to discontinue use. A popular WordPress web host WP Engine has outright banned its use.

Once you start adding a ton of content to your website, you might be wondering what your competitors are doing to give themselves an edge on your website and the rest of their competition as well.
With SEMRush, you can research any website, get analytics and insights, discover competitors’ best organic keywords to target, discover backlink resources including referring domains, types and geolocation, find Google AdWords ad copy and budget, find search volume, discover additional competitors that are in your niche(s) and so much more!
Definitely give their free search from their main page a try. You’ll instantly learn things about your competitors with a few strokes on your keyboard and mouse clicks. Of course, when you start doing a ton of searches, you’ll eventually hit their free threshold that will prevent further searching until the next day.
 Wrapping up the top five best SEO tools to use on your WordPress website is the Google Webmaster Tools service. Using WordPress SEO, which was recommended above, you can easily integrate Google Webmaster Tools into your website which will begin tracking your visitors, your page views, your popular pages and much much more.
From your WordPress dashboard, go to SEO > General then click the “Webmaster Tools” where you can enter the code provided to you by Google’s Webmaster Tools. Once you complete this step, return to Webmaster Tools and verify that the code has been integrated properly.
From there, give Google a few days to collect data on your website and then return to see all of the awesome metrics and stats they provide you with.
It has been known for quite some time now that Google loves websites that are optimized for fast page load times and for mobile users, they recently launched a new algorithm that looks for websites that are mobile response and mobile friendly.
Regarding page load times, a lot of that comes down to the amount of plugins that add javascript and heavy code to your web pages, whether you use a content delivery network and about your web host as well. The last thing you want to do is load hundreds of WordPress plugins that make visual changes to your front-end because if you look at the source code, you are going to see a massive TON of javascript files that will end up making your site load slow and degrade the user experience. Remove plugins you do not use and remember, less is more.
Make use of resources like GTmetrix and Google PageSpeed to check your website and see how it scores. Consider making changes to your website that will improve your scores.
Sometimes your web host will be a determining factor on how fast your pages will load. If you are on a discounted web host, consider investing in your business with a premium WordPress web host. WP Engine includes access to a content delivery network, object caching and other tools that will make your website load faster, perform better for your users and, therefore, boost your chances at SEO success.
![]() Lastly, mind your images. Did you know that we optimize every image before we upload them to our articles? There are premium WordPress image optimization tools and services available, however, we primarily use the PNG image format for our uploads and optimize them with TinyPNG, a free web-based service that is quick and painless.
Lastly, mind your images. Did you know that we optimize every image before we upload them to our articles? There are premium WordPress image optimization tools and services available, however, we primarily use the PNG image format for our uploads and optimize them with TinyPNG, a free web-based service that is quick and painless.
Did you transfer or install WordPress on WP Engine and need to figure out how to configure your site to restore the email functionality? We touched on this in our WP Engine review, however, we thought we’d create a separate guide for those that have already made the switch and in panic mode because they aren’t getting their contact form or comment alert messages.
We faced this exact scenario, hit up Google Search, spent hours in research and testing, and then we figured out this solution which worked the best for our needs.
We recommend Easy WP SMTP because it works 100% of the time for us and our clients. We’ve tried 5 plugins to accomplish this task and this plugin did the job perfectly, every time.
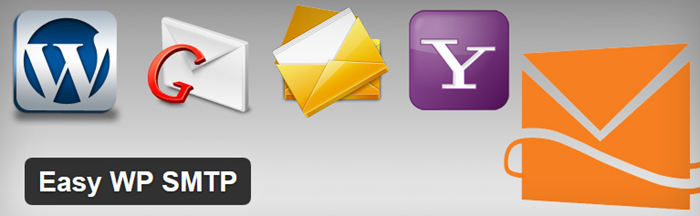
Click Here to Download or Review Easy WP SMTP
We only work with the best and in this case, the best is Google Apps for Work. You can register your account and try their service free for 30 days to make sure it is a good fit for your needs.
The best part about Google Apps is it uses the familiar and popular Google Gmail service to deliver your emails. This means, you can configure your domain email just like you can with Gmail, including forwarding, signatures, filtering and, of course, take advantage of their powerful spam filtering features.
The cost is $5 per month or $50 per year for one user.
Have multiple emails? Don’t panic. You can setup email aliases with your Google Apps account so that all of the emails are delivered to a single account. If you need more than one account / user, you can setup additional accounts for the same $5/$50 charge.
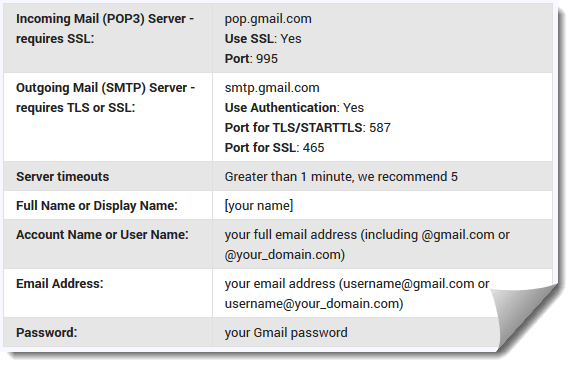
Used to using POP3? So are we. Here’s how to enable POP3:
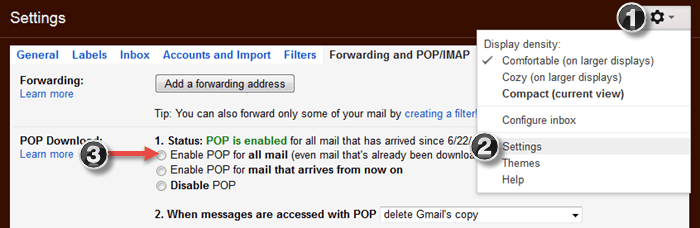
Now, go into your email client and setup a new account. Popular email clients like Thunderbird will auto-configure your account for Gmail, but if you need the manual settings to use, here they are:
Once you have the plugin installed and you have your Google Apps configured, you now need to configure Easy WP SMTP to work so that it can send emails to you.
In your WP dashboard, go to Settings > Easy WP SMTP and you will find the screen we show here.
If you decide to use Gmail, take advantage of the settings that work best for us in the screenshot we provided to the left.
Once saved, use the “Testing and Debugging Settings” section on this same page to send yourself an email to make sure everything is working correctly.
That’s it! Now you’ll receive any messages generated from your WordPress website including any contact form submissions, WP upgrade alerts, new comment alerts and more.
If this guide helped you, please leave us a comment and let us know. Of course, consider sharing this on social media and your website to help support us.
Are you having a problem with using /%category%/%postname%/ as your permalink structure when attempting to remove the /category/ base? As of the time of this guide writeup, it is still a problem in WordPress 4.2.1 that has dated back to WordPress over 8 years ago according to our research.
If you take advantage of a little hack in your permalinks by adding a . under category base, you may notice that your page 2 and beyond will show up as a 404 error. That’s not going to work, so you have a few options.
There’s an older free plugin available to correct this called WP No Category Base.
Simply install that plugin then go to Settings > Permalinks and remove the “.” from the Optional “Category base” area and you are golden. There’s no additional configuration page or settings that you’ll have to mess with.
 Note: This plugin hasn’t been updated since July 29th, 2012 at the time of this guide, yet, if you read the plugin reviews, you’ll notice that people are still using and recommending this plugin for those having this 404 issue with using a category permalink structure but removing the /category/ out of their URLs.
What’s really nice about this plugin is the fact that it will also redirect 301 the old /category/ links to the URL structure you want to use.
Does this fix your problem? Leave a comment below and let us know.
Genesis and Thesis are two of the most popular WordPress Framework systems. Genesis was developed by StudioPress and Thesis was developed by DIYThemes. These two developers are highly respected and they also developed several plugins available to their customers. Here are just a few of their best membership plugins.
We found the following plugins available for StudioPress Genesis framework customers.
We found the following plugins available for Thesis:
There are a lot of membership plugins to choose from either for Genesis or for Thesis. Genesis has an advantage of having several plugins available that are also developed by StudioPress which means that when StudioPress creates an updated version of Genesis, all these plugins will become compatible to the new version. As for Thesis, there are countless third party developers offering great membership plugins that you can download and easily install.
Choose the plugins you think would make it easier for you to manage your WordPress sites. It’s a must to get these plugins if you want to save time and energy in creating the codes yourself when you can do it in just a few clicks.