WordPress Guides Topic Index
Topic Index for "WordPress Guides"Need help with WordPress? This topic section of Top Five Advisor lists all posts that have been tagged as a WordPress guide to help you learn WordPress quicker.

Need help with WordPress? This topic section of Top Five Advisor lists all posts that have been tagged as a WordPress guide to help you learn WordPress quicker.
One of the most frequent questions we receive in our client work is about WordPress.com versus WordPress.org. Specifically, which version do I need? Why is one better than the other? What are the pros and cons of each system? What do you recommend?
Both systems, WordPress.com and WordPress.org are confused frequently. In this WordPress guide, we will go through both systems so that you will have a full understanding of each system to help you make an informed decision about which system is right for you. We want you to feel confident in your decision so if you have any questions at all, please feel free to ask in the comments section at the bottom of this guide.
 What is WordPress.com? The WordPress.com website is a commercial site that allows you to create and host a site for free. It includes the ability to use your own domain name, they provide the web hosting for you and they offer add-ons to enhance your experience.
If you do not have a domain name, your website will use a subdomain on the WordPress.com website similar to https://tygrscott.wordpress.com where tygrscott is your username you select during the account creation process.
WordPress.com runs on the WordPress.org software which is important to understand. The WordPress.com website is simply a hosted solution that runs the WordPress content management system, however, if you choose WordPress.com, you will be locking yourself into a set amount of themes, set amount of available plugins and no way to customize your theme PHP files to enhance your website. The system, put plainly, is locked down.
WordPress.com Pros
WordPress.com Cons
Once you have setup your free website, you’ll notice in the backend that they have a “Store” option which includes enhancements to the free plan which you should be aware of. Most will setup their website, spend months writing content and then they will find out that they will need to pay in order to access certain features. Let’s go over these enhanced plans now:
As you can clearly see, the easiest way to setup a website isn’t always the best way to go. At one point or another, you will need to upgrade your plan to enable certain features that are blocked on the free plan. Whether you need to add a domain name, remove ads, upgrade to a professional theme, or heck, customize the theme to your liking, you’ll have to dig out your wallet.
Remember, with WordPress.com, your content is subject to their Terms of Service. If they designate your content to be spammy, includes threats, uses any form of spammy links to drive traffic, they find your content misleading, your site generates content via automated methods and many other reasons, your site will get shut down.
By submitting Content to Automattic for inclusion on your Website, you grant Automattic a world-wide, royalty-free, and non-exclusive license to reproduce, modify, adapt and publish the Content solely for the purpose of displaying, distributing and promoting your blog. This license allows Automattic to make publicly-posted content available to third parties selected by Automattic.
The above quote is taken right from their Terms of Service as well. Your content is not under your full control like it would be if you hosted your own WordPress website. Additionally, WordPress.com includes a reblog feature that allows any WordPress.com user the ability to repost your content on their website.
 What is WordPress.org? An open source content management system that powers 22% of the Internet now including T5A.com. WordPress.org is the website you visit to freely download the latest version of their software including installation files.
Almost all of the guides and tutorials for WordPress on TopFiveAdvisor is based on the WordPress.org software that is installed on your own web hosting provider. Many web hosts include access to an automated WordPress installer which means WordPress on your own web hosting is about as easy as WordPress.com. If you happen to have a higher quality VPS hosting service that doesn’t offer a WordPress installer, you can use our installing WordPress manually guide.
WordPress.org Pros
WordPress.org Cons
If you are just getting your feet wet, don’t care about making money from your website and just want to setup a quick personal blog, your choice is best with WordPress.com. However, considering all the fees you’ll likely face as you get more serious with your website, there may come a point where you’ll wish you started with your own hosted WordPress installation.
Therefore, for the majority of viewers who are unsure, we highly recommend starting with the solution that gives you much more freedom, far less hidden costs and you are in full control of your content. The clear winner is WordPress.org. Of course, besides your web hosting, you’ll still need a domain name from GoDaddy (that link offers you their best domain registration discount) to use with your WordPress website.
Ease of Use Factor: Whichever you choose is essentially the same as far as creating your content. Since WordPress.com uses the same software that you download from WordPress.org, you won’t have a different experience for the most part. The only difference, as we’ve discussed, is the fact that you’ll need to do additional research about which plugins and themes to use. Remember though, that research and testing is what makes WordPress.org magic because you are in full control.
Did we miss something that you love about WordPress.com or WordPress.org? Be sure to leave a comment below and let us know. Of course, please consider sharing this guide on social media (sharing options below), in email, or with a friend. We’d appreciate your support!
Many people that want to start using WordPress on their web hosting account are lost because they either have a web host that doesn’t offer an automated script installer like Softaculous or Fantastico, or they have a type of hosting such as VPS Hosting where these automated systems add an unnecessary extra monthly cost to their hosting bill (especially if they are using their VPS for private use).
Below, you will find a high-definition video (1080P) that will walk you through the entire process of setting up your WordPress to work on your web host. Even if you do not have cPanel and instead have an in-house or Plesk control panel, you can use this video to guide you along.
Did you know that InMotion Hosting includes a free WordPress setup with your web hosting order? See our in-depth InMotion Hosting review and click here to order. During the last step of your order, check the radio button to “Install WordPress” and you can skip this guide entirely!
 We record our videos in full 1080P resolution. To enjoy the full experience, click the icon shown in the image to the left to maximize the video during playback.
Below, you will find the steps to setup your WordPress manually using cPanel as explained in the video above. We like to provide a textual guide as well as video to cover both types of learning methods (we all learn differently!). I like to use the cPanel file manager to upload the files to the server because you just need to upload one file and then extract the files on the server. It ensures that all files are uploaded correctly, ensures zero corruption during the upload process and is the most fool-proof method I’ve found.
The first thing you’ll need to do is download WordPress. From that page, click the blue “Download WordPress” button to download the latest version. Be sure to download the file to a location you can remember such as the Windows desktop.
Windows 7 and higher include native support for zip files. You can double click the file and use the “Extract all files” button in Windows explorer or if you have software such as WinZip or WinRar, you can simply right click the zip file and extract as I show in the video.
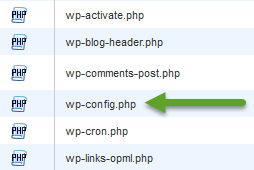
Now that you have the files extracted, you’ll want to rename the wp-config-sample.php file to wp-config.php. Once renamed, open the file in a text editor such as notepad.
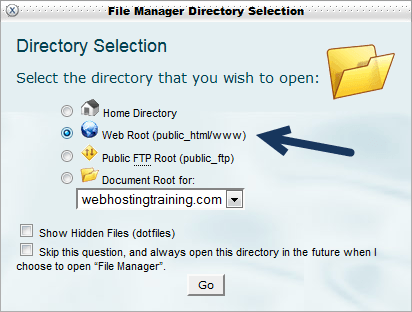 Once logged in to cPanel (reference your welcome email or get hosting from our web hosting review section), you’ll want to find the button labeled “File Manager” and open that. In the popup, Start from “Web Root (public_html/www)” and click the “Go” button.
In the actual file manager, find the “Upload” button. Click that and then “Browse” to your downloaded WordPress file from step 1. You should now notice on the bottom right of the screen, a progress bar shows the file being uploaded from your computer to the server.
Once the file is uploaded, return to the file manager and click the Refresh button. Now you should see the WordPress zip file uploaded to your website. Simply right click the file and “Extract.” Follow the prompts and it will extract the file onto your server.
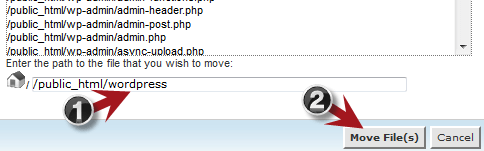 With the files extracted, you will be left with a “wordpress” folder with all of the files necessary to run WordPress inside. Since you will not want your website to be http://www.mywebsitehere.com/wordpress/ you will want to move these files to the main root. So, double click the wordpress folder and click the “Select All” button. Once all files are blue/selected, find the “Move File” button which will bring up a screen similar to the one above.
Congrats. You have now uploaded and placed all of the files required to run WordPress on your web host! Using this method of uploading ensures that no files are corrupted or skipped because we didn’t upload each individual file separately via FTP.
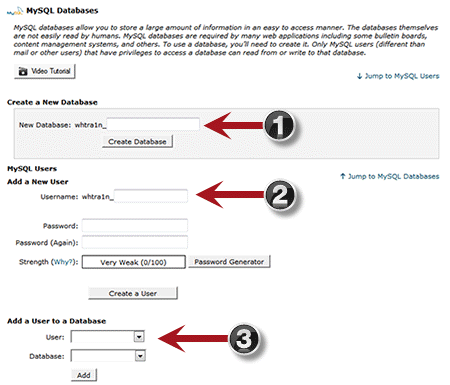 Now we need to go back to the file we opened in our text editor from step 3. With it open, return to cPanel and find the “Databases” section and click the “MySQL Databases” button.
The screenshot to the left has been edited to only show the sections you should be looking for. Referencing this screenshot:
The final step to your wp-config.php editing is to add the authentication keys and salts which will help secure your WordPress installation. Go to the WordPress salt webpage and it will generate unique phrases automatically. Just copy all lines to your clipboard and replace the 8 define lines with the content in your clipboard.
Save the wp-config.php. You are done editing this file.
 The final step is to upload your wp-config.php file to the server. Go back to the cPanel control panel, click File Manager (location Web Root again), click Upload, click Browse, select your newly saved wp-config.php file and begin the upload.
After the file is uploaded, return to the file manager, click refresh and verify that you have a wp-config.php file located along with your other WordPress files as shown in the screenshot.
Now your WordPress should be ready for install. Visit your website and you should see a language selection option. Click your desired language, click the blue “Continue” button and finally, fill out the site information including Site Title, login username, login password, your email address and make sure the check box “Allow search engines to index this site” is checked. Simply click “Install WordPress” and the setup will configure your database and prepare your site for first-time use.
Congratulations! Your WordPress site is now ready for use. After clicking “Install WordPress,” you’ll be taken to the WordPress Admin Dashboard where you can start configuring your website, add posts, add pages and much more. You may also visit your main website URL and verify that your site is showing default content. At the time of this review, the setup uses the default “Twenty Fifteen” theme.
In the coming weeks, months and years, we will continue creating guides to help you get the most of your new WordPress website. We’re going to show you how to change WordPress themes, add WordPress Plugins, teach you how to configure your WordPress and much more.
What would you like us to cover here? How did you like this guide? Let us know in the comment section below!
In the past, people would browse over the internet using their PCs or laptops. Nowadays, people can browse the internet with other devices like tablets, smartphones, and others. When using such devices, the web pages that were not designed for their resolution won’t come out looking like how they’re supposed to look. It’s either the page would be too big or the resolution is just not as appealing. This became a problem to many site owners thus Responsive design in WordPress themes were created and it’s now becoming a fast trend.
Simply put, when a site claims that it has cross browser compatibility that simply means the site supports all kinds of browsers whether they are for PC, for Kindle, an iPad or any other devices. WordPress is one of the most preferred blogging tool and it is now equipped with Responsive Design themes to let their users enjoy cross browser compatibility.
The goal of web developers is to keep their visitors happy while browsing their website. When the site is only compatible to one particular browser then the developer will lose all prospected visitors using other browsers and that’s not a good thing. There are many browsers being used such as Internet Explorer, Firefox, Safari, Google Chrome and many others used for mobile devices. It’s the responsibility of web developers to ensure that their site will look identical no matter what browser visitors are using.
If a WordPress theme design is said to be “responsive” that means that all the contents and the layout responds to the screen that views it. If a user views the page with a PC or with another device, the site with a responsive design must automatically adjust to the screen whether it’s on a computer monitor or a small mobile device. The aim is to give the best display possible for any type of screen or browser.
Since there are many responsive WordPress Themes available, you must know what to look for when making the selection. There are themes that you can get for free but the majority of these responsive design WordPress Themes are available at a price. If pricing is a big concern for you then you may narrow down your selection to the free themes available or those just within your budget.
Whether or not you are willing to pay for your Responsive Design WordPress theme, you still must evaluate the design to know what you are getting. It’s important to find the right one that fits your needs and wants. First of all, you must know how to check the design if it’s supported with other devices or browsers. There are tools available online that you can use such as the Browsershots, Browser Sandbox, Resizer, Adobe Browserlab and many others. By checking the design’s adaptation to different sized browsers let you see their weak points.
Menu handling and video handling are also important when making your choice. Menus most often are affected when the size of the screen has changed. When the theme is not responsive, the menu can break in different and weird places and the user may not be able to use the menu properly. In looking for a responsive design, make sure that it has the capability to make the menu adapt to whatever device or browser is used. Video handling is also important if your site has embedded video. This is particularly complicated if you create your own responsive designed site from scratch. Find a particular responsive design WordPress theme that can handle video embedding if this is one of your special needs.
There are other factors that you should consider such as the content hierarchy and ad display. Many website owners run ads on their website so they could earn especially from Google Adsense. It’s important to have a strategy on how you want to go about with these considerations. With content hierarchy you can set priorities to the real content and keep side bars hidden if that is what you prefer. Just make sure you check your site on the tools listed above to see if you are already satisfied. As for ads, you can opt for an alternative advertising when your site is viewed on mobile devices or simply turn advertising off.
As the way technology is going, it is inevitable that all themes will eventually have responsive designs. As an online publisher, it is your goal to have several versions of your site to accommodate more users using different browsers or mobile devices. The best way to get this is by getting a Responsive Design especially for WordPress themes to make your life easier. It will also make it easier for the readers to enjoy your site.
For small business website owners, it is essential to find the right theme framework that will help boost your business. Currently, the two most powerful and popular theme frameworks available for WordPress are the Thesis Framework and Genesis Framework. These frameworks are great and easy to use but you must choose one and stick with it as it’s very difficult to change your framework especially when your site is already established. You can get a penalty from Google when you make the switch and frameworks have different HTMLs so switching is highly complicated.
It is important to note that both the Thesis and the Genesis platforms are from well respected developers. Studiopress is the developer of the Genesis Framework while DIYThemes developed Thesis. With that said, you know you can never go wrong with any of the two and your choice will be based only on your preference and need.
One of the top considerations of website owners when looking for a premium wordpress theme is its price. If the price is too high many would run and hide. With Thesis and Genesis, their prices vary and each has its own pros and cons.
Starting with Thesis, the price is at $87 for its personal option and $164 for the Developers. With its Personal Option you are allowed to use it on your personal website with 1 development center that is localized. This option is great for beginners who only intend on using it with just one website. The Developer’s Option packs more as you can use the framework in as many sites as you want provided that these are your own personal or business sites. If it’s for a client then you are to pay an additional fee. The price for the fee can go as low as $32 per website if you buy 10 licenses. The Developers option is great for personal use with multiple websites but can get a bit more expensive when you use it for your clients. For 10 licenses at $32 each that already adds up to $320 plus $164.
With Genesis, the Framework alone costs $59.95 but if with theme then it’s at $79.97. Their Pro Plus is priced at $299.95. The $59.95 price allows you to use their Framework to as many sites as you want whether it’s your own personal websites or for your client. The $79.97 package option lets you use their Framework inclusive of a child theme to as many websites you want. Their Pro Plus Package costing $299.95 lets you use their Framework and all the themes that are also developed by StudioPress. The number of child themes continues to grow so you will get a lot of options to choose from. The big advantage is that these child themes developed by StudioPress are yours for free. In comparison, the Pro Plus Package is cheaper than the Developer’s Option if to be used with several clients.
To compare Thesis Vs Genesis in terms of their base designs is easy as each one has their own style. With Thesis you can choose from the skins available while Genesis calls these base designs as child themes. DIYThemes don’t offer skins so you will have to get them from a 3rd-party developer and the selection are plentiful. Some skins are available for free while many are priced from over $30 to as high as over $80. There are memberships available from these developers so you can get a cheaper rate for multiple skin purchases.
Child Themes are also made by StudioPress so you are not dependent on any third party developers to get your theme. The big advantage to this is that when StudioPress updates the Genesis Framework then all the child themes will already be supported. There are many Child Themes available for your selection but if StudioPress’ selection isn’t enough for you then they also have a marketplace wherein you can purchase Child Themes from other developers that are approved by StudioPress. The price for each Child Theme is $24.95.
The customer support of Thesis vs Genesis customer support is practically at par with each other. That’s because both are offering great support so customers are assured they won’t end up spending days to get a response from the team. Both have their support forums which is great as you can get answers from their representatives and from other webmasters as well.
If there’s one advantage Thesis has over Genesis in terms of customer support is with their online manual. You can even copy some of the snippets that you’d want to share in your websites. Genesis does not have a user manual.
All in all, Thesis and Genesis deserve their spots as the two most competitive Framework Systems for WordPress. Other similar Frameworks can’t compare. You can never go wrong whether you choose Thesis or you choose Genesis. What’s important is that when you choose one you got to make sure you already made up your mind as you have to stick with it until the end.
Guide in choosing the right Framework:
Choose Genesis – Click here to visit their site
Choose Thesis – Click here to visit their site
Your budget and need are really the two factors you have to consider when making a selection. By answering the guide listed above, you won’t go wrong in making the right choice for you.