WordPress Guides Topic Index
Topic Index for "WordPress Guides"Need help with WordPress? This topic section of Top Five Advisor lists all posts that have been tagged as a WordPress guide to help you learn WordPress quicker.

Need help with WordPress? This topic section of Top Five Advisor lists all posts that have been tagged as a WordPress guide to help you learn WordPress quicker.

One of the best ways to enhance your website to attract return visitors is to add social media integration into your website. Besides integrating your social media with WordPress SEO, you can also add some really nice eye-catching widgets to your WordPress sidebar that will help you increase follows, likes and social commenting.
Heres’s our choice of 5 social media widgets that you can implement on your website. Keep in mind, the more you add, the longer your website will take to load, so pick and choose your favorites but mind your visitor, don’t use them all, that’d be overkill. Instead, choose one or two and then add some social media icons or links to your other social media pages you’d like people to visit.
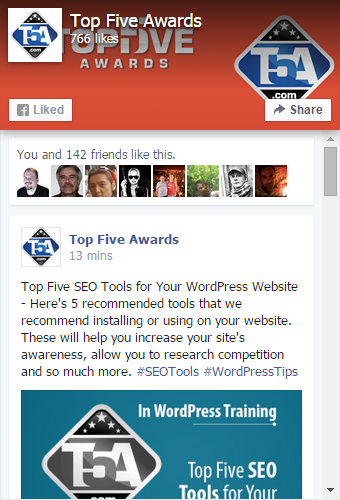 This plugin is brand new at the time of this writing and replaces the now deprecated Facebook Like Box. You can use the code they provide as a “Text” widget on your sidebar to display your Facebook page to all of your visitors.
What’s nice about this is there’s a “Like” button and a “Share” button that will encourage people to like and share your page to others.
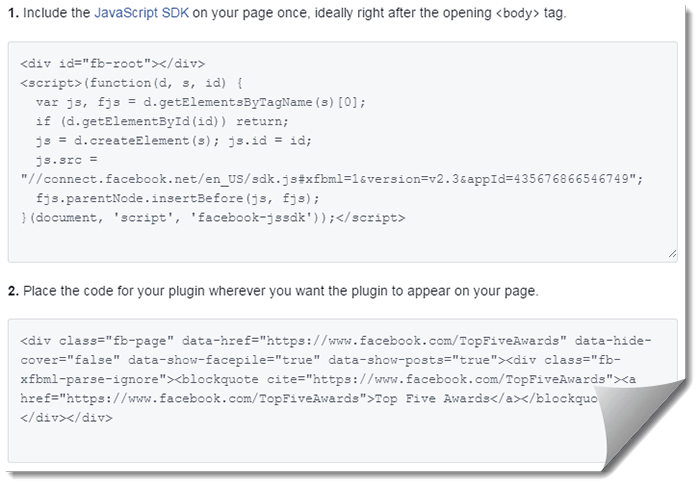
Visit the Facebook Page Plugin site, enter your page’s URL and then begin customizing how your widget will look on your website. You can customize:
– Width: 280x to 500px
– Height: 130px or higher
– Hide or show the cover photo (screenshot shows it)
– Hide or show friend faces (screenshot shows it)
– Show page posts (screenshot shows it)
Once you customize the plugin, then click the Get Code option and you’ll get the code you need to get this to show up on your website.
Enter the first code into your customized theme or child theme header.php file or look for a theme options on your dashboard since some themes come with a way to enter code into the header. An example of this is Thrive Themes which allows you to go to Thrive Themes > Thrive Options > Analytics / Scripts > Header Script box.
Once you have that added, you’d then add the second code as a text widget. Go to Appearance > Widgets. Look for a sidebar section then drag and drop the “Text” widget to that area. From there, you’ll get a box to enter the code in.
Log in to the Twitter account you want to setup a widget on then go to the Twitter Widgets page then click the “Create new” button. From there, you’ll see this configuration screen to begin setting up your new site widget:
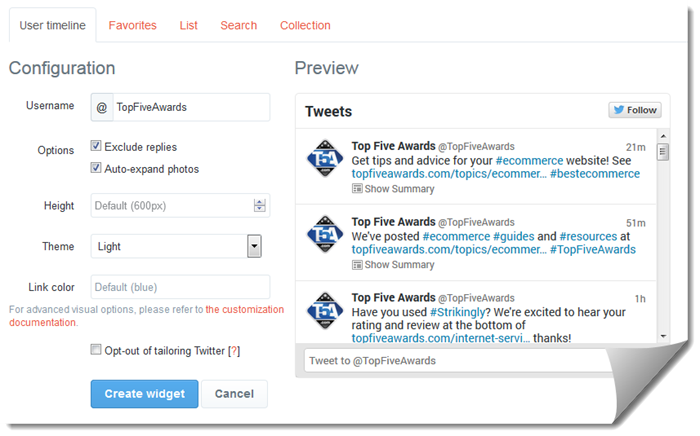
From here, notice all of the options available starting with the tab area. They are as follows:
Once you make your decision and customize the settings, click the blue “Create widget” button which will cause a message Your widget has been created along with a small code to copy and paste into a text widget as explained in the Facebook Page Plugin instructions above. You won’t need to add a special code to the header section of your website with this code.
![]() Another great social media widget integration is the Google+ Badge. This badge is similar to the Facebook Page Plugin except it doesn’t allow you to display your most recent posts. It allows people to add your Google+ page to circles and also to +1 the page. This feature was also mentioned in our Google+ Beginner’s Guide and makes yet another appearance here.
Another great social media widget integration is the Google+ Badge. This badge is similar to the Facebook Page Plugin except it doesn’t allow you to display your most recent posts. It allows people to add your Google+ page to circles and also to +1 the page. This feature was also mentioned in our Google+ Beginner’s Guide and makes yet another appearance here.
Head on over to the Google+ Badge page and wait a few seconds for the page to fully load. You’ll miss the badge creation page if you impatiently scroll down the page, give it a few seconds and the badge creation options will appear right on the top of the page.
Here’s the features you can choose from and an explanation:
Under advanced options, we recommend enabling “Dynamic” because this will enable the dynamic load feature which will improve your initial page loading time.
Once you are done, you will notice below the badge is a snippet of code that has been automatically generated for you. There’s two parts of this code just like Facebook’s code. Place the first part in your theme’s header.php or custom header script box (if available) and place the second part in a text widget.
 If you create video and upload them to YouTube, a great way to raise awareness and subscribers is to use the YouTube subscribe button. Head on over to the subscribe button page and scroll down until you see “Configure a button.”
For the channel name or ID, you will want to enter in your custom channel name or use your full channel ID name. We had a little difficulty getting our Top Five Advisor channel to work, but figured it out. So if you have a channel that was created from a Google+ page or from another source, go to your channel’s main page and click on your channel name. From there you can get the real channel ID from the URL as shown:
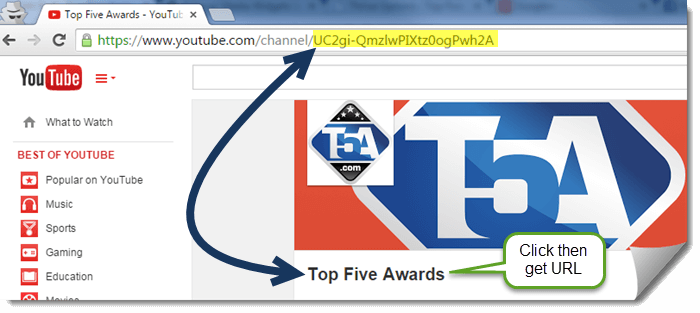
Anyway, once you configure the YouTube button with Layout setting, Theme setting and whether or not it shows Subscriber count, you’ll see the code that you can enter into a text widget. For this code, you can either enter the entire code into the widget or place the javascript part of the code in your theme’s header area which is shown below.
[html]<script src="https://apis.google.com/js/platform.js"></script>[/html] If you run a photography driven website or offer promotions and various related content, you may want to add Instagram as a sidebar widget (or take advantage of other widget areas on your theme).
Since Instagram doesn’t offer a direct widget solution, we’ve chosen SnapWidget as your Instagram solution. Head on over there then click the blue “Get Your Free Widget Button.” From there, you’ll get a large amount of configuration settings that you can use to make best use of this widget on your website.
Enter your username or favorite hashtag and then select the widget type that you’d prefer. We recommend selecting one style then click the Preview button at the bottom to see how it looks. The most popular style is the “Grid” layout because it shows just the photo and offers excellent options that will help you get it looking exactly the way you want.
For the sidebar widget area, we recommend the 125px thumbnail size and a 2×2 layout. Another option is to go with a larger thumbnail size like 250px and choose 1×2 or 1×4 so that your Instagram images are stacked vertically.
Other options include the background color, photo padding (space between images), hover effect, social sharing buttons that appear at the bottom of each image, and the ability to enable “responsive” if you have a responsive WordPress theme.
That’s it for our recommendations. Is there a widget that you use on your website that failed to make our list? Comment below and let our readers know!
Have you ever tried to use the Tag Cloud widget in your WordPress but it appeared way too messy to use? Here at Top Five Advisor, we have over 100 tags that we have setup and we’re just getting started. Unfortunately, the default display of the tag cloud widget is to show all of your tags and increase in size depending on the tag use on your content.
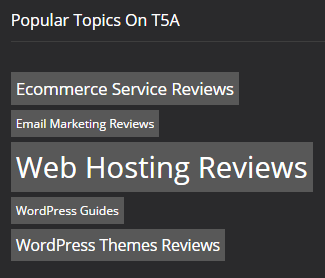 You may notice that we have the following screenshot on the left displaying on the bottom of our website and you may be wondering how we did it.
Thankfully, all you need to do is make a quick edit in your functions.php file and you’ll be able to customize how many tags will appear in your widget area.
Simply change the number 5 on the “$args[‘number’] = 5;” line and the number you set will be the total tags allowed to be shown in that widget area, whether it is in your sidebar or footer areas.
Here’s the code snippet that you need to add to your functions.php:
// Limit Tags in Tag Cloud Widget
add_filter('widget_tag_cloud_args', 'tag_widget_limit');
function tag_widget_limit($args){
 if(isset($args['taxonomy']) && $args['taxonomy'] == 'post_tag'){
  $args['number'] = 5; // <-- Tags Limit
 }

 return $args;
}
What this will do is show your most popular tags in the tag cloud depending on the number you set. In our case, the screenshot in this post represents the 5 most popular tags as of the time of this posting.
One of the greatest ways we’ve found to discourage spammers on our site is to remove the URL field in your WordPress comment section. Thankfully, this is a rather painless process that requires a small plugin or functions.php edit.
Here’s the functions.php code snippet:
// Remove URL Field
add_filter('comment_form_default_fields', 't5a_remove_url');
function t5a_remove_url($fields) {
	if(isset($fields['url']))
	unset($fields['url']);
	return $fields;
}
Once you’ve added the following filter to your functions.php, you should notice that the URL field permanently disappears from your commenting area of all posts and pages that allow WordPress comments. This one is really awesome because your website will not even print the URL field in your posts and pages, blocking spambots from even attempting to submit comment spam.
Although we attempt to limit our plugins whenever possible, we do realize that not everyone is comfortable with editing their functions.php or the child themes setup requires should you decide to update your theme to the latest version.
Install the Hide-n-Disable-comment-url-field plugin and you are off to the races.
In your dashboard, go to Plugins > Add New. In the search box, enter Hide-n-Disable-comment-url-field as your search query, then click search. From there, this plugin should be the first plugin in the list.
Install the plugin as usual, activate and you are done.
To verify the changes are working, visit your WordPress website from a different web browser that is not currently logged in. Navigate to a post that is currently accepting comments and see if you have the website field.
Now that you’ve been using your WordPress website, you are probably looking for ways to extend your website to add additional functionality and features. One of the first steps you should make is adding an SEO plugin and to take advantage of SEO resources that will potentially increase your website traffic.
One of the biggest sources of traffic to your WordPress website will likely be search engines. Unfortunately, the default WordPress configuration will not allow you to maximize your chances of ranking better in their search index.
Below, you will find the top five resources that we recommend you to use and implement as part of your overall SEO strategy.

Plugin Page – Joost de Valk WordPress SEO Page
The primary goal of most SEO plugins is to do one thing, to allow you to optimize your content title tag and meta description so that search engine spiders will have a greater understanding of what your content is about.
WordPress SEO goes way above and beyond that by allowing you to optimize your tag, category, custom post type, archives and pages as well. The thing is, this plugin does so much more, things you may not be expecting, that will help you drive more traffic to your website. For instance:
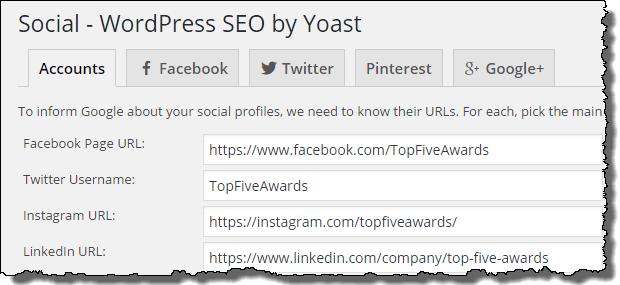
How about a full social media enhancement that allows you to inform search engines about your social media pages and profiles? Facebook Open Graph is support, Twitter cards are supported and specific Google+ meta data is also supported. If you’ve seen our Twitter account, we don’t even need to explain how awesome these enhancements are:
Interested in #ThriveThemes? See our in-depth Thrive Themes Review written yesterday here: http://t.co/DUpK861vnD
— Top Five Advisor (@TopFiveAdvisor) May 1, 2015
Other features include XML Sitemap generation (easy spider food for engines), RSS optimizations, breadcrumbs, import and export functionality to convert to or from another SEO plugin and lastly, the awesome page analysis feature that occurs on any page or post. The analysis will let you know how your SEO for your target keyword is, will show you how many characters left in your meta description and will even warn you if your title/description text is too long. All of it, great stuff and we use it every day.
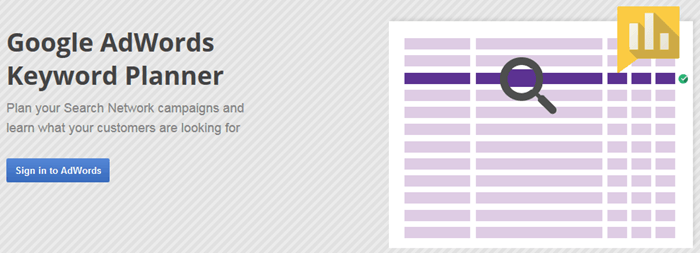
One of the most important things you can do for your niche and website is to do your research into your market. The Google keyword research tool is awesome for Google AdWords users (paid traffic) but it can also be awesome for people not planning to advertise.
With this free tool, you can search our your niche and get keyword ideas based on search volume, number of results and it will even show you the competitive scope of the keyword. Dig around in there, find some low hanging fruit and make content around it.
We strongly recommend incorporating the Google Keyword Planner in your content marketing SEO strategy.
 Screaming Frog SEO Spider Page
Screaming Frog SEO Spider is an awesome spider and website crawler tool that you run as software on your PC, Mac, or Ubuntu. The software will crawl your entire website and generate a list/report that you can use to find broken links, 301 redirects and other problem areas on your website.
This tool is especially useful if you’ve changed your permalink structure and need to quickly find posts that reference old URLs that need updating. Although this can be a tedious manual process, there is a quicker way with PHPMyAdmin export, find/replace and upload which you could certainly outsource to someone who can do this for you.
We found this tool to be invaluable when we converted our Top Five Advisor website to WordPress and needed a full site structure spreadsheet that we could use to redirect old links. After that was completed, we decided to switch our URL structure again to take advantage of the WordPress tagging system which required another round of link fixing.
Alternative: Broken Link Checker Plugin. This plugin will scan your website for broken links on your website that is totally free, however, this plugin is known to be extremely resource intensive on your web host which can lead to performance issues or a message from your web host to discontinue use. A popular WordPress web host WP Engine has outright banned its use.

Once you start adding a ton of content to your website, you might be wondering what your competitors are doing to give themselves an edge on your website and the rest of their competition as well.
With SEMRush, you can research any website, get analytics and insights, discover competitors’ best organic keywords to target, discover backlink resources including referring domains, types and geolocation, find Google AdWords ad copy and budget, find search volume, discover additional competitors that are in your niche(s) and so much more!
Definitely give their free search from their main page a try. You’ll instantly learn things about your competitors with a few strokes on your keyboard and mouse clicks. Of course, when you start doing a ton of searches, you’ll eventually hit their free threshold that will prevent further searching until the next day.
 Wrapping up the top five best SEO tools to use on your WordPress website is the Google Webmaster Tools service. Using WordPress SEO, which was recommended above, you can easily integrate Google Webmaster Tools into your website which will begin tracking your visitors, your page views, your popular pages and much much more.
From your WordPress dashboard, go to SEO > General then click the “Webmaster Tools” where you can enter the code provided to you by Google’s Webmaster Tools. Once you complete this step, return to Webmaster Tools and verify that the code has been integrated properly.
From there, give Google a few days to collect data on your website and then return to see all of the awesome metrics and stats they provide you with.
It has been known for quite some time now that Google loves websites that are optimized for fast page load times and for mobile users, they recently launched a new algorithm that looks for websites that are mobile response and mobile friendly.
Regarding page load times, a lot of that comes down to the amount of plugins that add javascript and heavy code to your web pages, whether you use a content delivery network and about your web host as well. The last thing you want to do is load hundreds of WordPress plugins that make visual changes to your front-end because if you look at the source code, you are going to see a massive TON of javascript files that will end up making your site load slow and degrade the user experience. Remove plugins you do not use and remember, less is more.
Make use of resources like GTmetrix and Google PageSpeed to check your website and see how it scores. Consider making changes to your website that will improve your scores.
Sometimes your web host will be a determining factor on how fast your pages will load. If you are on a discounted web host, consider investing in your business with a premium WordPress web host. WP Engine includes access to a content delivery network, object caching and other tools that will make your website load faster, perform better for your users and, therefore, boost your chances at SEO success.
![]() Lastly, mind your images. Did you know that we optimize every image before we upload them to our articles? There are premium WordPress image optimization tools and services available, however, we primarily use the PNG image format for our uploads and optimize them with TinyPNG, a free web-based service that is quick and painless.
Lastly, mind your images. Did you know that we optimize every image before we upload them to our articles? There are premium WordPress image optimization tools and services available, however, we primarily use the PNG image format for our uploads and optimize them with TinyPNG, a free web-based service that is quick and painless.
Did you transfer or install WordPress on WP Engine and need to figure out how to configure your site to restore the email functionality? We touched on this in our WP Engine review, however, we thought we’d create a separate guide for those that have already made the switch and in panic mode because they aren’t getting their contact form or comment alert messages.
We faced this exact scenario, hit up Google Search, spent hours in research and testing, and then we figured out this solution which worked the best for our needs.
We recommend Easy WP SMTP because it works 100% of the time for us and our clients. We’ve tried 5 plugins to accomplish this task and this plugin did the job perfectly, every time.
Click Here to Download or Review Easy WP SMTP
We only work with the best and in this case, the best is Google Apps for Work. You can register your account and try their service free for 30 days to make sure it is a good fit for your needs.
The best part about Google Apps is it uses the familiar and popular Google Gmail service to deliver your emails. This means, you can configure your domain email just like you can with Gmail, including forwarding, signatures, filtering and, of course, take advantage of their powerful spam filtering features.
The cost is $5 per month or $50 per year for one user.
Have multiple emails? Don’t panic. You can setup email aliases with your Google Apps account so that all of the emails are delivered to a single account. If you need more than one account / user, you can setup additional accounts for the same $5/$50 charge.
Used to using POP3? So are we. Here’s how to enable POP3:
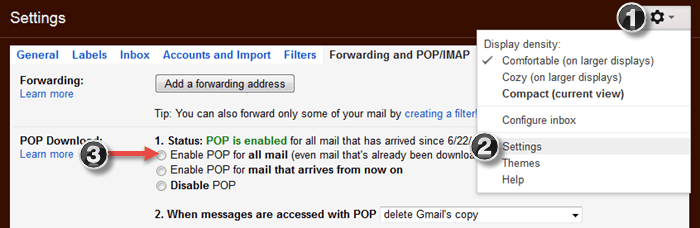
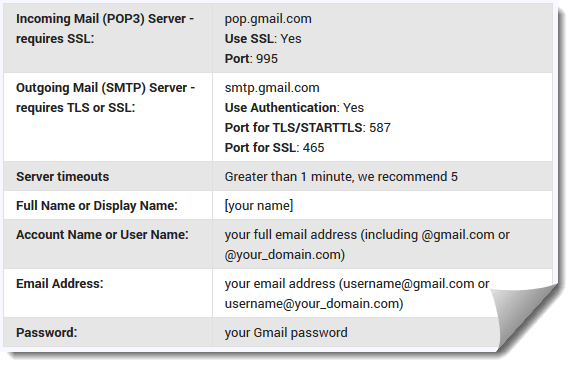
Now, go into your email client and setup a new account. Popular email clients like Thunderbird will auto-configure your account for Gmail, but if you need the manual settings to use, here they are:
Once you have the plugin installed and you have your Google Apps configured, you now need to configure Easy WP SMTP to work so that it can send emails to you.
In your WP dashboard, go to Settings > Easy WP SMTP and you will find the screen we show here.
If you decide to use Gmail, take advantage of the settings that work best for us in the screenshot we provided to the left.
Once saved, use the “Testing and Debugging Settings” section on this same page to send yourself an email to make sure everything is working correctly.
That’s it! Now you’ll receive any messages generated from your WordPress website including any contact form submissions, WP upgrade alerts, new comment alerts and more.
If this guide helped you, please leave us a comment and let us know. Of course, consider sharing this on social media and your website to help support us.
Are you having a problem with using /%category%/%postname%/ as your permalink structure when attempting to remove the /category/ base? As of the time of this guide writeup, it is still a problem in WordPress 4.2.1 that has dated back to WordPress over 8 years ago according to our research.
If you take advantage of a little hack in your permalinks by adding a . under category base, you may notice that your page 2 and beyond will show up as a 404 error. That’s not going to work, so you have a few options.
There’s an older free plugin available to correct this called WP No Category Base.
Simply install that plugin then go to Settings > Permalinks and remove the “.” from the Optional “Category base” area and you are golden. There’s no additional configuration page or settings that you’ll have to mess with.
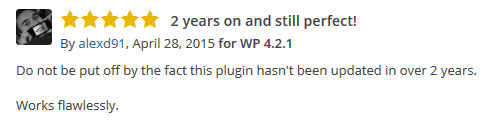 Note: This plugin hasn’t been updated since July 29th, 2012 at the time of this guide, yet, if you read the plugin reviews, you’ll notice that people are still using and recommending this plugin for those having this 404 issue with using a category permalink structure but removing the /category/ out of their URLs.
What’s really nice about this plugin is the fact that it will also redirect 301 the old /category/ links to the URL structure you want to use.
Does this fix your problem? Leave a comment below and let us know.
In our WP Engine review, we explained there is an easier way to migrate your files from your current web hosting provider to WP Engine besides the methods they explain in their migration checklist.
Above, you will find the video recorded by reviewer Scott Buehler that shows you exactly how to do this in cPanel. Thankfully, if you happen to be on a host that uses Plesk or any other control panel, they are highly likely to have a file manager that you can use to accomplish this same task.
The reason you want to compress your wp-content folder into a zip file is it guarantees there will be zero file corruption or missing files during your migration. If you have to download all the images and files one by one using FileZilla, you will have to carefully watch the status screen for red errors about file transfers not completing. If you see them, those will be files that will likely be missing or corrupt, not good.
 For those of you that have a cPanel web host, usually you’ll just need to add a /cpanel to the end of your domain name. If that doesn’t work, then head over to your web host’s control panel and find the cPanel access link from there to get where I started this video.
Once you gain access to the file manager, you simply right-click on wp-content and click the compress option as shown. Additionally, there is a “Compress” icon on the file manager toolbar should you need it.
Depending on the size of your website and your sites’ server speed, it will take a few seconds up to a minute to complete the process. After that, download the file from your server. upload it to WP Engine and you are good to go.
WP Engine wp-content Migration Instructions
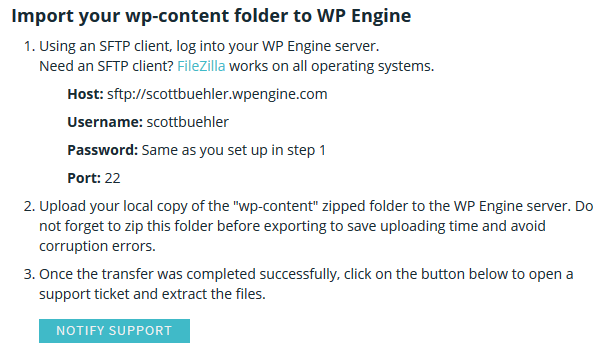
I briefly showed you how to download the file in FileZilla. It’s the same process to upload, simply login to WP Engine via your SFTP instructions and click and drag the file from the left panel (your computer) to the right panel. Once that file transfer is completed, click on the green Notify Support button in the migration checklist, as shown above, to alert WP Engine customer service that you file is ready to be extracted.
Hope this helps!
Now that you have your WordPress installed either using our tutorial on manually installing WordPress or our fully automated WordPress install method, the next step is to setup your WordPress settings so that your website will perform as you expect.
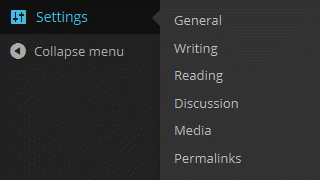 In this guide, we walk you through all of the default settings of WordPress and also cover the WordPress dashboard main screen. In the video below, we cover the general, writing, reading, discussion, media and permalinks settings and also go over why we make the recommendations that we do.
Keep in mind that these recommendations are what Scott Buehler recommends. If you believe your site will benefit from different settings, then do it! Setting up these settings now, although tedious and boring, will help you down the line because you’ll be able to focus on what actually matters, your content!
Since we are covering each setting section in detail, this video is much longer than the majority of our training videos, sorry about that.
Other options including configuring what day the week starts on and your preferred site language.
Post via e-mail is an interesting feature if you prefer to write your blog posts via email instead of using the WordPress editor. You’ll want to keep the email address you configure as secret so that other people can’t send it email and have their post appear on your website. For security reasons, I do not use this feature.
In this section, I go over my recommendations in the video which effects how people interact with your content (the commenting system).
Those are the main things you should consider updating. You definitely want to keep the emails enabled when you receive comments, that way you’ll be alerted when someone makes a comment so you can get into your dashboard and approve / reply to them ASAP.
Enable moderation so that you have full control over the comments that appear on your website. If you don’t manually approve comments and simply leave must have a previously approved comment on, a spammer can make several helpful posts to your website and then later return with a ton of spam that will automatically approve on your site. Just something to be aware of.
Another technique I use to prevent spam is to set the hold comment for moderation option to 1 link so that when someone makes a comment on your site, if they include even one link, they will wind up in the moderation queue. You only need to worry about this option if you decide to leave “” unchecked.
The blacklist is a neat feature because you can setup comment words, names, emails and IP addresses to automatically be marked as spam when received.
Avatars
This feature is awesome. If someone has setup a Gravatar with their email address, when they place a comment on your website, their icon will display along with their comment right on your website. For most users, set the maximum rating to G, set the “Mystery Person” Avatar and call it a day.
The default avatar icon will only display for users who have not setup a Gravatar for their email address.
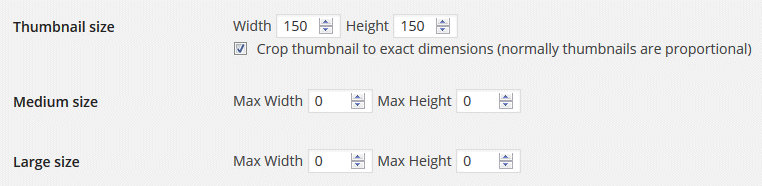
For most users, you can leave this page as is. Only if you need to change the thumbnail and other media sizes will you need to go in here and setup custom image sizes to fit your needs. When you install premium or custom themes, the authors will typically make use of their own image size settings anyway.
Organize my uploads – This option should be left unchecked, that way your post images will be organized by when you upload them to your website. Otherwise, you are going to end up with a massive single subdirectory on your site with thousands, even millions, of images in the same folder. This can and will cause problems for your server down the road.
This is arguably the most important section you’ll need to update. WordPress allows you to customize the web URLs on your website so that they are more eye-catching and friendly to your users. Again, we will use our blog here to show how important this is.
Which one looks better to you?
or https://www.t5a.com/wordpress/?p=132
When sharing your URL around the web including social media, the first URL actually tells your users what your content is about whereas if they saw the default opton (the second option above), they would have no idea what your content was about or, more importantly, if they want to click that link and see what you wrote.
Our recommendation is to set this to “post name” so that your post name is used as your URL.
If you made it this far and have configured your website, congratulations!
Now that you’ve conquered the most boring part of setting up your website, now we get to move on to learning how to create content, how to change your theme and much more. It’ll be way more fun from here on out so congrats for getting this done.
One of the biggest hurdles people face when wanting to start their website is actually getting it started. There are thousands of people online willing to do it for you that cost more money than many people’s budgets and they end up frustrated, never to launch their dream project.
The first thing they will do is look for guides that teach people how to install WordPress manually which can confuse and frustrate them. They simply do not want to go through that entire process and look for an easier way.
In this guide, we’ll walk you through some of the easiest methods to install WordPress that we’ve found that have left people saying “Whoa, it’s that easy!?!” Yes, it is that easy. Let’s begin, shall we?
If you have no hosting yet and truly just starting out, you are in luck! What if we told you that there is a host out there that will automatically setup your WordPress with no effort on your end? All you’d need to do is order your hosting and click on a radio button that says “Install WordPress” and boom! Your brand new web hosting account will have WordPress automatically setup for you!
It can’t be that simple Scott Buehler, can it? Absolutely. Let me show you right now:
Around the 3 minute mark in this video, I begin to show you the entire ordering process with InMotion Hosting web hosting. On the very last page of the ordering process, you’ll find the “Install WordPress” option. As long as you don’t miss that, you are golden.
 Sounds expensive Scott. How much? This is the best part. If you use our site and link below to order, you’ll get over 50% off their normal pricing. This is an exclusive offer that we have because I spent years getting to know their staff and company. Take advantage of it now!
Your total price you will pay with no add-ons is just: $47.94 for a full year of web hosting. It’s absolutely crucial to understand that InMotion Hosting is not a discount cheap host out to cram as many customers on a server as possible making your site load slowly. Not at all, in fact, the price you’d pay without our link is more than double. Additionally, I use and trust their web hosting on several of my own projects.
 If you already have a web hosting plan, you may still be in luck to get WordPress setup and running with little hassle. Head over to your web host’s sales pages and look for mentions of anything that references an installer for the most popular Internet software. If you see that, you are in luck!
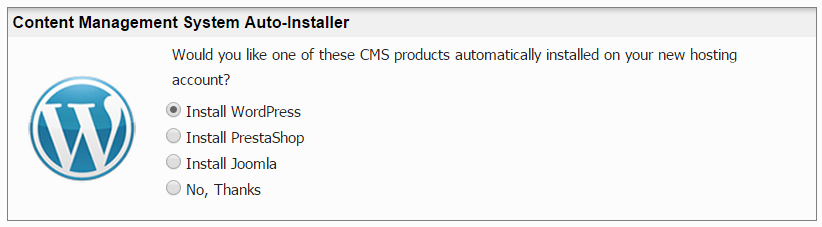
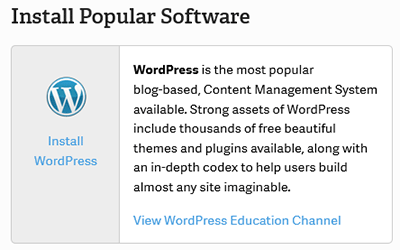
If your web host mentions this, they probably have a 3rd party solution in their control panel called Softaculous or Fantastico. Both of these solutions will install WordPress on any domain setup on your web hosting plan in a matter of a couple clicks. The best part? You can take advantage of these services for free.
Once you find the Fantastico or Softaculous icon on your control panel (after logging in), you simply click that and you’ll see something similar to the image I shared with you in this section. Simply click the Install WordPress option, fill out your new blog’s information and let the installer do everything for you.
Examples of popular hosts that offer this type of free service include Web Hosting Hub review, A Small Orange Review, SiteGround review, HostGator Review and Bluehost Review. These are just a small sampling of hosts that offer an auto-installer for WordPress that you can take advantage of.
Lastly, if you have your heart set on a host that does not offer any of the solutions we’ve talked about on this page, we will do it for you! As long as you order your web hosting from our site, we will gladly setup your WordPress for you for no additional cost. All you need to do is copy and paste your hosting order receipt to us in our contact form and request WordPress setup and we will take care of everything for you.
People that will typically fall into this category have chosen a much higher quality web hosting solution such as a VPS Hosting or even a dedicated server and they didn’t opt to pay monthly for Softaculous (which can be extremely expensive over the years of your plan).
Questions or Comments?
If you have any questions or comments about the process of getting WordPress setup for you, please leave it below. Scott is monitoring this post for any questions and will respond personally to anything you need.