WordPress Training Category Index

WordPress Training Category at Top Five Advisor

Category Index for "WordPress Training"

You’ve found the WordPress training resource site provided by Top Five Advisor. Our goal is to help our users learn and use WordPress to maximize everything WordPress has to offer. We in-depth WordPress theme reviews, premium WordPress tips, tricks and resources to help beginners and intermediate users.

Hot topics include: WordPress for beginners, WordPress premium plugin guides and WordPress news.

Top 5 Solutions to Backup Your WordPress Website

You’ve created your WordPress website, you’ve added your content and maybe you’ve even hired writers and started being a multi-author website. The very next thing you should be considering is a backup solution to protect your website.

I’m never one to fully rely on my web host to backup my stuff. I’ve read the nightmares some people have had when a web host had a hardware failure with RAID configuration corruption that wiped out not only client websites but the backups to that data too.

Way too risky. Let me help you take control of your website backups with various solutions that I recommend and use on my websites along with client websites as well.

The Manual Backup

Let’s start with the obvious. There are ways to backup your WordPress without using any automation at all. No WordPress plugins, no monthly paid services and it’s fairly straight-froward and easy to accomplish.

The problem? The manual backup is… well.. manual. You will have to remember to use your chosen method at least on a weekly basis to grab your backups and store it on your computer. Other than that, if this sounds like a great solution for you, Mr./Mrs. I’m in CONTROL and that’s the way I LIKE IT, let’s get started!

Consider a USB external drive. Using an external hard drive will help prevent your backups from clogging your main hard drive over the long term. Also consider using a naming structure where you download your backups to a dated folder, something like 20150529 for May 29th, 2015. I put the year first so that Windows (or Mac) will automatically sort the folders by year then date.

cPanel Manual Backup

cPanel Backup Method

Most people are on a cPanel based web host. Examples of popular web hosts that use cPanel are InMotion Hosting, HostGator and SiteGround. If you see a section that looks similar to the screenshot above, then continue on!

Login to your cPanel using the instructions provided by your web host, find the Files section then click on Backups.

From here, you have three options.

  • Download a Full Website Backup – This will generate a full backup zip file that will include all files on your entire cPanel account including your email on server, cPanel configuration settings and yes, your entire website data including images and your database(s).
  • Download a Home Directory Backup – This will generate a zip file of all of your website files but it will not include your WordPress database.
  • Download a MySQL Database Backup – Clicking on a database here will generate a zip file of your database to download.

I prefer to download the home directory and MySQL files separately so that I can restore them easier if needed. That choice is up to you.

cPanel WHM Semi-Automated Backup

WHM Backup SolutionIf you happen to be on a Virtual Private Server, you will have access to a much more powerful backup solution. Login to your WHM, search for backup and click on Backup Configuration. This will bring you to the screen shown on the right.

Here’s the backup settings I’d recommend for you to use but feel free to play with it.

Backup Status: Enable
Backup Type: Compressed
Backup Weekly: Sunday
Retain: 4 Weekly Backups
Backup Accounts: (check)
Select Users: Select all
Backup Suspended: Enable
Backup Access Logs: Enable
Backup Bandwidth: Enable
Use Local DNS: Disable
Backup System Files: Disable (your host can restore this easier than you)
Databases: Per account Only
Backup Directory: /backup

Once you save your configuration, you are set. Now all of your cPanel accounts will be backed up and you’ll likely get an email from your server letting you know a backup has been completed every Sunday. Just login to your server with FTP, navigate to the /backup folder and begin your downloads.

Other Control Panels

You should be able to find a backup option on any web host you are on. For instance, in Parallels Plesk Panel, find the Backup Manager under the Files section. The process is very similar to the cPanel method shown above.

If you have a vDeck control panel such as the one provided by iPage, then look for Archive Manager and zip the entire www directory.

The PHPMyAdmin Alternative

PHPMyAdmin Database Backup

Based on my experience with some less-than-optimal web hosts, you may need to download your WordPress database the old caveman way using PHPMyAdmin. Every host I’ve encountered has had access to PHPMyAdmin because it’s the easiest way to allow clients to make changes to their database.

Fortunately, PHPMyAdmin also allows you to download your entire database.

  1. Click the database name on the left, most likely, you only have one database to choose from (for security reasons, we blurred our database name).
  2. Click the Export tab.
  3. Keep Quick as the radio button selected.
  4. Click Go. You will instantly receive a download prompt to download your entire database.

Take that you data hoarding web host!

VaultPress

VaultPress WordPress Backup

VaultPress is a premium service provided by the Automattic team, the same guys who develop and run WordPress.com. Services start at $5/mo and it includes full daily backups with automated restores should you need to. It also includes a 30-day backup archive and customer support if needed.

You can upgrade to the Basic plan which does real time backups and will allow you to keep a full backup archive so that you could restore from a 90-day old backup if you needed to.

Download VaultPress or go to Plugins > Add New, search for VaultPress and install the one with author Automattic.

After installing VaultPress, you will be asked for a subscription or your registration key if you have one already. There is no free version available.

The WP Engine Method

WP Engine Backup Points

WP Engine is a web host that specializes specifically with WordPress. One of the coolest features that these guys offer as part of the service is automated backups of your data and database in a method they call Backup Points.

WP Engine will save a full month of your backups that you can restore from. Just click the checkbox next to a backup point, click the restore button and follow the instructions. It just doesn’t get any simpler than that.

Additionally, you can create your own new backup and download that to your hard drive whenever you want.

To download your backup, place a check in the archive you want to download and then click Download Zip. From there, WP Engine will send you an email with the download link to download your archive. I recommend doing this once a week just to be safe.

Free Plugin Backup

There are a couple backup plugins that you can choose from. These are both easy to use and easy to configure and will allow you to backup your website from within your WordPress dashboard.

  • BackUpWordPress – This plugin works great in shared hosting environements and offers all of the features you’d expect including scheduling, direct downloads and more. It will backup your entire website including files and database. This plugin doesn’t include functionality to backup your files to an external server.
  • BackWPup Free – This plugin will also backup your database and your /wp-content/ folder (where all the most important WordPress files that you upload are located). The one benefit this plugin has it it works with Dropbox, Amazon S3, Microsoft Azure, RackspaceCloud, SugarSync and has support for FTP transfers.

The problem with these plugins is they can be resource intensive depending on how large your website is. At some point, you might get an email from your web host telling you that your website is using too many resources and it will likely be from a backup plugin or from a caching plugin, so keep that in mind.

Another issue you may have is forgetting to download your backups. All these plugins do is help you create your backups but they do you little to no good if your host suddenly goes offline, has a catastrophic hardware failure or something similar that wipes your site off the Internet.

It’s always good to have a local copy. If you choose to go this route, make it habit to download your backups on a weekly basis and consider setting up a weekly alert on your phone with Google Calendar.

Story Time: I had a client that had a similar plugin installed. They configured it and let it do its thing for years. There was well over 50GB of backup files that his web host was complaining about that he had no idea were there. Within 1 hour, I took his site from 50GB+ to 400MB which completely satisfied his host. My point? Download your backups and delete them from your server on a regular basis.

WordPress Export

Find it at Tools > Export.

WordPress ExportThere are times that you may need to export a file of just your post content for importing into another WordPress website. I had to do this for a client that wanted to migrate from a WordPress MultiSite install to a regular WordPress install.

Using this method will create an XML file that will contain all of your posts, pages and custom post types content when you select the All content option.

The problem with using this method is a big one. If your website goes offline and you try to restore from this XML file, WordPress will not be able to access your media embedded within your posts. Therefore, all of your content that has images will show broken images everywhere.

I don’t recommend using this method unless you have a unique situation like we had. Backing up your entire database and full website structure is way cleaner to restore from and it doesn’t rely on your current host being online to work. If you are migrating web hosts, it’s a simple as logging in to your domain registrar and changing the nameservers to your new host.

What’s your favorite way to backup your WordPress website? Chime in at the comment section below. As always, if you feel this guide will help someone, please pass it on to them and share it on social media. I appreciate your support!

4

5 Best Ways to Clean Up and Optimize Your WordPress

After you’ve used WordPress for a while, you may want to consider optimizing and cleaning up your website, database and more. Using these techniques, you will free up disk space, optimize your database for best performance and hopefully, see a little increase in performance on your website.

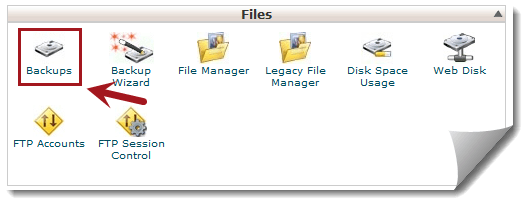
Important: Before proceeding, please download a full backup of your website and database. In case something goes wrong during the cleanup process, you’ll be thankful to have a backup ready for restore.

Prevent Image Resizing Bloat

Have you ever logged in to your WordPress site via FTP and looked at /wp-content/uploads/? If you have, you may notice that every image you upload is resized multiple times automatically on every upload. These images are left there, permanently and will likely never be used.

It gets worse when you start adding plugins and customized themes because they also can add their own image sizes that WordPress will process on every upload. Thankfully, there’s a way to disable the default image sizes in your WordPress settings.

WordPress Image Resizing Preferences

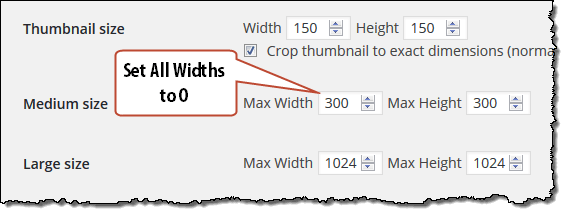
Go to Settings > Media.

Thumbnails may be used by your theme to display posts on your front end which you can check by right clicking the image in your browser and look for image viewing options. In Firefox, Right Click > View Image Info. In Chrome, right click image > open image in new tab. Either way, you will be able to see the image name and location which will tell you if the theme is using your original upload or a thumbnail.

If the thumbnail being used does not match what you show in Thumbnail size under media settings, then your theme is likely using its own image size. If that is the case, then you can set Thumbnail size, Medium size and Large size to 0 in all 6 fields.

Once saved, your WordPress will no longer create these additional images.

Clean Up Post Revisions

Every time you modify and save a post, WordPress defaults to saving a revision of your post. What this will do is create an entire copy of your post and save it to your database which can then be used to restore an old post in case you overwrite something important.

The problem is WordPress will store an umlimited amount of revisions on your posts which can take up a massive amount of space and bloat in your database. I’ve seen WordPress databases grow to the point of 6x the size it needs to be (we’re talking GBs of space here) with certain clients that have tons of posts and changes going on daily.

So what can be done to fix this issue?

Disable or Limit Post Revisions

You can disable post revisions on all content so that this doesn’t happen in the first place by adding a single line of code to your wp-config.php (the file that stores your database authentication settings). Add this line anywhere in your wp-config.php and revisions will no longer be saved:

define( 'WP_POST_REVISIONS', false );

Of course, you may decide that revisions are important, especially if you have a multi-author blog. If that is the case, then I’d recommend limiting post revisions to a maximum of 3 revisions to keep your database as bloat-free as possible while still having restore functionality. Here’s the code that you’d add to your wp-config-php:

define( 'WP_POST_REVISIONS', 3 );

Feel free to change the 3 to a number you are comfortable, however, my recommendation or lower number stands.

Database Revision Cleanup Plugin

Now that you’ve limited or eliminated post revisions, you still have an existing bloat in your database which can be severe depending on how long you’ve been adding / editing content on your website.

Let’s go ahead and clean out all the junk in the database.

Recommended Plugin: WP Clean Up. Under Plugins > Add New, search for WP Clean Up and install the plugin with listed author BoLiQuan.

WP Clean Up Settings

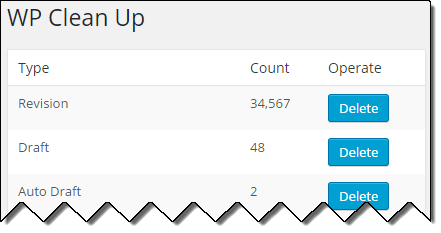
Once installed and activated, go to Settings > WP Clean Up.

On that page, you will see the above screenshot with all of the options to clean up on your database. Obviously, I fudged the numbers in my screenshot because I keep my revisions disabled, however, you might be shocked at how much junk is stored in your database!

Be careful what you purge with this. For instance, we like to plan our content out in advance by saving draft posts. If we clicked delete under drafts, a full 2 days of research and post creation goes out the window. If you don’t do this, you may discover that using the Delete All button is fine.

Before deleting anything, I hope you followed that red warning at the top, back up your DB! Scroll down to the bottom of the WP Clean Up page and take note of how big your database is under Total.

After your cleanup, compare the before and after and report how much database clutter and space we helped you clean out in the comment box below. I’m curious!

Go ahead and clean up your database and let out a sigh of clutter relief.

Deactivate and Delete Unwanted Plugins

After discovering WordPress plugins, many users will go crazy installing and playing with all sorts of plugins to see how they work. The problem is, if you leave all these unnecessary plugins installed, it can delay the page loading speeds of your pages and slow down your overall site performance on both the front end and back end.

Go to Plugins in your WordPress dashboard and thoroughly evaluate your plugins and determine their value. Do you really need that Hello Dolly plugin? No. Delete it (sorry Matt).

While You Are At It, Delete Old Themes

Since you are in the deleting plugins mood, head over to Apperance > Themes.

You can delete a theme that you aren’t and will never use by clicking on the theme which will take you to a Theme Details overlay. On the lower right corner of that overlay, you will see a red Delete link that will allow you to delete the theme.

I recommend leaving Twenty Fifteen in your themes along with the theme you actively use. Just in case your theme breaks during an update or some other reason, WordPress can revert your site to the Twenty Fifteen theme if necessary.

Delete Spam Comments

Delete Spam Comments

If your site is even remotely popular, it is likely the comments section of your posts is being hit by spambots that add tons of spam comments into your database.

Go to Comments > Spam Tab

From here, you can scan your comments and look for legitimate comments received that were marked as spam. After restoring those, you can use the Empty Spam button to delete thousands of spam comments.

Depending on how much spam you’ve allowed to accumulate, this can be a major performance booster as it removes tens of thousands of comment entries in your database.

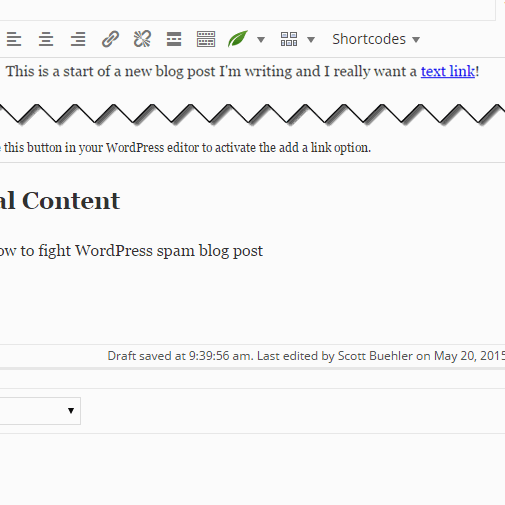
Shocked? If you want a way to manage your spam and virtually eliminate your spam problem, be sure to check out my fighting WordPress spam guide. Every client I manage takes advantage of the spam fighting techniques I use in that guide and not one has complained. 🙂

Since you are here, go to Comments > Trash tab and purge the comments there as well.

If your site is having a spam problem, I recommend purging your spam on a weekly basis to keep your database optimized.

Delete Those Unused Resized Images

I Can’t Stress This Enough – Download a full backup of your website including all images before proceeding with this one. Seriously.

DNUI Screenshot

In the occasional case where I’ve been hired to help cleanup a WordPress site that has been operational for over a year and they have expressed a desire to cut down on the disk space their site is using, I’ll use what I am about to mention to clean up the unused images and image references in the database.

For the most part, this isn’t necessary for most websites. If your site isn’t image heavy or hasn’t been online for too long, skip this and move on to the next cleanup tip below.

What this plugin does is scans your database and looks for images that aren’t assigned to posts on your website. What this plugin cannot do is prevent deletion of images that are being used naively by your theme.

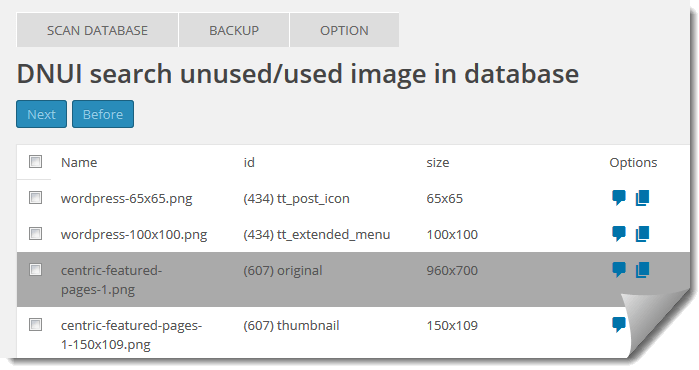
Recommended Plugin: DNUI Delete not used image. Under Plugins > Add New, search for DNUI and install the plugin with listed author Nicearma.

Access the plugin by going to Settings > DNUI.

From here, go to the OPTION tab and check the option Show only image not used so that images used in your posts will be hidden from the results page. Also update the Quantity of image to search to 100. There’s no save button here, but after switching to the Scan Database tab, the settings are used.

Go ahead and select / delete unused images.


I hope this guide has helped you. If you see any value in the efforts to create this guide, please consider sharing it on social media, your email blast or link to it on your website. Thank you!

1

How to Delete or Edit an Image Gallery in WordPress Posts

In one of our previous WordPress Guides, we showed you how to add images to your WordPress posts which included a section on adding an image gallery with a working example.

After releasing that guide, I remembered we had a couple business clients that were using the keyboard backspace key to delete and then recreate the gallery to edit it. Once I showed them the correct way, they were thankful to say the least!

Editing an Image Gallery

Edit an Image Gallery in WordPress

Editing an image gallery is quick and easy to accomplish once you realize how it is done.

In the Edit Post screen, locate the image gallery in the post and then click on it to reveal what I am highlighting above in my screenshot.

After the click, you can then click the little pencil edit icon and make changes to your gallery. This will make a full screen edit window appear with options as shown below.

Edit Image Gallery Options

In the edit window, you can change the captions, Add to Gallery, rearrange the order of images (click and drag) and on the right side, change your Gallery Settings. If you don’t like using  the ## column you set (or it looks bad on the front end), you can change the value, change how the images are linked and all of the other settings you set when creating the gallery.

Everything that you can do to create a gallery can be done when editing your gallery as well.

Hopefully this will save you heaps of time and effort in the future when you need to change a WordPress gallery within your posts!

Deleting an Image Gallery

There’s two ways you can delete your image gallery and remove it from your WordPress post.

  1. Click the text that follows immediately after your gallery and then use the Backspace key. Of course, you can also click your cursor before the gallery and use the Delete key if preferred.
  2. Click the gallery itself and then click the X on the little toolbar that appears above the gallery.

Once your gallery is deleted from your post and you save, the gallery will no longer appear in your post.

Don’t forget to clean up your Media Library!

If the images used in your gallery aren’t going to be used in the future and you know the images aren’t used in your other posts, after saving your changes to your post, click the Media button in your dashboard.

WordPress Media Bulk Select

Once your are in the Media Library, use the Bulk Select button as shown above. This will allow you to select the media files you want to delete permanently.

Select the media files then click the blue Delete Selected button to delete the images. Clean up completed!

How to Create and Update a Menu in WordPress

In this guide for WordPress Beginners, we are going to show you how to create and update menus in WordPress. Menus are used in WordPress themes to show important pages or posts that you want your visitors to see. Menus can also be used on your sidebar to show navigation links, sales pages and whatever else your heart desires.

How to Create a Menu

Create a WordPress Menu

In order to create a menu, log in to your WordPress dashboard and then head over to Appearance > Menus. From there, you will find a blue link that says create a new menu where you can then name your first menu and then click the blue Create Menu button.

It’s as easy as that, now your menu is created and ready for your posts, pages and links.

You may have noticed in my  screenshot how I named the menu Primary. That’s because I want to be able to visually understand what menu is assigned to what location on my site. If I want to create a menu that will be used as a sidebar widget (explained further down), I’d name it something similar to Sidebar Navigation just so I’d understand what menu I need to edit when I decide I want to add something to a menu.

In this case, I know I want to assign my new menu to the “Primary Menu” location (also explained below) on my theme, so I called the menu Primary.

Adding Items to Your Menu

With your menu created and hopefully you have pages ready to be assigned, let’s prepare to add items to your new menu. Before that though, I want to call your attention to a hidden area of this screen that is quite important called Screen Options.

Screen Options

Menu Screen Options

Once you click the Screen Options tab on your menu edit screen, it will reveal the options shown above. From here, you can enable certain menu options that are hidden by default. Believe me, I wish I had someone show me this because I spent a couple years using Custom Links to manually add links to some of my posts because it wasn’t shown as an option by default.

If you think you will ever need to add menu items that link to Posts or Tags, place a check in these boxes to enable them as options when creating your menu. I also highlighted Link Target because this option will allow you to create a new browser window or tab on external links if needed. Once this is checked, you’ll have access to a new checkbox under all links in your menu labeled Open link in a new window/tab.

Once done enabling screen option features, click the Screen Options tab again to close this hidden area.

Let’s Add Some Items to Our Menu

Add Menu Items to WordPress

As shown in the Gif image above, it’s rather painless and easy to add menu items to your menu. Select the section that has pages or posts that you want to add to your menu, check the boxes and then click Add to Menu.

You can also link to categories, custom links (external websites), tags and more.

Edit Menu ItemOnce your items are added, you can customize the text of the menu items by clicking the down arrow under each item you added under Menu Structure which will reveal the options shown on the left.

Navigational Label: This will change the text that is used on the menu.

Title Attribute: This is a popup label that appears when a user hovers their mouse over a menu to explain more about the page/post.

If you want to change the order of your items, you can simply drag and drop them to use the order you prefer. You can also place certain menu items on various levels which will cause a sub-menu to appear on your menu.

After you’ve added all your items, changed the order of the items and edited the item labels, remember to click the blue Save Menu button to save your changes. In the animated Gif above, you may wonder why I checked the “Primary Menu” option before saving, let’s go ahead and dive into this feature now:

Assigning Primary / Secondary Menu

Assigning Primary Menu
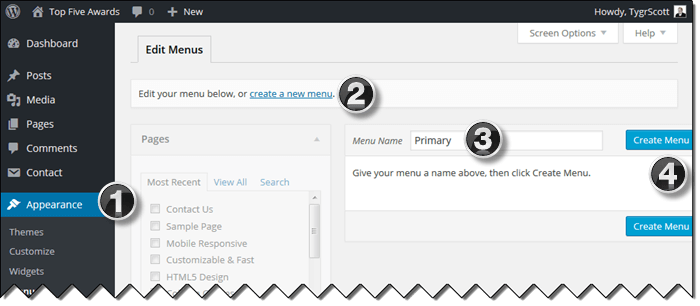
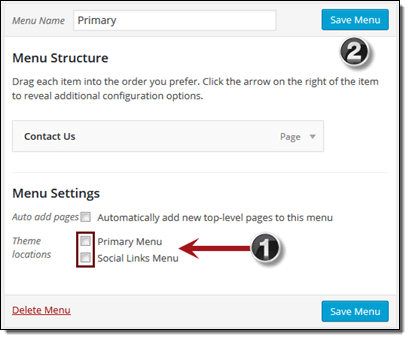
If you are currently using a WordPress theme that allows for Primary and Secondary menus, you will be able to assign your new menu with items to that designated location on your front end website.

Keep in mind, the designated location where your menu will appear depends on the theme but for most, you can assume the Primary Menu will be located in your navigational area at the top of every page on your website.

Another important thing to know is that each WordPress theme can call each menu location something different. In my screenshot, I’ve got the Twenty Fifteen theme active and it is calling the secondary menu “Social Links Menu” which is obviously meant for linking social media.

Simply select Primary Menu or any other theme location and click save menu.

Manage Menu LocationsAlternatively, you can click the tab labeled Manage Locations and assign your menus to the proper theme locations as shown in the screenshot to the left here.

Simply click the drop menu, assign your created menus that you want to use then click Save Changes.

Finished!

Adding a Menu to the Sidebar or Footer

Now that you’ve created your primary navigation and set up your menus, you may be wondering how you’d go about adding a menu to the sidebar or footer areas of the front end website. This is actually easier than you’d think.

First, create the menu that you’d like to appear on your footer or sidebar. In the case of these menus, do not assign a Theme Location. Instead, we will manually place the menu using widgets.

Second, after your menus are all created and ready to be used, go to Appearance > Widgets.

Add Menu to Widget

From the widgets screen, add the Custom Menu option from the Available Widgets area to your Widget Area*. As shown above:

  1. Click and drag Custom Menu to your Widget Area*.
  2. Add the text that you want to appear above your menu in the Title area.
  3. Select the menu you want to appear.
  4. Save.

After saving, go to your website and check out the new sidebar menu!

* The Widget Area is what the Twenty Fifteen theme calls their sidebar widget section. This can be named anything. As an example, in Thrive Themes, you will find “Main Sidebar,” “Footer Column 1,” “Footer Column 2,” etc. 

If your theme supports footer widgets, you will see a footer section on your Appearance > Widgets page that you can use to add other custom menus.

Editing Your Menu

Select WordPress MenuOnce your menus are placed on your website, you won’t have to change their placement settings. From here on out, all you need to do is go to Appearance > Menus and select your menu from the drop down list.

From there, make any changes you want to your menu including removing/adding pages, changing the labels, etc. and save. Once you click the Save Menu button, the changes will go live immediately on your website.

Hopefully this guide helped you to create, edit and place menus on your WordPress website. If you have any questions or would like us to enhance this guide in any way, please leave a comment below. Remember, if this guide has helped you, take a moment to share this post in social media and on your website. We’d appreciate it!

How to Fix the Error Establishing a Database Connection in WordPress

There’s nothing more frustrating than seeing Error Establishing a Database Connection when accessing your WordPress website. Below, we will explain the causes of this error and various methods you can use to correct the problem.

This page is meant to be as comprehensive as possible to cover the majority of issues we’ve seen. Many of the solutions and corrections we list are based on our own experience working with clients and it also includes solutions discovered from other users.

If you are making database changes, we strongly recommend backing up your database. Go to your cPanel or web control panel and look for a backup icon. Download your database and keep it in a safe location just in case.

Why Is This Error Occurring?

The main reason you are seeing this error is because your WordPress installation is unable to authenticate to your MySQL database. Meaning, the database username and password that is set in the wp-config.php file is incorrect and because of this, your WordPress installation can’t connect to the database to begin the process.

If you have an existing site that was working fine but suddenly you are receiving this error, there’s other reasons that cause this error to appear which we will cover below.

Database Connection Issues on New WordPress Websites

The main culprit to this error on new WordPress installations is the wp-config.php has not been properly configured or has the wrong information. Without the configuration file being set up 100% correctly, you will receive the database connection error.

If you are setting up your WordPress manually, consider using that linked guide. It will walk you through the entire process including updating the following information in your wp-config.php file.

define('DB_NAME', 'database_name_here');
define('DB_USER', 'username_here');
define('DB_PASSWORD', 'password_here');
define('DB_HOST', 'localhost');
define('DB_CHARSET', 'utf8');
define('DB_COLLATE', '');

Once everything is  configured correctly and uploaded to your server, you should now be able to continue with your WordPress installation.

Did You Know? Most web hosts will install and pre-configure your WordPress for you without having to go through the manual setup process. Log in to your web host control panel and look for a WordPress, Softaculous, Fantastico or SimpleScripts icon. All of these options will automatically install WordPress for you. If you haven’t signed up for hosting yet, consider InMotion Hosting because they offer an automatic WordPress installation service during the sign up process which is even easier!

Running WordPress on Localhost

If you have used LAMP or MAMP to install a PHP/MySQL server on your local machine and you know the defined variables are 100% correct, you may need to specify an IP address instead of using DB_HOST ‘localhost’. Try specifying the localhost IP address like this:

define('DB_HOST', '127.0.0.1');

Some users have reported that using an IP address has fixed their issue.

Database Connection Issues on Existing WordPress Websites

For existing websites, there’s some troubleshooting to do to help detect the primary reason why your website will not load. If this is you, then you are very likely in a hurry to start testing and trying things so let’s get started right away.

Check for Database Corruption

WordPress Database Corruption

Your main site and your /wp-admin/ WordPress dashboard will show a differently styled error page. Add /wp-admin/ to the end of your domain name and see what it says there.

If you see “Error establishing a database connection,” continue on to the next step, database corruption isn’t the cause.

Are you seeing the error “One or more database tables are unavailable. The database may need to be repaired?”

Your database is corrupted. You will see an error similar to the above screenshot with the repaired link taking you to domainhere/wp-admin/maint/repair.php?referrer=is_blog_installed

You will then be taken to a page where it asks you to modify your wp-config.php. Log in to your server with FTP software like FileZilla and download your wp-config.php file. Open the file in a plain text editor (notepad is fine) and add the following line anywhere:

define('WP_ALLOW_REPAIR', true);

Once you add the line to your wp-config.php, upload that to your server, reload the page and you will see the following screen:

Repair Database Tables in WordPress

Again, backup your database. Now, go ahead and click the button Repair and Optimize Database. Hopefully, this will fix your database corruption and get you back online.

Once your database is repaired, remember to remove the WP_ALLOW_REPAIR line from your wp-config.php and reupload. If you leave this line in there, anonymous users will be able to access the repair page and potentially cause serious problems.

Error Establishing Database Connection in /wp-admin/

Error Database Connection in wp-admin

If you see the above error at your yourdomainhere/wp-admin/ URL and your site was working previously, then your database is either unavailable, inaccessible, or something has happened to your wp-config.php.

Step 1: Check Your wp-config.php

wp-config Last ModifiedLog in to your server via FTP, look for your wp-config.php and look at the Last modified date. If this is showing a recent date, then either a hacker or your web host has made modifications to the file.

If this applies to you, then please change your server’s FTP authentication password, notify your web host of the problem and have them restore your previous wp-config.php (if possible). Otherwise, restore the file from your own backup.

Step 2: Connect to Your Database Manually

Use the wp-config from one of your backups that you know has the information right and test for a database connection to your server.

Copy the following code to a new php file, something link testing.php, change the database, username, password, hostname (most use localhost, but not all) and upload it to your server.

<?php
$database = "database_name_here";
$username = "username_here";
$password = "password_here";
$hostname = "localhost";

//Connection to Database. Do not edit below this line.
$t5a = new MySQLi($hostname, $username, $password, $database);
if ($t5a->connect_error) {
   echo "<strong>Error. Unable to connect to your database. Here's the error:</strong><br />" . $mysqli_connection->connect_error;
}
else {
   echo "You connected to your database successfully!";
}
mysqli_close($t5a);
?>

When you point your browser to the new yourdomainhere/testing.php, it will report one of two things: You connected to your database successfully! or Error. Unable to connect to your database. Here’s the error.

If you are able to connect to the database with this method, you may have a typo in your wp-config.php. Fix that and you are golden.

If you are unable to connect to the database and you know the username/password/database are correct, it’s time to move on to step 3.

Verify the information is correct. Consider logging in to your cPanel or web control panel and add a new user and password with full rights to your database. Use that new user/pass that you know is 100% correct and test that with the above script. Not sure how to create a new user/pass for your database? We explain it on our how to manually setup WordPress guide at step 6

If your new database username and password allow you to access the database, then your previous database user may have been deleted, password/name altered or the permissions reset. If that is the case, update your wp-config.php with the new username and password and you should be able to restore functionality to your website again.

Step 3: Contact Your Web Host

If your wp-config appears fine and configured correctly, then the next step is to assume your MySQL database is offline, inaccessible or the host is going through some sort of an attack that is causing their database server to go offline.

Start a live chat, ticket or phone call and find out if they are aware of database connectivity problems. Let them know that your site is showing “Error establishing a database connection,” that you’ve done your best to troubleshoot the problem and have determined that the server/host is having an issue.

About Server Performance Issues

If you receive Error establishing a database connection sporadically on the front end and the back end of your website, the most likely culprit is your web host. You are likely running out of RAM which is causing the server to terminate connections to your database for both you and your users.

One thing that might work for you if you are seeing this problem is asking the web host to restart the server, especially the MySQL service. Something might be hanging up the server that causing the errors.

If that is the case and your host is unable to rectify the problem for you for the long term, then you may need to consider upgrading to a VPS plan or switching to a reliable WordPress web hosting service. Remember, the most important component to a website is reliable web hosting. Without it, you will end up frustrating your visitors, you could potentially see demotion in search engine rankings due to slow response time algorithms and most importantly, your revenue will decline.

How to Quickly Add a Contact Form in WordPress

Need a way to allow someone to contact you from your website? Rather than offering a list of contact form plugins that you’d have to choose from and figure out, we are going to use one of the most popular and easiest contact form plugins available and walk you through the entire process of adding a form to a contact page. Let’s begin, shall we?

Step 1 – Install Contact Form 7

With almost 27 million downloads and over 1 million active installs, Contact Form 7 is my go-to choice for installing a contact form on a WordPress website, whether it be my own sites or on client websites. It just works without any hassle or huge learning curve.

Download Contact Form 7 or go to Plugins > Add New, search for Contact Form 7 and install the plugin with author Takayuki Miyoshi and click Install Now.

After you have successfully installed Contact Form 7, click Activate Plugin or go to Plugins > Installed Plugins and click activate from there. You should notice a new Contact section has been added to your dashboard. Ignore it for now.

Step 2 – Create a Contact Us Page

Go to Pages > Add New.

In the title, enter the name of the page, traditionally called Contact Us.

Click in the WordPress visual editor (where you type your content) and you’ll notice a permalink has been automatically generated. Click the edit button if you wish to rename to something shorter like /contact/.

Add your desired content that you want to appear on your contact page. You can add content that you want to appear before and after the form.

Click the Save Draft button to save your work.

Step 3 – Locate / Edit Your Contact Form

New Contact Form 7 Section
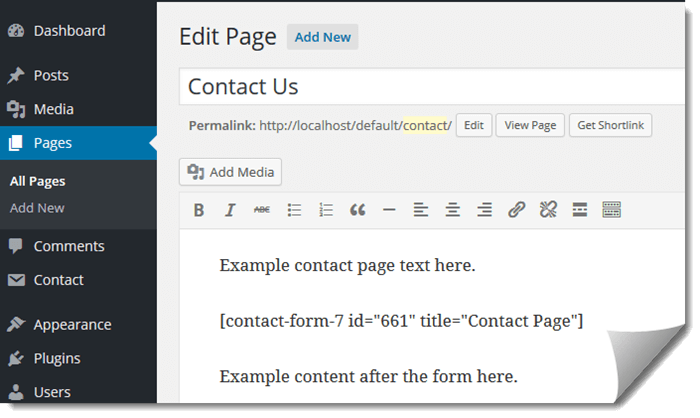
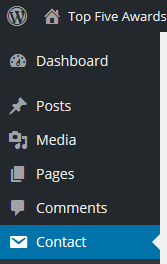
A shortcode is a small bit of code that Contact Form 7 uses to generate your contact form. In your WordPress Dashboard, click on the new Contact section as I’m showing you on the left.

This will take you to a new page labeled Contact Forms with one form already created for you.

Feel free to click the edit link on the default form and rename the form to Contact Page if you plan on having multiple contact forms then click the blue Save button.

Contact Form 7 Shortcode

Copy the shortcode they provide you (every id is different, don’t use ours) to your clipboard with right click > copy.

Step 4 – Place That Code!

Head back to Pages and click the edit link under the draft contact page we created in step 2. Now paste the shortcode where you’d like your contact form to appear within your content. Here’s our finished example:

Contact Page

Click the blue Publish button to make your new contact form live.

Step 5 – Test Your Form

Once your page is published, click the View Page button (shown in screenshot above) and it will take you to your new contact form page.

On the page, go ahead and fill out the form and send it to yourself to make sure the contact form is working (and that you receive an email).

That’s it! Your form is live and ready for your viewers to submit a request to you.

Customizing

Once you start adding multiple contact forms to your website, you may find that figuring out where the submissions are coming from and knowing what priority to treat the messages to be extremely important.

Pro Tip 1

Contact > Edit your form. Scroll down to the Mail section and look for Subject: on the left.

You can add a label in front of [your-subject] so that when the mail is delivered, you’ll know where the request was received from. Here’s an example we use on our contact form: T5A Contact Page: [your-subject]

This does two things, one, I can setup my email client to FILTER all messages with a subject that has T5A in it and place these messages in a high priority folder. Second, Contact Page, this tells me where the contact form was filled out. Without ever opening or previewing the email received, I already know what site and what form was filled out. Neat, right?

Pro Tip 2

You can edit your form to add new fields or to remove fields that you don’t want to appear on your site. All you need to do is edit your form and click the “Generate Tag” button which will give you several options to choose from. Each selection will offer some instructions to complete along with some options.

Once you fill out your new desired entry, you will need to follow instructions and add the shortcodes given to you where they want it. The first code will be copied to the form on the left (add it wherever you want the form entry to appear on your live form). The second code will be copied to the Mail template section which is the template that is generated and sent to you via email. If you forget the add that second code to the mail section, you won’t see what the user has entered into your form.

Once done, click the blue Save button and your changes will already be live on your site (no changes needed to your contact page). Test it, see how the form appears on your site and see how the email looks when delivered. From there, you can make changes if needed.

How Are You Using Contact Form 7?

Leave a comment below to let our readers know how you are using Contact Form 7.

Remember to share this guide if it has helped you.

How to Add Images to WordPress Posts and Pages

In this WordPress Guide, you will learn how to add images to the majority of your WordPress content using the WordPress visual editor. We will cover various methods you can use to add images to your content. The process is extremely simple and straight forward.

The Drag and Drop Method

Drag and Drop Media

  1. Place your cursor where you want your image(s) to appear.
  2. From your desktop, drag and drop the image file to your WordPress editor.

Once the image is dragged to your WordPress editor, you should see what we are showing in our screenshot with a message to Drop files to upload. Once you release the click on your mouse, WordPress will upload the image to your Media Library.

Add your title, alt text, caption and alignment settings then click Insert into post.

The Add Media Method

Add Media Button
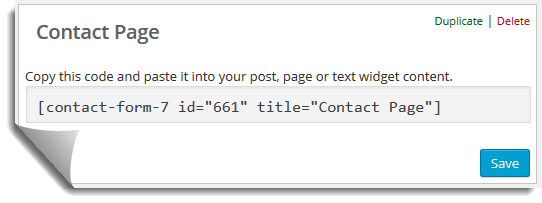
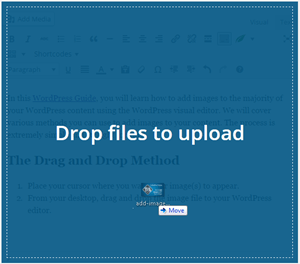
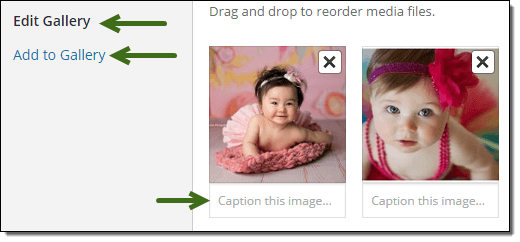
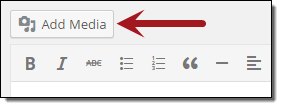
Another popular method that people continue to use (including me)  is to use the Add Media button. The process is very similar to the drag and drop method.

One advantage to using this method is an upload is not required if you already have a suitable image uploaded already. You can select the image, customize the description and then Insert into post.

  1. Place your cursor where you want the image(s) to appear.
  2. Click the Add Media button.
  3. Drag and drop the image to the add media screen.

Or, if you already have an image ready to be used, click the Media Library tab and click the image you want to use in the post. If you already have thousands of images, you can also use the search function to find the image.

Add an Image Gallery

Create an Image Gallery
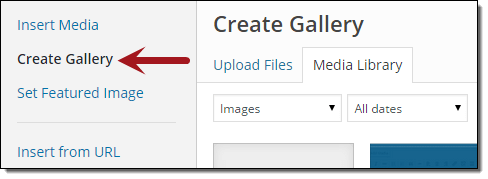
Now that WordPress has been upgraded to include native galleries, you no longer need a plugin. Here’s how to add an image gallery into your posts.

  1. Place your cursor where you want the gallery to appear.
  2. Click Add Media.
  3. Click Create Gallery.
  4. Choose the Upload Files tab to add new images or choose Media Library to use existing uploaded images.
  5. Select the images you want to appear in the gallery (check mark will appear).
  6. Click the Create a new gallery button.
  7. Customize your gallery appearance.
  8. Click the Insert gallery button.

Regarding customizing your gallery appearance in step 6, on that screen you can drag and drop the images to change the order of appearance. On the right under Gallery Settings, you can choose how you want the media to appear in your post, how many columns, randomize order and the image size you want to use.

WordPress Gallery Settings
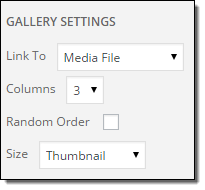
Here’s some recommended settings:

  • Link To: Media File
  • Columns: 3 or 4 (If you have 6 images, use 3 to make it display evenly)
  • Size: Thumbnail

The actual appearance of your gallery will depend on the theme you are using. With Thrive Themes, here’s a live example of how the gallery appears which adds a really neat carousel effect when clicking on an image.

Image credits for these images are available here.

Afterwards, you can click the gallery within your WordPress editor and click the pencil icon to edit the gallery if needed.

Adding an Image From a URL

Get Permission: Do not directly link to other website’s images unless you have permission. Otherwise, you are stealing their bandwidth and susceptible to having the images removed or worse, changed to something wildly inappropriate.
  1. Click Add Media.
  2. Click Insert from URL.
  3. Paste direct image link.
  4. Add link text.
  5. Click Insert into post.

Some Image Tips

Make sure you have copyright permission to use images in your posts.

Consider optimizing your image sizes. If you are running a photography blog, then by all means use the full high-resolution images, but if you are running a standard site with traditional images, resize the images to fit your content. It makes no sense to upload an image that is 4,000px wide when your content area can only fit a 750px width image. This will help drastically reduce download times on your pages.

If you are uploading a JPG or PNG, consider using a web service like TinyPNG or using an image optimization plugin. Anything you can do to speed up page loading times on image-heavy pages will help the overall user experience and potentially help you rank higher in search engine indexes.

Don’t add images “just because.” Your ultimate goal should be helping the user with the topic you are writing about. Consider using images to help the user visually understand what you are referencing in your content. In our case, this post includes multiple screenshots with arrows to help you through the process of adding an image along with an example image gallery so you can see one in action.

1

5 Big WordPress Mistakes Beginner Users Make

We were all new with WordPress at one point and had to learn the hard way. With WordPress being the most popular content management system on the planet, we’ve found from our clients a short list of major mistakes that always seem to come up when we optimize their WordPress installations.

Thankfully, with all of the awesome WordPress resources including here at Top Five Advisor, beginner WordPress users now have the ability to discover and fix these problems faster than ever before.

So, what are the most common mistakes that beginner WordPress users make?

Discouraging Search Engine Visibility

Search Engine Visibility

When you create your first website and set up WordPress, the site will be live and online. After the installation, most people skip the reading and dive right in to the WordPress settings. That’s fine, in fact, it is a great way to learn, however, when they go to Settings > Reading, they see the above option to Discourage search engines from indexing this site and enable it.

That’s something we’d also recommend, however, we’ve found that our clients will change this setting when they are beginners to WordPress and forget to change it back after they go live.

We’ll give you $1,000 if you can get our site listed in Google search. Anywhere. Nothing we are doing is working!

This was the easiest money we’ve ever made with a digital marketing client, however, we were honest, told them what the problem was and applied a large chunk of that money towards improving their website.

When your site is live and ready, don’t forget to uncheck this box so that Google and other search engines are permitted to index your site in their search engines. There’s nothing more frustrating than working for months on end building a ghost town.

Who Needs to Set Up Permalinks? You Do!

Find it here: Settings > Permalinks

WordPress Permalinks

By default, when you first install WordPress, your permalink settings will be set to Default with your links using the p=123 setting. This setting is not human or search engine readable and tells nobody what your post topic is about.

The sooner you change this setting to a human-readable format, the better. Preferably, you will change this before launching your website.

The most common structure that most sites should consider using is the Post name option, however, we chose to use the custom structure option to enable the category to come before the name of the blog post because we cover a massive amount of topics in several categories. Of course, you will have problems using /%category%/%postname%/ without reading our guide on this subject.

Which would you prefer?

Default: https://www.t5a.com/?p=11178
Or: https://www.t5a.com/wordpress/5-wordpress-beginner-mistakes/

Previously, the Post name option was known to cause problems with website performance which you may have read about online from older blog posts on this subject. Thankfully with the release of WordPress 3.3 and beyond, this problem was corrected and does not cause these issues.

For most, you will be able to update your permalinks right from the dashboard. This will automatically update your .htaccess file (on your host server) and you’ll be on your way. If you happen to see an error that states If your .htaccess file were writable, we could do this automatically…, then you will need to update the .htaccess file manually using an FTP software like Filezilla (free) or ask your host or administrator to make these changes.

Ignoring WordPress Updates

Keep WordPress Up To Date
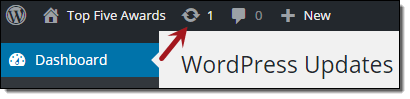
Another huge mistake we see is clients ignoring important updates. WordPress does an excellent job keeping their content management system secure when potentially severe security problems present themselves.

With the latest versions of WordPress, it will automatically update and keep your site secure from these threats, however, WordPress will not automatically install the latest major versions of their software and it will also not automatically update your plugins which could also have critical exploits that need updates.

We strongly recommend logging in to your WordPress dashboard at least weekly to apply updates. You should not be afraid to update your plugins and WordPress core. It’s as easy as checking each item that has an update and clicking the update button. In fact, you should be more afraid to ignore updates because this is the most common reason WordPress websites get hacked / exploited.

You Have Way Too Many Plugins

We get it, WordPress plugins do so much to add functionality to your website and it is addicting. However, if you add too many plugins to your website, you’ll start noticing problems with pages loading slowly, bad page speed scores on Google PageSpeed Insights, server performance issues and more.

Any plugins that are not being used should be deactivated and uninstalled. Beginner WordPress users commonly will try tens, if not hundreds, of plugins on their website but they forget to uninstall the ones they didn’t like.

Approach plugins with a minimalist mindset and only use plugins that are crucial to your website’s success.

Leaving Default or Incomplete Pages Live

This is another huge one because it tells search engines and readers of your website that you are a BEGINNER. Many new WordPress website owners will create a bunch of content pages that they will “update later” and post them live just so they can visualize their site structure.

The big mistake these beginners make is leaving these “coming soon” or “we’re updating this” pages up after going live. There’s nothing more frustrating to your readers than clicking on an article they are interested in only to find a blank page with no content. As for search engines, they all have algorithms in place to detect sites that use these temporarily pages and mark them as a “low quality site” which will massively hurt your potential rankings.

Other Tips

  • Keep local backups of your WordPress website. Update them weekly.
  • Don’t change the URL (permalink) of older blog posts when reviving / updating them.
  • Don’t ignore the basics. Get a contact us, terms of service, about and disclosures page live.
  • Don’t keep the default admin username for security reasons.
  • Use a strong password. Try keypass to remember your gSLs@5^*Ku style encrypted passwords.
  • You aren’t Just another blog. Go to Settings > General and add a proper tagline.
  • Don’t over-complicate your categories and tags.

How to Add a Link or Hyperlink to Your WordPress Content

Back to the WordPress basics in this post which will show you how to create a hyperlink in your content. This is a WordPress visual or text editor feature that is simple to use, once you know where to look. Any place that has the WordPress editor will allow you to add a link to another post or page on your website.

Of course, the first thing is to create or edit a post, page or custom post type. Once you do, you’ll get the traditional WordPress editor that allows you to create your content.

Add a Text Link to WordPress

Use this button in your WordPress editor to activate the add a link option.

Linking to Internal Content

Adding a WordPress Link Gif

This is a GIF showing you how to add a link in WordPress.

Let’s say I want to link to my how to fight WordPress spam blog post, all you need to do is highlight the text that you want to be linked, click the link button on the toolbar, search for your post, click the post and then click add link.

Of course, you don’t have to highlight the text first, you can also click the link button, find the post you want, click that and then add the text you want linked in the Link Text box. Highlighting just makes it a little easier (for me anyway).

One option you have is to Open link in a new window/tab. What this will do is add a target=”blank” to your link HTML so that it opens in a new window. Click here to see my WP Engine review and to see this link open in a new tab/window.

Linking to External Content

It’s the same exact process except this time, you simply copy the URL you want to link to (from your browser’s address bar) and then paste that into the URL field.

  1. Copy URL to your clipboard. Windows: Control + C. Mac: Command + C.
  2. Go to your post and highlight the text you want linked.
  3. Click the Insert/edit link button.
  4. Click the URL box and paste. Win:Control + V or Mac: Command + V.
  5. Click the blue Add Link button.

Linking an Image

Hyperlink an Image
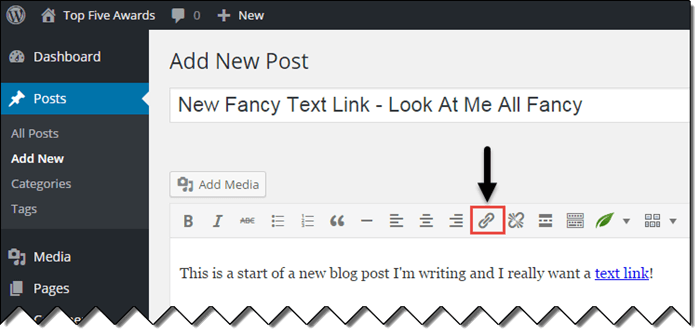
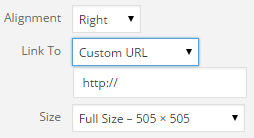
You can also hyperlink an image that you’ve uploaded to your content. All you do is use the Add Media button, drag your image to your browser to upload and then on the right, look for the section shown in the screenshot.

Look for Link To and switch that to Custom URL which will present the http:// box where you can enter the URL that you want to link to. It’s that simple.

1 2 3 4